 |
| Diagram 1 |
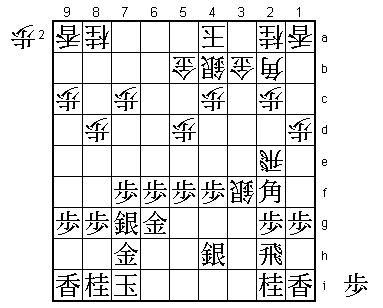
The position in Diagram 1 is from Game 4 of the 28th Oi Title Match (1987).
From the Double Yagura opening, I have played very aggressively as White. My opponent, the Oi Titleholder Takahashi, has just moved his king to 7i. If Black can complete his castle by moving his king into safety at 8h, his position will be very solid. On the other hand, five moves are required to get my king into a solid castle - B-1c, K-3a, S-3c, G5b-4b, and K-2b. Of course, Takahashi was not going to give me that kind of leeway. His stern expression seemed to say "Don't even think about it."
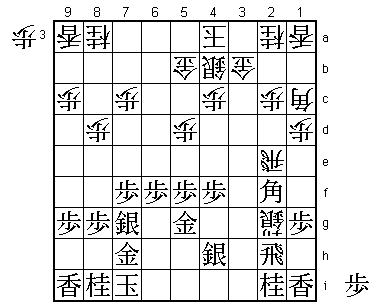
This left me no choice but to take the fight to him before he could move his own king to safety on 8h. In Diagram 1, I played ... B-1c; G-5g Sx2g+; (Diagram 2).
 |
| Diagram 2 |
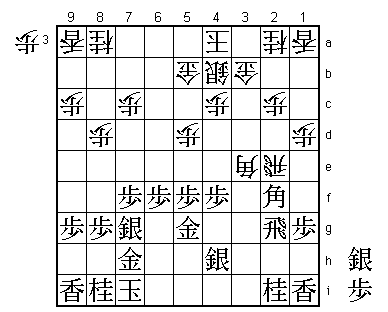
Black must play Rx2g here. I replied by bringing out my bishop with ... B-3e, reaching Diagram 3.
 |
| Diagram 3 |
This line may look a little wild, but the state of each other's castles justifies it. We both have king positions that are strong against bishops but vulnerable to rooks. My bold attacking plan strikes at the heart of this weakness: I felt I could win if I could get a rook in hand, even at the cost of a silver.
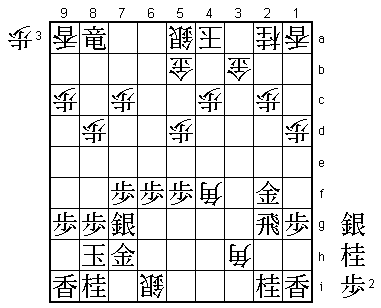
If Black plays Bx3e here, ... Rx2g+ of course wins for White. Alternatively, Black can defend his bishop with S-3g, but after ... P*3f; G-4g Px3g+; Gx3g Rx2f; Gx2f Bx4f; K-8h B*3h; R*6a S-5a; Rx8a+ S*6i (Diagram A) White's attack is one move faster.
 |
| Diagram A |
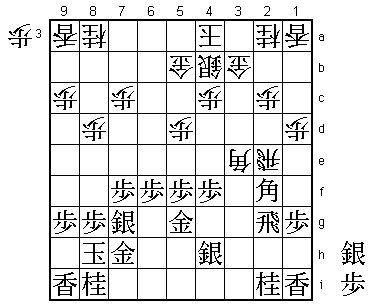
In Diagram 3, Takahashi moved his king to 8h (Diagram 3a). This was a cool-headed response typical of the Oi Titleholder's style.
 |
| Diagram 3a |
If now ... Bx2f, Black plays S-3g, after which White has no satisfactory reply. In this position, neither side can allow the other to get both the rooks. It should be noted here that when two rooks face each other with a piece in between, the side with the piece in between is restricted in movement. Therefore, Black is tied down in Diagram 3, but if White plays ... Bx2f in reply to K-8h, White now has the piece in the middle and becomes tied down himself.
To some extent, Black left the second file to its fate and played K-8h because there was no defense. When you have no defense, it's usually best to leave well alone.
 |
| Diagram 4 |
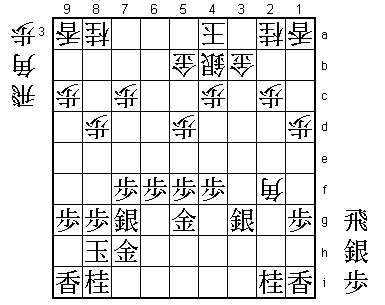
Let's try to assess this position. Having won a bishop in exchange for a silver, White has a material advantage. On the other hand, Black's king is the safer now that it is in its castle. One side has a material advantage, the other a more solid castle. The next few moves will determine which of these advantages is the greater. We are at the crossroads between the middlegame and the endgame. If White proceeds normally here, we will enter the endgame where, as the saying goes, speed is more important than material. If we go into the endgame at this point, therefore, Black's safer king will carry more weight than White's material advantage.
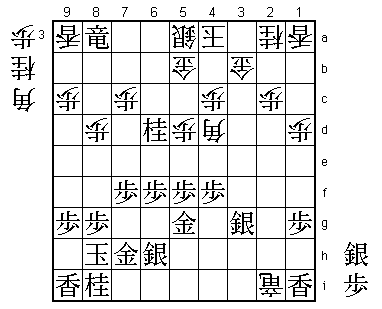
In Diagram 4, White's bishop has various escape squares, such as 4d, 5c, 6b, 1e, and 7a. But if the bishop goes anywhere except 7a, Black can play the very strong rook drop R*8b. After R*8b, play might continue ... R*5i; Rx8a+ S-5a; S-6h Rx2i+; N*6d (Diagram B) or +Rx9a. In this kind of mutual all-out attack, the fragility of White's king position becomes conspicuous. I had no confidence in this kind of line.
 |
| Diagram B |
 |
| Diagram 5 |
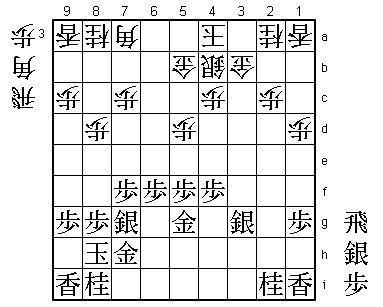
Of all the retreat squares for the bishop, only this one has a completely different meaning. In Diagram 4, as we have seen, Black's fastest attacking plan is R*8b followed by Rx8a+. The rook drop R*6a is not so frightening since White can interpose his rook with R*5a.
Retreating the bishop to 7a gives White an unstable position, but it is the only move to prevent R*8b and the violent storm that would ensue. If White can steer the position into calmer waters, that is, bring it back to the middlegame, he can make his material advantage tell. In view of his material deficit, Black cannot afford to let this happen. The longer the game goes on, the more decisive this disadvantage will become, and if White is allowed to play B*7b, his position will be impregnable.
After the game, we came to the conclusion that S*7b would have been Black's best reply to B-7a. The silver drop looks heavy-handed, but there is absolutely no danger that it will be out of the action here. After ... S*7b; B-4d R*8b (Diagram C), the silver's proximity to White's king ensures that it will be effective. And even if White tries to run away from the silver on 7b by playing ... K-3a, Black will have the knight drop N*3d (after taking the knight on 8a).
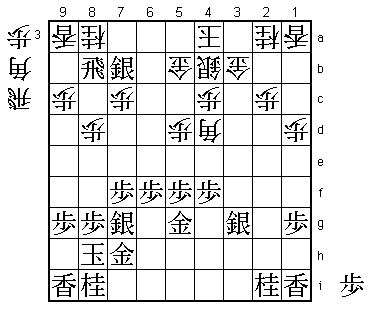 |
| Diagram C |
The best reply to S*7b seems to be ... P*3f, abandoning the bishop on 7a. This is high-level tesuji whereby White gives up his bishop in order to slow down Black's attack. After S*7b P*3f; Sx7a= Px3g+; R*8b, White has an excellent defense in ... P*6a (Diagram D).
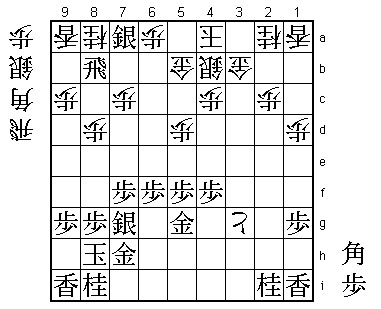 |
| Diagram D |
P*6a reduces the effect of Rx8a+ while preventing S-6b+. But if Black had played Sx7a+ instead of Sx7a=, his attack would have been one move slower. In order to be able to bring the silver directly into the attack after Rx8a+, it was necessary not to promote it when capturing the bishop so that Black could next play S-6b+. If it had promoted when capturing on 7a, this would have taken two moves: +S-6a-6b.
Instead of capturing the bishop on 7a after P*3f, what about the rook drop R*6a? After ... R*5a; Sx7a+ Px3g+ (Diagram E), it is difficult to see how Black should proceed, though this is probably his most promising line.
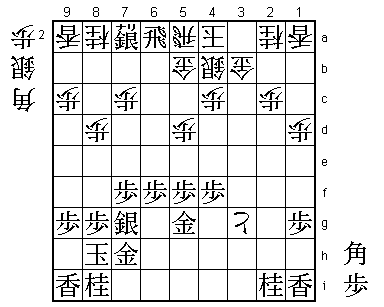 |
| Diagram E |
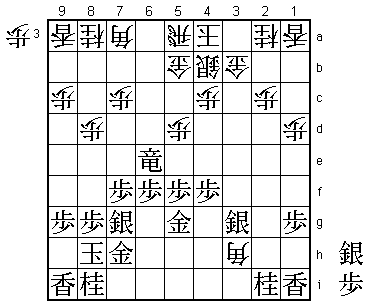 |
| Diagram 6 |
... B*3h looks too slow, but it aims at the steady accumulation of a decisive material advantage. At first sight, S*7b seems an effective reply, since after ... B-5c; S-6a+ wins the rook on 5a, but White can first play ... P*6d!, and after +Rx6d B-5c attacks Black's promoted rook, saving the rook on 5a.
The reply to B*3h that I spent most time on was +R-2e, defending the knight on 2i. If now ... B-4i+; S*3d +B-3h; Sx2c+ Gx2c; +Rx2c S*3b, expelling White's promoted rook from the 2nd file. For example, if ... +R-2e P*2d; +Rx2d S4b-3c; +R-2e P*2d (Diagram F), and White will be able to take the knight on 2i.
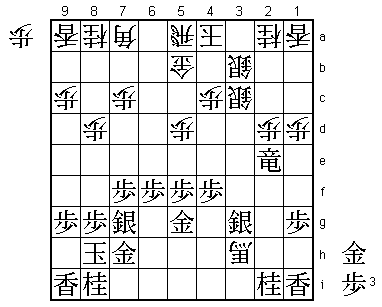 |
| Diagram F |
In Diagram 6, in reply to my ... B*3h, Takahashi counterattacked fiercely with S*6c. Play then continued ... Bx2i+; Sx5b+ Kx5b; G*6c, reaching the position in Diagram 7.
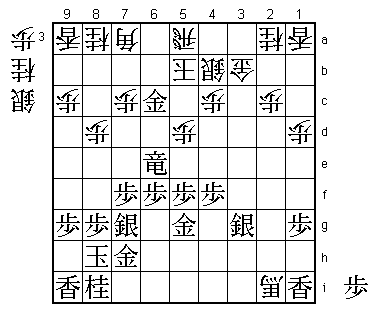 |
| Diagram 7 |
The normal response here would be ... K-4a, getting as far as possible from Black's attacking pieces. But then Black could play G-6b Bx6b; +Rx6b G*6a; +R-8b (Diagram G). White still has winning chances here, but since Black has a promoted rook on the board and a bishop in hand, it's not easy to defend, so he would have to counterattack. It should be remembered that, when Black played G*6c, White is almost a whole bishop up. Black therefore has no choice but to pursue the attack. But for White, who has a big material advantage, the quickest way to win is not to counterattack but to defend precisely against Black's attack.
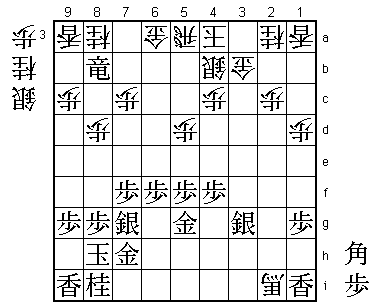 |
| Diagram G |
In Diagram 7, I played ... K-6a. This move proved to decisive. At first sight it looks very risky to move towards the opponent's attacking pieces, but if I am able to play ... P*6b, the game will be over. ... K-6a stopped Takahashi dead in his tracks. If he had two pawns in hand, he could would still be able to keep his attack going with P*2b followed by P*3d, but he only has one.
After ... K-6a, the game continued P*2b N-3c; Gx7c P*6b (Diagram 8) G-8c P-5e; P*3d N-2e; S-3f N-3g+; S-4e Px5f; S-5d S*9d (Resignation Diagram) and White resigned.
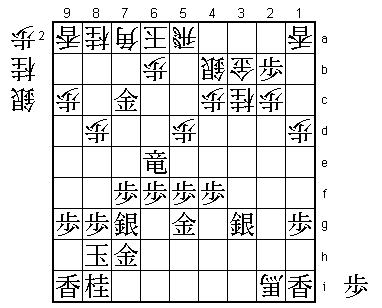 |
| Diagram 8 |
In the Resignation Diagram, instead of ... S*9d, ... Px5g+ would have been answered by S-6c+, which might easily turn the tables completely. The defensive move ... S*9d enables White to answer S-6c+ with ... Sx8c, putting an end to Black's attack. If Black now plays Gx8d, White can safely reply with ... Px5g+. In either case, Black's attack has clearly fizzled out, so he has no choice but to resign.
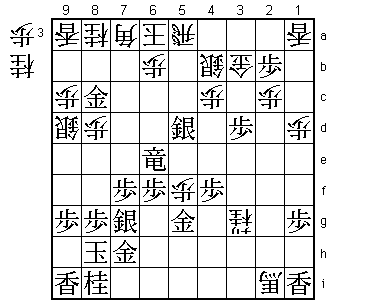 |
| Resignation Diagram |
Takahashi may have responded to ... B-7a incorrectly, for after R*6a R*5a, R-6e+ his attack quickly ground to a halt. It seems that the right way to continue the attack was S*7b.
... B-7a, ... K-6a, and S*9d were all completely defensive moves, which may have disappointed readers who like my attacking style. But for me this was a game in which I had a clear theme that I was able to carry through to the end. It is said that attacking is the best defense, but in certain situations defending is the best attack. This is something you should always remember.