In a game of shogi, there are always a few turning points. At these crossroads, the path, direction and ultimately the fate of the game are decided. It is of course important to take a deep breath and think hard at these points. But even more important is the attentiveness needed not to overlook them. Even if you think hard, you can often miss the key point in the position and go down a byroad. When you reach an important crossroads, you have to choose which path to take, and there may be several paths, both attacking and defensive. But what if all these roads lead to a losing position? Then you have no choice but to open up an entirely new road.
If a position where you have been halted in your tracks is really the key turning point in the game, there should always be a way forward, though it may not be immediately obvious. It is essential to develop the acute whole board perception that enables you to judge that you are now at a major turning point. Having realized this, you must analyze this key position as deeply as you can.
 |
| Diagram 1 |
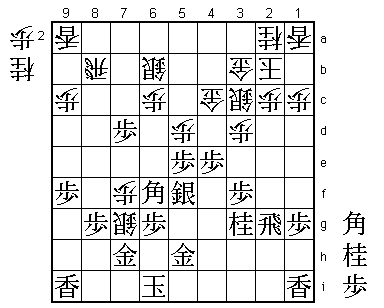
I came to this kind of halt in the position in Diagram 1. Strictly speaking, I had done so two moves earlier when White played ... P*7f and I responded with B-6f. Fukuzaki then made the silver drop ... S*7g to reach Diagram 1. This bold attacking move is typical of his style.
In this position, I had to decide whether to defend or counterattack. This was clearly a crucial point that might well decide the outcome of the game.
Defending is essentially the process of reversing the flow. Its aim is to stop and reverse a current that has moved in one direction from opening to middlegame and then to the endgame. It is the act of pushing the endgame back into the middlegame.
In view of this, you must consider what situation you will be returning to if you manage to fend off the attack. There is no point in throwing everything into defense if it means you have to use up all your attacking pieces and pieces in hand, ending up with a large material deficit. You have to avoid a situation where the more you defend, the worse your material disadvantage gets. On the other hand, if you are already material down at the crossroads, then counterattacking is your only option.
In Diagram 1, if Black decides to defend, then he has either Bx7g or Gx7g. After Bx7g Px7g+; Gx7g B*3h would simply lead to a material deficit. But Gx7g Px7g+; Bx7g Rx8g+; S*7h +Rx7g; Sx7g B*3h (Diagram A) would come to much the same thing.
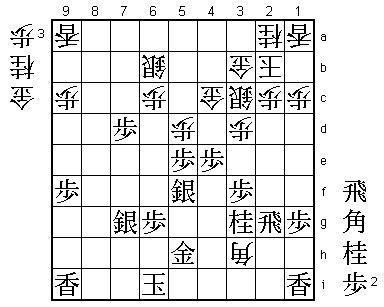 |
| Diagram A |
Since White's king is quite secure in this position, Black cannot hope to get close to it even if he has a rook in hand. After the bishop drop ... B*3h, the material loss is simply too much. As I mentioned earlier, if defending gives you a big material disadvantage, you have no choice but to attack. In the position in Diagram 1, simply defending would leave Black too far behind to recover.
 |
| Diagram 2 |
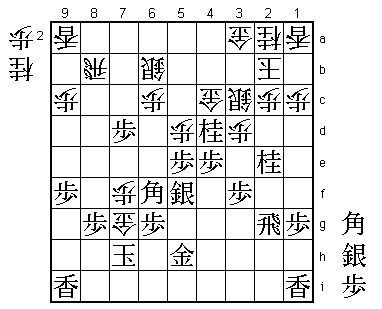
Even though Black is counterattacking, he must always bear in mind the balance between his king and the opponent's king. In this position, Black's king is in considerable danger, but however many knights he hands over, the situation will not change significantly because White has no effective attack using knights.
N*4d followed by N-2e puts White's king in danger. Restricting White's attacking possibilities by attacking is thus an indirect means of defense. Black has put White in a double bind. In effect I am saying "if your attack is too slow I will win, but if you give me too many pieces, I'm going to mate you."
The real aim of the plan N*4d and N-2e is to defend indirectly by putting White's king in a dangerous situation without handing over useful pieces. This is an essential endgame technique that you must remember.
Now that Black has played N-2e, he can answer ... B*3h (see Diagram A) with R-5g. There are times when an attack is not simply an attack but also a very effective means of defense.
 |
| Diagram 3 |
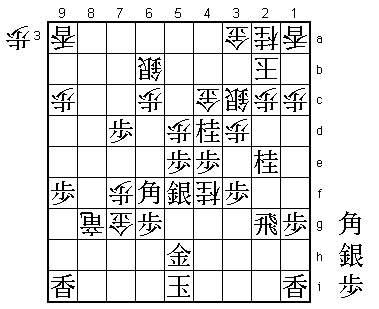
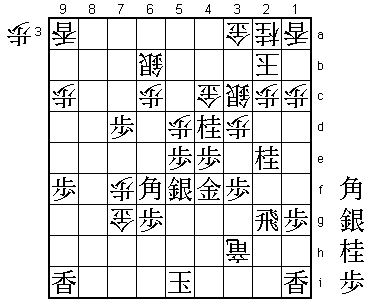
If Black chooses to defend in this position, he has either K-4h or G-5g. But after K-4h +R-7h, Black is at a loss for a defense, and after G-5g (or G-4g) +R-7h; Gx4f +R-3h (Diagram B), attacking Black's rook and threatening mate.
 |
| Diagram B |
Even if White's knight on 4f is removed, White has the powerful and almost unanswerable mate threat ... +R-7h, so there is no effective defensive move in this position.
Once again, counterattack is the only way. Black has one thing going for him in Diagram 3: his king cannot be mated at this point even if he hands over quite a lot of material. Here the situation has shifted from material considerations to speed.
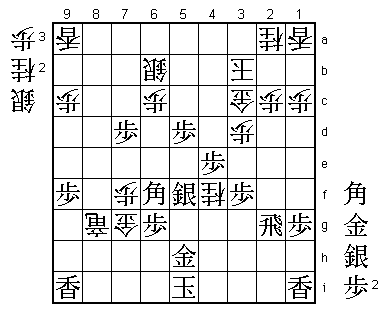
I played S*3b, threatening mate after Nx1c+. Play continued ... Gx3b; Nx3b+ Kx3b; Nx3c+ Gx3c; Px5d (Diagram 4).
 |
| Diagram 4 |
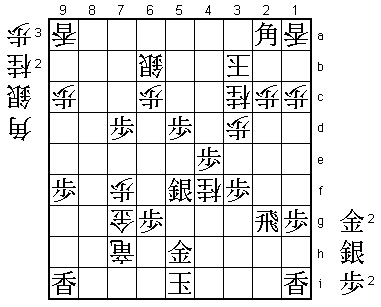
Px5d threatens mate. If White is kind enough to threaten mate himself by +R-7h, Black has a simple forced mate after Bx3c+ Nx3c (or ... Kx3c; B*4d etc.) B*2a (Diagram C) ... K-4a; G*4b etc.
 |
| Diagram C |
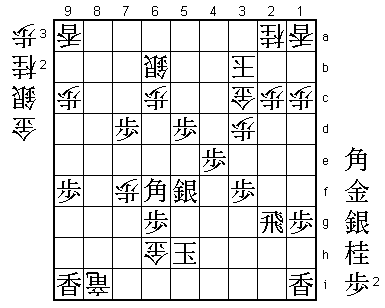
In the position in Diagram 4, Fukuzaki 7-dan played ... P*4d, which was the losing move. He was under the illusion that after Px4d, Black was no longer threatening mate. If White had played ... +R-8i instead of ... P*4d, the endgame would have remained very complex and difficult. For example, after ... +R-8i; K-4h Nx5h+; Kx5h White has the brilliant move ... G-6h (Diagram D).
 |
| Diagram D |
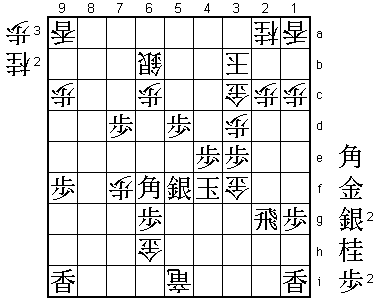
If now Kx6h S*7g, removing Black's bishop on 6f, his key defensive and attacking piece. Without this bishop, Black is no longer threatening mate. He therefore has no choice but to escape by either K-5g or K-4g. If K-5g +R-5i; K-4f S*3e; Px3e G*3f (Diagram E).
 |
| Diagram E |
If Black's king escapes to K-5e, the bishop on 6f is blocked out of the attack and the mate threat removed. If instead Kx3f +Rx5f and, after the interposition of any piece on 4f, ... Px3e. When Black's king escapes to the 2nd file, his rook is blocked and, since White will also remove the bishop from 6f after ... +Rx6g, Black's chances of winning evaporate.
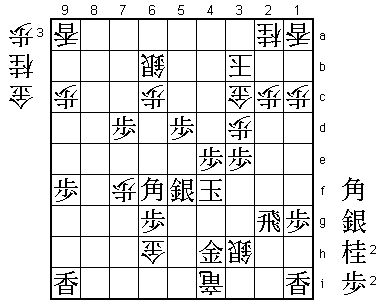
Although it is quite perilous, the correct reply to ... G*6h seems to be K-4g. After ... +R-4i; G*4h (even if Black uses a gold for defense, he is still threatening mate with Bx3g+) ... N*3e; Px3e S*3h; K-4f (Diagram F) ... +Rx4h; Bx4h Sx2g=; N*4d Gx4d; Px4d, when White has no mating line.
 |
| Diagram F |
Even so, I do not know whether I would have found this narrow escape with K-4g if I had actually been faced with a move like ... G*6h. In fact, Fukuzaki analyzed this line in some depth, but apparently thought that ... P*4d was the safer choice.
 |
| Diagram 5 |
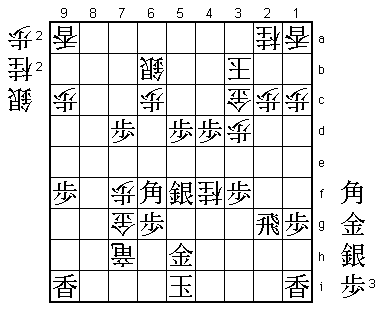
Fukuzaki thought he had achieved a winning position with ... +R-7h. The main line he analyzed was S*4c K-2b; B*3a Kx3a; G*3b Gx3b; Sx3b+ Kx3b; P-4c+ Kx4c; Rx2c+ when White's king just manages to escape to his right-hand side of the board.
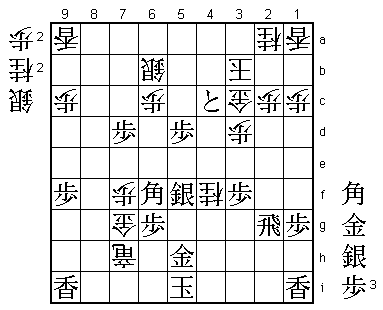
But he had completely overlooked my next move: P-4c+ (Diagram G)
 |
| Diagram G |
At this point, Fukuzaki froze. It's sudden death. If now ... Kx4c; Bx3c+ Kx3c; G*4c Kx4c; Rx2g+ G*3c; B*6a S*5b; S*3b and mates. White played ... Gx4c, but he had to resign after Rx2c+ Kx2c; B*4a N*3b; P*2d (Resignation Diagram). If ... Kx2d; P*2e Kx2e; S*1f K-2d; P*2e K-2c; G*2b K-1d; Bx3b+ and mates.
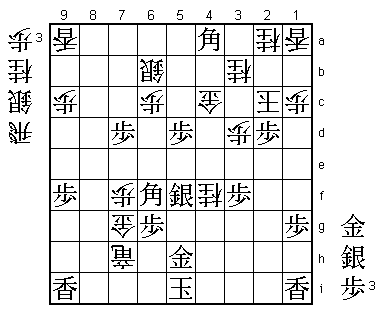 |
| Resignation Diagram |
The game only lasted 95 moves, but Fukuzaki had actually analyzed the hidden possibility ... G*6h (Diagram D) and related variations in amazing depth. It was fortunate for me that he had overlooked just one move, P-4c+.
In the endgame, everything can change with just one move, and since this directly affects both players' kings, you need to take the utmost care. The endgame is always based on the complex interrelationship between the kings: you can never think of them seperately. You must be aware of the situation of your own king and decide the most appropriate way of attacking accordingly. In this chapter, the two attacking moves N*4d and S*3b arose from an assessment of the situations of both kings. They were endgame "make or break" moves that made maximum use of this interrelationship.
There are always a few crossroads in the endgame. Be sure not to overlook them. Particularly in the endgame, they will directly affect the outcome.