 |
| Diagram 1 |
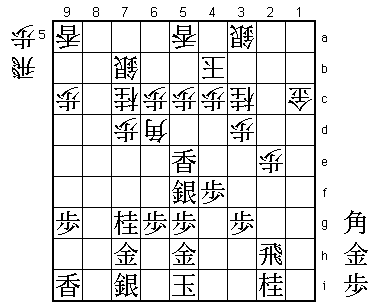
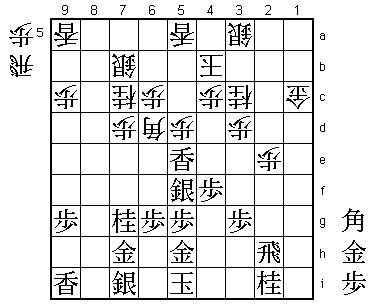
The position in Diagram 1 is from the 1st game of the 28th Oi Title Match. My opponent, Takahashi, the Oi Titleholder, playing White, had just dropped a lance at 5a. In this position, Black is a whole gold up. Having three golds against one is a substantial material advantage and, applying shogi common sense, one would expect the position to be a fairly easy win for Black. But in fact this is not the case. The first thing to notice is that, compared with the white king's freedom of movement, Black's king is quite boxed in. Unpleasant possibilities like ... R*3i; K-6h N*7f mate spring to mind. Furthermore, after ... P-5d (Diagram A), Black's gold advantage will be reduced to a gold/lance exchange, with the lance on 5a exerting strong, silent pressure on the head of Black's king.
 |
| Diagram A |
Generally speaking, when you have a material advantage, it is better to slow down the pace and aim for a longer battle. As the struggle continues, the difference in material will inevitably make itself felt. However, this position appears to be an exception to the rule. Even though Black is material up, he must do something quickly before White gets in ... P-5d.
 |
| Diagram B |
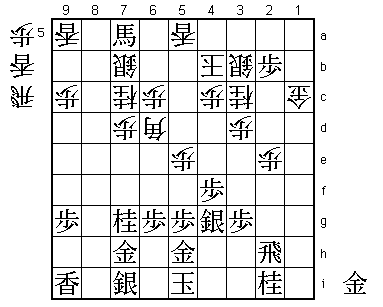
White really has to do something quickly before Black's promoted bishop becomes effective. In fact, I had first intended to answer ... S-3b with B*7a, but this doesn't work due to the reply .... S-6a. Looking deeper into the position, I found B*6b.
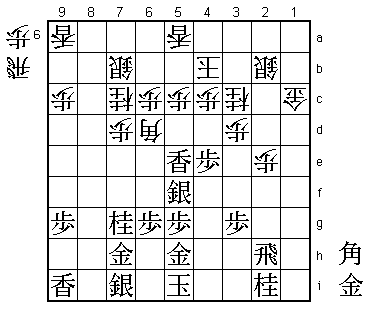
From Diagram 1, play continued P*2b Sx2b, P-4e (Diagram 2) the main aim behind P*2b.
 |
| Diagram 2 |
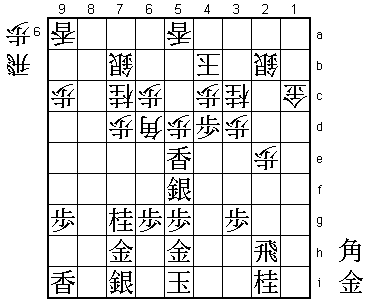
Although P-4e aims directly at the head of White's king, this move still looks a little slow in view of White's counterplay on the 5th file, but it contains a surprisingly nasty threat. After thirteen minutes' thought, Takahashi played ... P-5d. Ignoring the threat to the lance, I continued with the violent pawn push P-4d (Diagram 3).
 |
| Diagram 3 |
If now ... Px4d; B*2a and White can only defend against the threat of G*4c by dropping his rook. It is here in particular that the effect of the drop P*2b is felt and where Takahashi must have wished he had played ... S-3b instead of ... Sx2b.
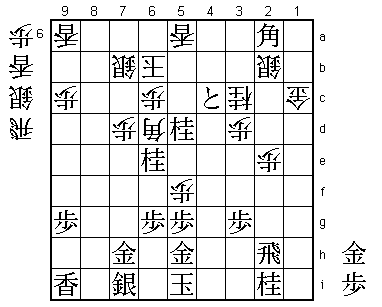
With P-4d, I got a clear sense of my distance from the enemy king. During the game, I became increasingly confident that if I could get this pawn push in, I could finish my opponent off. Takahashi left the pawn alone and took the lance with ... Px5e. Ignoring the threat to my silver, I continued with B*2a, threatening mate in short order. White cannot defend with the lance drop ... 3*b in view of Px4c+ Kx4c; P*4d.
 |
| Diagram 4 |
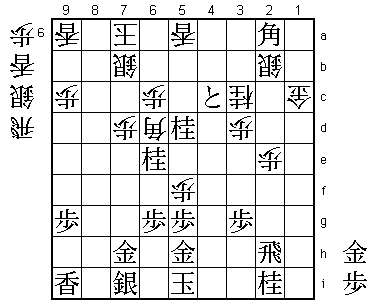
If White takes this knight with the lance on 5a, Black can finish explosively with +P-5c Bx5c; Nx5c+ Kx5c; B*7a. Here Takahashi played ... K-7a (Diagram 5).
 |
| Diagram 5 |
Since the lance on 5a is White's most effective attacking piece, it is natural that he should not want to part with it straight away. White intends first to remove his king from danger and then take the knight with the lance.
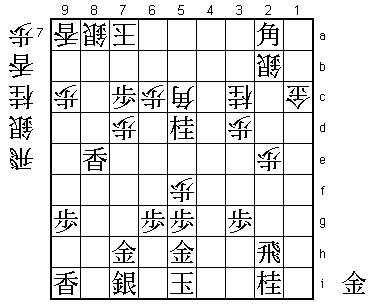
But in this position I made a slight mistake. My next move, P*7c, was the right idea but the wrong way round. The right move order was +P-5c Lx5c and then P*7c S-8a; Nx5c+ Bx5c; L*8e (Diagram C), with two unpleasant threats Lx8a+ and B-4c+.
 |
| Diagram C |
If White defends with ... P*8b, for example, B-4c+ is game, set and match.
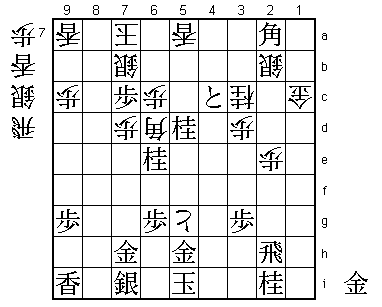
Here Takahashi decided to let the silver go and pin his hopes on counterattack with ... Px5g+, bringing about a very difficult position (Diagram 6).
 |
| Diagram 6 |
What particularly makes it difficult is the fact that the bishop on 2a is doubly blocked by the tokin on 4c and the knight on 5d. If there were only one piece blocking it, the bishop's path could be opened in one move. But with two pieces in the way, the bishop feels very heavy.
 |
| Diagram 7 |
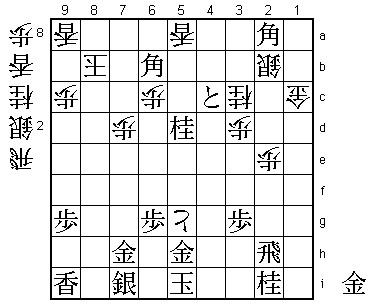
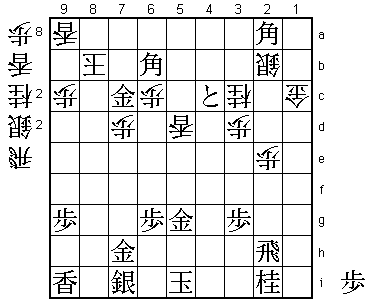
Here it is possible to immediately play G*7c and, after ... K-9b (if ... K-8a, Black has a forced mate with B-7a+ Kx7a; N-6b+ etc.), take the tokin on 5g. However, I chose the move order Gx5g Lx5d; G*7c (Diagram 8), in order to give White the additional possibility of ... K-8a, which he didn't have after the immediate G*7c.
 |
| Diagram 8 |
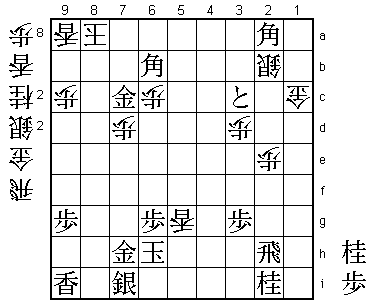
There is a very subtle difference between the two king positions. ... K-8a has the point that after +Px3c (threatening mate) ... Lx5g=, Black is forced to play K-6h as he has no mate after P*5h. With the king on K-9b, however, P*5h is playable because Black can still mate with N*8d, but White can defend with ... R*8f or ... L*8a. By playing Gx5g without committing the gold to 7c, I forced my opponent to analyze more variations and may well have succeeded in confusing him. This is a typical and effective ploy in a close-fought endgame battle.
 |
| Diagram 9 |
In this position Black's two bishops are working together most effectively, the bishop on 2a covering the squares 5d, 6e and 7f and the bishop on 6b covering 4d and 3e. From their respective positions, the two bishops cut across the board to give Black vital central thickness. White has many pieces in hand, but the power of the two bishops is awesome. For example, White can defend against mate and threaten mate himself with ... S*7e, but B-6e+ (Diagram D) simultaneously extinguishes the mate and threatens instant mate with P*8b K-9b; +Bx7d.
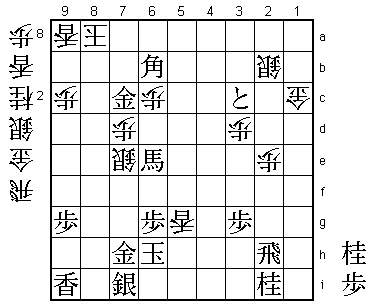 |
| Diagram D |
Here Takahashi plunged into the final engagement with ... R*5h, a typically sharp counterpunch by the Oi champion. In fact, I hadn't taken this move seriously into account. I thought I could simply escape with K-7g, but ... N*8e; K-6f S*7e defends against the mate threat with check and after K-5f, White can simply take the rook on 2h.
After nine minutes' thought, I played Rx5h Lx5h+; Kx5h.
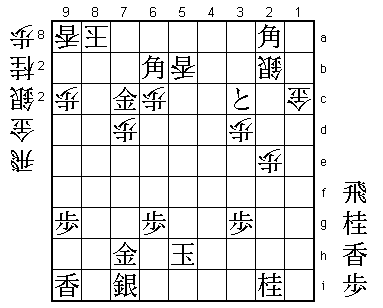 |
| Diagram 10 |
I defended with P*5c. I didn't like the look of P*5g, but it appears that my king could have marched manfully up the board eating the enemy pawns on 5g, 5f, and 5e, and found a safe haven on 4d.
Takahashi now played ... R*5f but after L*5g (Diagram 11) found he needed one extra piece to deliver mate.
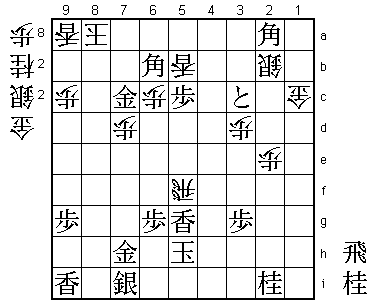 |
| Diagram 11 |
Play continued ... S*4g; Kx4g S*4f; K-3h N*2f; K-2h Sx3g+; Nx3g N*1f; K-2g and White resigned (Resignation Diagram).
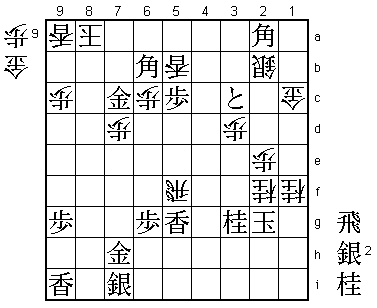 |
| Resignation Diagram |
After ... G*2h; Kx1f, White, with only pawns left in hand, cannot mate.
From quite early on in this game, I felt I had a winning advantage; I won a lance, exchanged bishop for rook and then went a whole gold up. But when I was actually faced with the position in Diagram 1, it wasn't as good as I had thought and I lost my cool a little. In this situation, it was lucky that I was able to find the difficult move P*2b, which turned out to be decisive.
This game brought home to me again the power of the long-range pieces. When my bishop on 2a was blocked out, I felt anxious, but when my two bishops ranged freely over the whole board, I recovered my composure. The chief value of the rook and bishop lie in their ability to cover a wide area. In order to make full use of their potential, it is vital that you place rooks and bishops where they are most active.
Always be fully aware of the advantages and shortcomings of each piece. Give full play to the long-range potential of the rook and bishop, remembering that the efficiency of these pieces strongly influences the outcome of the endgame.