|
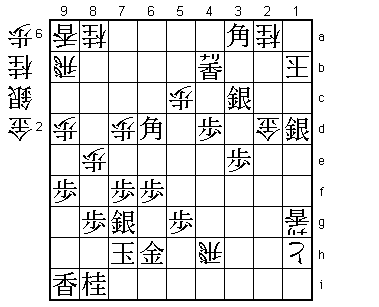
| Diagram 1 |
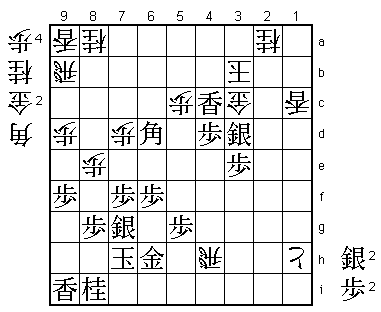
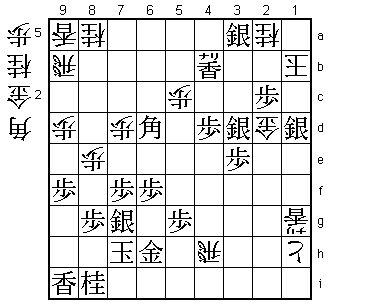
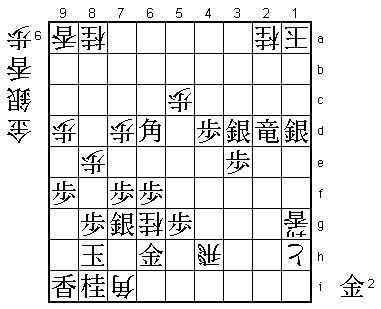
The position in Diagram 1 does not bring back entirely happy memories. It was the point at which I had turned what should have been a comfortable win into a difficult position through a loose move in the endgame. The game was against Nakahara, then Meijin, in the 25th 10-dan League.
I thought for 17 minutes in this position. I spent half this time regaining my composure and the other half on my final analysis of the endgame. It was this position that had worried me most, but I succeeded in working out a win in all variations.
In this book, it is my aim to concentrate on examining just the endgame, in other words, the process from the position in which one works out a win up to the opponent's resignation. What are the thought processes of the shogi professional during the endgame? Through this analysis of my own games, I hope to give readers a better idea of the way shogi professionals think in the endgame and enable them to feel something of the atmosphere of this final phase of the game.
Diagram 1 is the starting point of this chapter. I will outline the lines I examined and the kind of mating patterns I envisaged.
The endgame is that frightening phase of the game when just one mistake can directly decide the outcome. The aim is perfectly clear - you have to mate your opponent's king before he mates yours. In this sense, it could be said that the endgame is more easily understandable than the opening and middlegame.
To mate your opponent quicker than he mates you. It may seem like stating the obvious, but this is the most important theme of the endgame. Speed is everything.
In Diagram 1, if there were a mate, it would be straightforward, i.e. S*2c Gx2c; Sx2c+ Kx2c; S*3d K-1b; G*2c K-1a (Diagram A).
 |
| Diagram A |
Black can win White's rook with P*1b, but there is no forced mate. What about Black's king in Diagram 1? There is no immediate mate, but it would be dangerous for Black to give White too many pieces (allowing, for example, ... S*6i; Kx6i G*5h; Gx5h S*7h etc.).
Black must concentrate on doing two things in this position. Firstly, he must threaten mate without handing pieces over to White. Secondly, he must threaten mate while keeping his silver on 3d. I have already explained the reason for the former. But why is it necessary to keep the silver on 3d? This requires a little explanation.
In this position, the silver on 3d is essential for mating White's king. For example, after Bx5c+ Gx3d; Px3d, we reach the following position.
 |
| Diagram B |
Here Black has two worries; the first is that White may get an entering king and the second is the move ... B*4e (Diagram C), putting Black's king in check and forcing him to drop a silver on 5f.
 |
| Diagram C |
This obviously reduces Black's attacking power. Furthermore, ... B*4e is an effective defensive as well as attacking move. Finally, I should point out that considering lines where you have to interpose a piece increases the amount of analysis you have to do and makes it more complicated.
Choosing the simplest and most direct lines is the best way to steer through to victory in the endgame when you have a winning position. Allowing the silver on 3d to be removed goes against this basic precept. I hope you now fully understand the demerits of letting the silver be dislodged from 3d. To find a way of threatening mate while not handing over many pieces and keeping the silver on 3d; these are the two basic conditions for delivering mate in Diagram 1.
|
| Diagram 1 (repeat) |
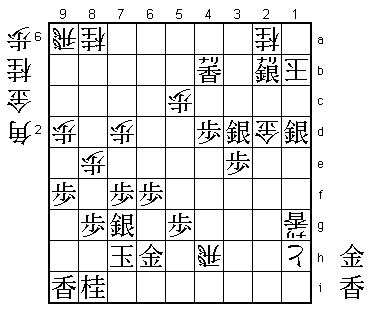
 |
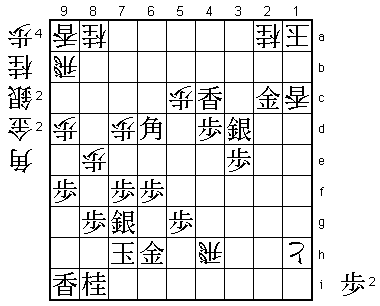
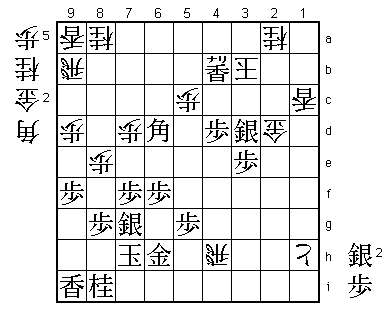
| Diagram 4 |
If White now defends with . ... G*1a; Bx9a+ is decisive. If now ... Rx9a; P-2b+ Gx2b; Sx2b+ (Diagram D) ... Kx2b; G*2c and mate next move.
 |
| Diagram D |
Against the defense ... G*1a, Black must take care not to go rushing in with the immediate P-2b+. This may seem to come to the same thing, but after ... Gx2b; Sx2b+ Kx2b; G*2c K-1a, there is no mate. Black can play Bx9a+ as before, but now his own king is in danger as a result of handing over pieces and, what is more, White can defend with ... Rx4b.
You must always calculate mating variations while simultaneously assessing the safety of your own king. Just a slight change in the move order can be the cause of sudden death in the endgame.
Against S*1d (Diagram 4), the move I was most afraid of was the capture of the promoted lance ... Rx4b (Diagram E).
 |
| Diagram E |
It was absolutely vital to calculate the variations after ... Rx4b when I played P*2d. If Black replies Sx4b+, it will be very difficult to mate after White captures his silver with ... Gx1d.
Black therefore has no choice but to answer ... Rx4b with P-2b+. Play would then continue ... Rx2b; Sx2b+ Kx2b; R*2c K-1a ; Rx2d+ (Diagram F), putting the White king in brinkmate.
 |
| Diagram F |
But what about Black's king in this position?
Firstly, after ... S*6i; Kx6i G*5h; Gx5h G*7h, Black's king gets away with K-5i and cannot be caught. The most unpleasant move for Black in Diagram 8 is ... G*7i. His king is chased hard after Kx7i N*6g; K-8h B*7i (Diagram G)
 |
| Diagram G |
K-7h Bx6h+; Sx6h G*8h; K-6g S*5h; K-5f R-4g+; K-6e, but just manages to escape. The fact that White's rook is no longer on 9b encourages Black's king to advance boldly to the upper part of the board, where it is now safe.
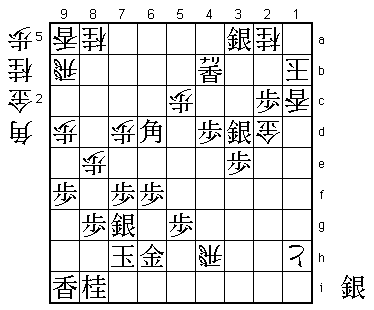
I chose the move P*2d having calculated that White has no mate in this line. This may be called a straight line calculation. Each section of analysis, from Diagram 1 to Diagram 4, from Diagram E to Diagram F, and then from Diagram G together forms a single line of calculation.
The variation after ... Rx4b formed the basis of my analysis. My main task in this endgame was to delve as deeply and precisely as I could into this variation. Having calculated that this line was a win, I felt that all the other variations must be winning too.
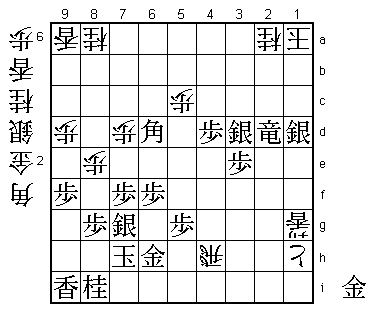
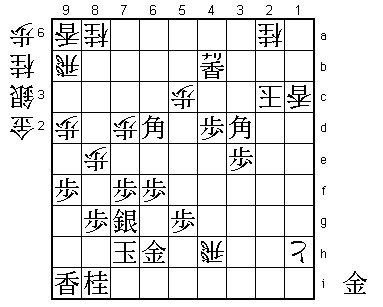
 |
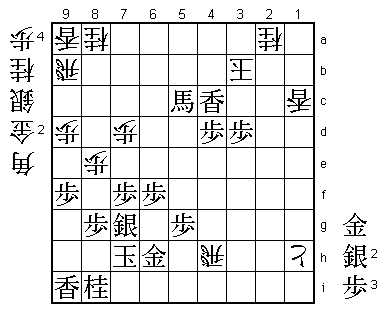
| Diagram 2 |
This lance promotion was the aim behind the pawn drop P*2d. It enabled me to force White's king from 3b to 2b without having to drop a silver on 4a. If White replies ... Rx4b; S*4c wins. If ... Kx4b; P-4c+ K-5a; S*6c G*6b; +Px5c Gx6c; +Px6c is winning. If White answers P-4c+ with ... Rx4c+, Black captures the rook and his king is completely safe.
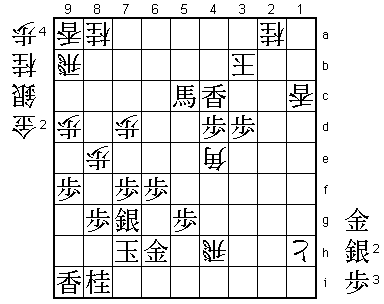
After L4b+ K-2b; P*2c K-1b; S*3a, we reach the following position.
 |
| Diagram 3 |
Here White appears to have the defense ... B*1a, after which we have the straight-line variation P-2b+ Bx2b; Sx2b+ Kx2b; S*2c Gx2c; Sx2c+ Kx2c; B*3d (Diagram H)
 |
| Diagram H |
... K-2d; G*2e K-3c; P-4c+ K-2b. Now Black can decide the issue, as he did in one of the lines mentioned above, with Bx9a+. The attacking and defensive bishop drop B*3d is the key move in this variation; with this move, Black's king is made safe.
By means of S*3a, Black succeeded in his aim of threatening mate while maintaining the silver on 3d.
After ... B*1c, play continued P-2b+ Bx2b; Sx2b+ Kx2b; B*3a K-1b; S-3c= (Resignation Diagram) and Nakahara resigned. Mate cannot be prevented.
 |
| Resignation Diagram |
Just seventeen moves were played from the position in Diagram 1 up to White's resignation. I have attempted to outline the variations and considerations that lay behind these 17 moves. I hope you now understand that the process from P*2d formed a straight line, on which the move ... Rx4b was a single point.
In the endgame that proceeds from a winning position, getting to the opponent's king as fast as possible is the key to making your victory certain. Make that line as short and as precise as you can.
Choose a straight line when you stand better and a curved line when you stand worse. The choice may vary slightly according to the position, but this is undoubtedly one of the most important guiding principles of the endgame. The endgame is all about speed. Mating the opponent's king as quickly as possible is its clear-cut, indeed, its only theme. Make for the enemy king in a straight line. There is only one road. The rest are all detours.