73rd Kisei Match Game 1
Black: Goda Masataka, Kisei
White: Sato Yasumitsu, Challenger
73rd Kisei-sen, Game 1, June 12th 2002
1.P7g-7f     00:00:00  00:00:00

Even though both Goda and Sato have played numerous title matches and
have taken a couple of titles each, this is the first time they play
each other in a title match. If this first game is an indication of
what a Goda-Sato match is going to be like, I hope they will play
many more.

2.P8c-8d     00:00:00  00:00:00
3.G6i-7h     00:01:00  00:00:00
4.G4a-3b     00:01:00  00:08:00
5.S7i-6h     00:10:00  00:08:00
6.P3c-3d     00:10:00  00:08:00
7.S6h-7g     00:10:00  00:08:00
8.S7a-6b     00:10:00  00:08:00
9.S3i-4h     00:10:00  00:08:00
10.K5a-4a    00:10:00  00:09:00
11.K5i-6i    00:10:00  00:09:00
12.P5c-5d    00:10:00  00:09:00
13.G4i-5h    00:10:00  00:09:00
14.S3a-4b    00:10:00  00:09:00
15.P4g-4f    00:10:00  00:09:00

The first surprise. Even though this move has been played more than
20 times in the past, the last time it was played was more than three
years ago (January 1999) in a Ryu-O tournament game between Toyokawa
and Hatakeyama Mamoru. However, if we disregard this game, we have to
go back to 1992 to find a period when this move was actually played
with some regularity. It is hard to say if Goda actually prepared
something as Sato changes his plans to play Yagura almost immediately.
Maybe Goda just wanted to avoid Sato's famous opening preparation.

16.P7c-7d    00:10:00  00:25:00
17.S4h-4g    00:10:00  00:25:00
18.S6b-5c    00:10:00  00:26:00
19.P6g-6f    00:28:00  00:26:00
20.G6a-5b    00:28:00  01:04:00
21.P2g-2f    00:59:00  01:04:00
22.P4c-4d    00:59:00  01:06:00
23.B8h-7i    01:08:00  01:06:00
24.P6c-6d    01:08:00  01:38:00
25.P2f-2e    01:22:00  01:38:00
26.B2b-3c    01:22:00  01:39:00
27.P3g-3f    01:24:00  01:39:00
28.S4b-4c    01:24:00  01:39:00

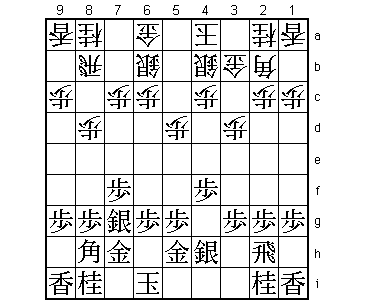
The Gangi (Snow Roof) castle. This castle gives a better defence against the attack with P4e. Still, the attacks P4e and P6e are the main plans for black and white. To support this attack, both players therefore take the time to move their bishops to 2f and 8d respectively.

29.B7i-6h    01:25:00  01:39:00
30.P8d-8e    01:25:00  01:39:00
31.B6h-5i    01:33:00  01:39:00
32.B3c-5a    01:33:00  01:39:00
33.S4g-5f    01:34:00  01:39:00
34.K4a-3a    01:34:00  01:46:00
35.B5i-2f    01:48:00  01:46:00
36.B5a-8d    01:48:00  01:48:00
37.P4f-4e    01:56:00  01:48:00
38.P4dx4e    01:56:00  02:08:00
39.S5fx4e    01:56:00  02:08:00
40.N2a-3c    01:56:00  02:10:00
41.S4e-5f    02:24:00  02:10:00
42.N8a-7c    02:24:00  02:14:00
43.K6i-7i    02:36:00  02:14:00
44.P6d-6e    02:36:00  02:38:00
45.P6fx6e    02:41:00  02:38:00
46.R8b-6b    02:41:00  02:38:00
47.G5h-6g    02:43:00  02:38:00
48.N7cx6e    02:43:00  02:47:00

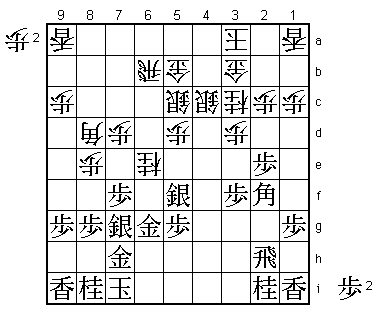
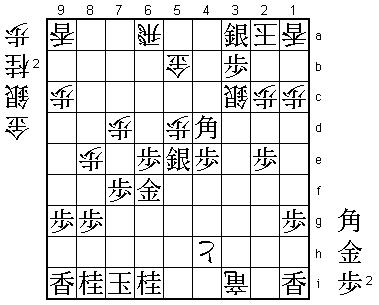
49.S7g-6f?!  02:43:00  02:47:00

The first important point of the game. 49.S6f turns this into a
very wild game where black is forced to defend. Even though this
doesn't necessarily mean that the following variation is bad for
black, defending is more difficult than attacking, especially in a
game with limited thinking time (4 hours per player in the Kisei).
After the game Sato said he was worried about 49.P*6f. After 50.Nx7g+
Nx7g P*4d N6e S6d white will find it difficult to get a good attack
going on the 6th file. Goda agreed that 49.P*6f would probably have
been better.

50.B8dx6f    02:43:00  02:48:00
51.G6gx6f    02:43:00  02:48:00
52.N6ex5g+   02:43:00  02:48:00
53.P*6e      02:43:00  02:48:00
54.R6b-6a?!  02:43:00  03:10:00

This returns the initiative to black. White had a difficult decision
to make, though, as black strongly threatened B*7a followed by either
Bx6b+ or Bx5c+. Going for the mutual attack with 54.P*4f fails because
of 55.B*7c and saving the rook is followed by Bx4f+. White's best move
was 54.P*4d. After this, Sato feared 55.B3g, but white can keep the
initiative after 56.+Nx5f Gx5f S*5e.

55.P3f-3e    03:03:00  03:10:00

Now we get an all-out fighting game with an outcome that is impossible
to predict.

56.P*6h      03:03:00  03:24:00
57.P*4d      03:32:00  03:24:00
58.S5cx4d    03:32:00  03:24:00
59.P3ex3d    03:32:00  03:24:00
60.N3c-4e    03:32:00  03:27:00
61.P*4f      03:44:00  03:27:00
62.P6h-6i+   03:44:00  03:38:00
63.K7ix6i    03:44:00  03:38:00
64.S4d-5e    03:44:00  03:40:00
65.S5fx5e    03:44:00  03:40:00
66.P*6g      03:44:00  03:41:00
67.P4fx4e    03:57:00  03:41:00
68.S*6h      03:57:00  03:46:00
69.G7hx6h    03:57:00  03:46:00
70.P6gx6h+   03:57:00  03:46:00
71.R2hx6h    03:57:00  03:46:00
72.+N5gx6h   03:57:00  03:46:00
73.K6ix6h    03:57:00  03:46:00
74.R*2h      03:57:00  03:46:00
75.B*4h      03:57:00  03:46:00
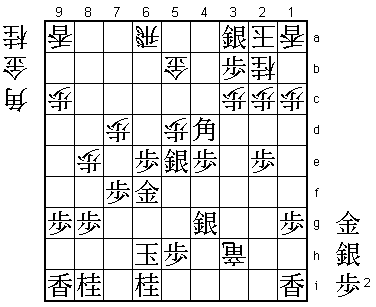
76.P*4g?     03:57:00  03:57:00

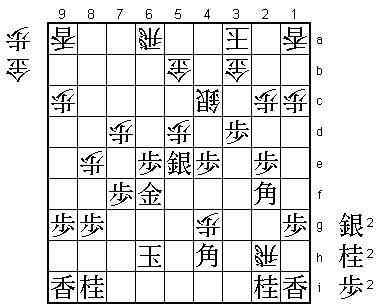
Shogi is a frightening game. Even though this looks like a very strong
move, it is actually too slow! White should have played 76.Px5e and
after 77.S*3c there is the brilliant 78.S*5i! and now 79.Kx5i P*4g
is a mating threat. As black also has all kinds of attacking moves
like S*2b or Sx3b+ Sx3b S*2b it is impossible to say if this variation
is actually winning for white. However, with both players having only
three minutes left, this would have been a very difficult position to
play for black.

77.S*3i!     03:57:00  03:57:00

Great defence. This gives black the time he needs.

78.R2hx2i+   03:57:00  03:57:00
79.N*4d      03:58:00  03:57:00
80.P4gx4h+   03:58:00  03:58:00
81.N4dx3b+   03:58:00  03:58:00
82.S4cx3b    03:58:00  03:58:00
83.B2f-4d    03:58:00  03:58:00

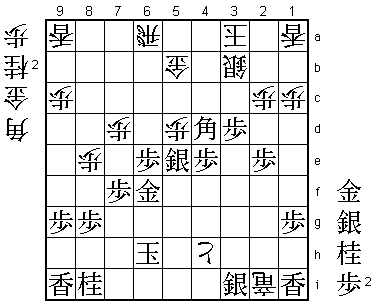
Threatens mate after G*2b. Black seems to be winning easily, but...

84.B*7i!     03:58:00  03:59:00

The only move. After 84.B*3e Bx3e +Rx3i black can play B*4d! and the
bishop on 3e is actually defending against the white mate. Furthermore
84.B*9e fails to the nice defensive sacrifice 85.S*8f and 86.Px8f
leads to (a rather long) mate after 87.G*2b.

85.K6hx7i    03:59:00  03:59:00

No choice. 85.K7g +R2g N*6g Px5e is a mating threat that defends
against the white mating threat by creating an escape for the white
king to 5d.

86.+R2ix3i   03:59:00  03:59:00
87.N*6i      03:59:00  03:59:00
88.P*3c      03:59:00  03:59:00
89.P3dx3c+   03:59:00  03:59:00
90.S3bx3c    03:59:00  03:59:00
91.P*3b      03:59:00  03:59:00
92.K3a-2a    03:59:00  03:59:00
93.S*3a      03:59:00  03:59:00

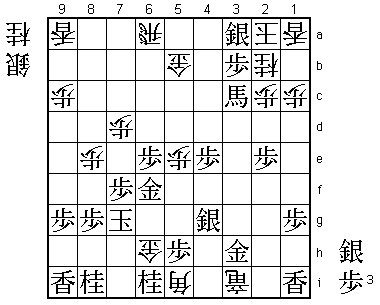
94.N*2b?     03:59:00  03:59:00

Tough to have to play this in byoyomi, but this is the decisive
mistake. Correct was 94.S*2b and Bx3c+ Sx3c leads to nothing for
black. If black takes the silver with 95.Sx2b+ then after 96.Sx2b
S*3a white has the choice between settling for sennichite with S*3c
or taking the risk and try to win with P*3c.

95.B4dx3c+   03:59:00  03:59:00
96.+R3ix3c   03:59:00  03:59:00
97.B*4d      03:59:00  03:59:00
98.S*6h      03:59:00  03:59:00
99.K7ix6h    03:59:00  03:59:00
100.+P4h-5h  03:59:00  03:59:00
101.K6h-7h   03:59:00  03:59:00
102.+P5h-6h  03:59:00  03:59:00
103.K7hx6h   03:59:00  03:59:00
104.+R3c-3h  03:59:00  03:59:00
105.P*5h     03:59:00  03:59:00
106.P*3c     03:59:00  03:59:00
107.S*4g!    03:59:00  03:59:00

A fine move to decide this game. White can't take this silver because
108.+Rx4g Sx2b+ Kx2b N*3d Kx3b Bx3c+ Kx3b S*4d leads to mate. The white
promoted rook needs to stay on the 3rd file to defend against N*3d.

108.+R3h-3i  03:59:00  03:59:00
109.G*3h     03:59:00  03:59:00

Now white has to give up the defence of 3d.

110.B*5i     03:59:00  03:59:00
111.K6h-6g   03:59:00  03:59:00
112.P5dx5e   03:59:00  03:59:00

Creates an escape square for the white king to 5d, but this is not a
mating threat, so...

113.B4dx3c+  03:59:00  03:59:00
114.G*6h     03:59:00  03:59:00
115.K6g-7g   03:59:00  03:59:00
Resigns      03:59:00  03:59:00

No mate (116.Gx6i K8h) and no defence, so Sato resigned. A great
fighting game, showing that both players are completely at ease with
playing on the big stage. The gloves are off right from the start and
this promises to be a great Kisei match. It is a pity that a Kisei match
only has a maximum of five games...
