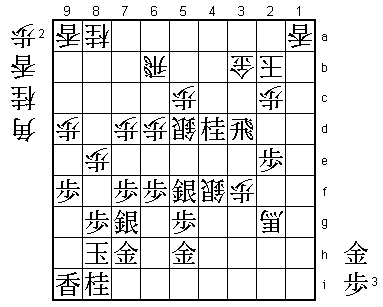
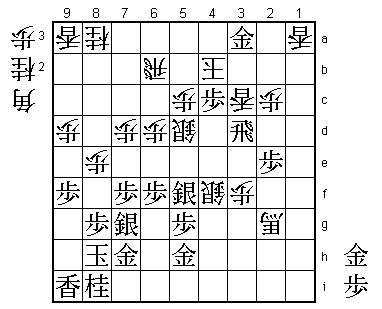
71st Meijin Match Game 3
[Black "Habu Yoshiharu, Challenger"]
[White "Moriuchi Toshiyuki, Meijin"]
[Event "71st Meijin-sen, Game 3"]
[Date "May 9th and 10th 2013"]
1.P7g-7f     00:00:00  00:00:00
2.P8c-8d     00:00:00  00:00:00
3.P2g-2f     00:01:00  00:00:00
4.G4a-3b     00:01:00  00:01:00
5.G6i-7h     00:02:00  00:01:00
6.P8d-8e     00:02:00  00:03:00
7.B8h-7g     00:05:00  00:03:00
8.P3c-3d     00:05:00  00:03:00
9.S7i-8h     00:06:00  00:03:00
10.B2bx7g+   00:06:00  00:09:00
11.S8hx7g    00:06:00  00:09:00
12.S3a-4b    00:06:00  00:09:00
13.S3i-3h    00:10:00  00:09:00
14.S7a-7b    00:10:00  00:10:00
15.P9g-9f    00:11:00  00:10:00
16.P9c-9d    00:11:00  00:10:00
17.P4g-4f    00:19:00  00:10:00
18.P6c-6d    00:19:00  00:10:00
19.S3h-4g    00:20:00  00:10:00
20.S7b-6c    00:20:00  00:10:00
21.K5i-6h    00:22:00  00:10:00
22.S6c-5d    00:22:00  00:10:00
23.S4g-5f    00:24:00  00:10:00
24.P4c-4d    00:24:00  00:10:00
25.G4i-5h    00:25:00  00:10:00
26.G6a-5b    00:25:00  00:10:00
27.P3g-3f    00:26:00  00:10:00
28.K5a-4a    00:26:00  00:10:00
29.K6h-7i    00:27:00  00:10:00
30.K4a-3a    00:27:00  00:11:00
31.P1g-1f    00:28:00  00:11:00
32.P1c-1d    00:28:00  00:12:00
33.N2i-3g    00:35:00  00:12:00
34.P7c-7d    00:35:00  00:22:00
35.P6g-6f    00:41:00  00:22:00
36.S4b-3c    00:41:00  00:22:00
37.R2h-4h    00:46:00  00:22:00
38.G5b-4b    00:46:00  00:25:00
39.K7i-8h    00:54:00  00:25:00
40.K3a-2b    00:54:00  00:25:00
41.L1i-1h    01:31:00  00:25:00

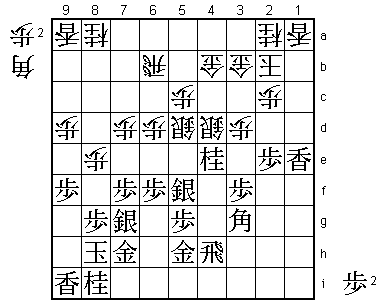
Habu and Moriuchi have played the Kakugawari 18 times before. In these
games Habu had the black pieces 13 times, winning no less than 10 times
(one game ended in sennichite). However, one of the games Moriuchi won
was a huge win in the 6th game of last year's Meijin match after black
won five games in a row. In that game Habu played 41.N2e and after S2d
B*2h it became a position that was very popular one year ago (it was also
played in the second game of last year's Meijin match).

42.G4b-4c    01:31:00  00:38:00
43.P2f-2e    01:32:00  00:38:00
44.G4c-4b    01:32:00  00:41:00
45.P4f-4e    01:33:00  00:41:00
46.P4dx4e    01:33:00  00:41:00
47.N3gx4e    01:33:00  00:41:00
48.S3c-4d    01:33:00  00:41:00
49.B*3g      01:33:00  00:41:00
50.R8b-6b    01:33:00  01:32:00
51.P1f-1e    02:17:00  01:32:00
52.P1dx1e    02:17:00  01:33:00
53.L1hx1e    02:17:00  01:33:00

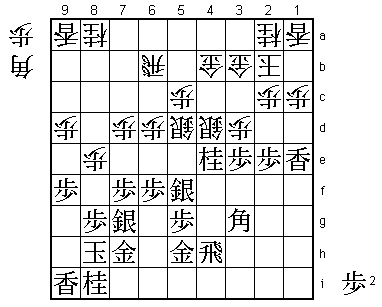
Almost ten years ago (Febuary 2004, Asahi Open), Habu and Moriuchi also
played a similar position against each other. However, in that game the
lance was still on 1i and therefore the white gold was also in a different
position. In that game it followed 54.P*1d Lx1d Lx1d P*1e B*2g Px1d Bx3f+
G4g +B2g L*2i +B1f G3f and black won.

54.P*1c      02:17:00  01:35:00

The alternative 54.Lx1e is not very appealing because after 55.Bx1e black
has exchanged an attacking lance for a defending lance. Also, the bishop is
aiming at the gold on 4b and there is also the option of pulling back the
bishop with tempo because this attacks the silver on 4d.

55.P3f-3e    02:18:00  01:35:00

This is a very strong attack. The reason it doesn't get an exclamation mark
is that it has been played before: Murayama played it against Watanabe in the
Asahi Cup in January. There it followed 56.Px3e P*3c G3b-4c S5e S5dx5e Bx5e
Sx5e S*5a and even though Murayama lost the game he had a big advantage here.

56.B*1g      02:18:00  02:32:00

This is a move that was analyzed in the post-mortem analysis of the aforementioned
game between Murayama and Watanabe. The plan is to make a promoted bishop, giving
the white king support if it needs to make a run up the board. However, Habu
shows that this is not a very effective plan.

57.P3ex3d    03:07:00  02:32:00
58.P*3f      03:07:00  02:34:00
59.B3g-4f    03:12:00  02:34:00
60.B1g-2f+   03:12:00  02:45:00
61.P3d-3c+   03:16:00  02:45:00

62.N2ax3c    03:16:00  03:10:00

Or 62.Sx3c Nx3c+ G4bx3c S*3e and white is in trouble. Even after picking up
the lance with +Bx1e, black plays P*3d G3c-4c R1h and it is hard to find a
good square for the promoted bishop.

63.R4h-1h    03:21:00  03:10:00

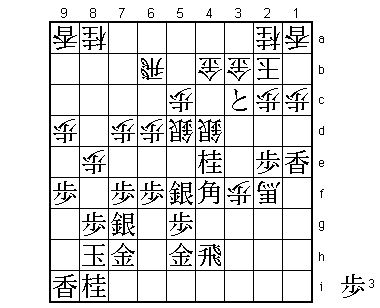
Now rook, bishop and lance are attacking the vital point 1c and there is no
good defense.

64.S4d-3e    03:21:00  04:05:00
65.L1ex1c+   03:48:00  04:05:00
66.L1ax1c    03:48:00  04:07:00
67.P*1d      03:48:00  04:07:00
68.L1cx1d    03:48:00  05:48:00
69.R1hx1d    03:48:00  05:48:00
70.L*1a      03:48:00  06:37:00

71.N4ex3c+!  05:36:00  06:37:00

In the press room, 71.Rx5d was thoroughly analyzed and seemed more than enough
for black. For example, 72.Px5d L*2i Sx4f Lx2f is good for black (R*2h G5h-6h
Rx2f+ P*3d is strong because N4e fails to the fork B*4d). Also, 72.Sx4f can be
answered by Nx3c+ G3bx3c N*3h +Bx2e P*3d Px5d Px3c+ Gx3c Nx4f and the black
attack continues. For some reason, Habu plays a more difficult, but also much
nicer attack.

72.G4bx3c    05:36:00  06:37:00
73.N*3d      05:36:00  06:37:00
74.G3cx3d    05:36:00  06:37:00
75.R1dx3d    05:36:00  06:37:00
76.S3ex4f    05:36:00  06:37:00
77.L*2i      05:36:00  06:37:00
78.N*2g      05:36:00  07:11:00
79.L2ix2g    05:41:00  07:11:00
80.+B2fx2g   05:41:00  07:11:00
81.N*4d!     05:42:00  07:11:00

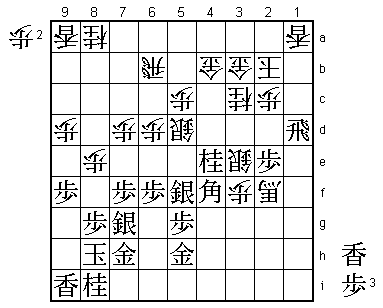
This is the difficult position that Habu must have analyzed until the end of
the game when he played 71.Nx3c+. It is not obvious that this is winning for
black, but there is no defense.

82.L*3a      05:42:00  07:52:00

Or 81.G4b P*3c! Gx3c G*2a Kx2a Rx3c+ and black wins. Also, 81.G4c G*3b K1b P*1c
Kx1c P*1d K1b Rx3c+! Gx3c Gx3c Gx3c N*2a G*2b Rx2b Gx2b Kx2b R*3b is a perfect
mate.

83.N4dx3b+   05:57:00  07:52:00
84.L3ax3b    05:57:00  07:52:00
85.P*3c      06:01:00  07:52:00
86.L3bx3c    06:01:00  07:52:00
87.G*2a      06:02:00  07:52:00
88.K2b-3b    06:02:00  08:18:00

Or 88.Kx2a Rx3c+ and the promoted rook can also take the pawn on 5c if chased
away.

89.G2a-3a    06:04:00  08:18:00
90.K3b-4b    06:04:00  08:19:00
91.P*4c      06:05:00  08:19:00
Resigns      06:05:00  08:19:00

After 92.Sx4c G*4a K5b Rx3c+ S5d P*4d the black attack is decisive while white
has no chance to get to the black king. Moriuchi resigned here, again a quick
end to a game that was very one-sided. The fourth game will becomes very important
now, with Habu getting his first and vital win, trying to claw his way back into
this match.
