62nd Osho Match Game 4
[Black "Watanabe Akira, Challenger"]
[White "Sato Yasumitsu, Osho"]
[Event "62nd Osho-sen, Game 4"]
[Date "February 19th and 20th 2013"]
1.P2g-2f     00:00:00  00:00:00
2.P3c-3d     00:00:00  00:00:00
3.P7g-7f     00:00:00  00:00:00
4.B2bx8h+    00:00:00  00:02:00
5.S7ix8h     00:01:00  00:02:00
6.S3a-2b     00:01:00  00:02:00
7.S3i-4h     00:03:00  00:02:00
8.S2b-3c     00:03:00  00:02:00
9.K5i-6h     00:04:00  00:02:00
10.R8b-2b    00:04:00  00:03:00
11.K6h-7h    00:05:00  00:03:00
12.K5a-6b    00:05:00  00:04:00
13.S8h-7g    00:05:00  00:04:00
14.K6b-7b    00:05:00  00:05:00
15.K7h-8h    00:06:00  00:05:00
16.P2c-2d    00:06:00  00:12:00
17.G6i-7h    00:06:00  00:12:00
18.K7b-8b    00:06:00  00:15:00
19.P4g-4f    00:08:00  00:15:00
20.S7a-7b    00:08:00  01:02:00
21.S4h-4g    00:08:00  01:02:00
22.S3c-4d    00:08:00  01:02:00
23.G4i-5h    00:11:00  01:02:00
24.P9c-9d    00:11:00  01:02:00
25.P9g-9f    00:19:00  01:02:00
26.N2a-3c    00:19:00  01:08:00
27.P3g-3f    00:31:00  01:08:00
28.G4a-5b    00:31:00  01:41:00
29.N2i-3g    00:34:00  01:41:00
30.G5b-4b    00:34:00  01:59:00
31.P6g-6f    01:16:00  01:59:00
32.R2b-2a    01:16:00  02:01:00
33.P1g-1f    01:29:00  02:01:00
34.P1c-1d    01:29:00  02:05:00
35.P7f-7e    01:39:00  02:05:00

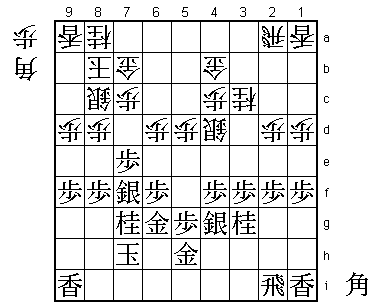
Like in the second game, Sato played a direct Mukaibisha. Actually,
in between the 2nd and 3rd game of this Osho match, Sato and Watanabe
played the Challenger final of the Oi match with the same opening.
In that game Sato won after moving his king into the strong Anaguma
castle. After the game, Watanabe said that he learned from this game
and decided to play this Vanguard Pawn on the 7th file to make it
less attractive for white to play the Anaguma castle.

36.P5c-5d    01:39:00  02:18:00
37.R2h-2i    02:00:00  02:18:00
38.P8c-8d    02:00:00  02:35:00
39.P8g-8f    02:04:00  02:35:00
40.S7b-8c    02:04:00  02:40:00
41.S7g-7f    02:05:00  02:40:00
42.G6a-7b    02:05:00  02:40:00

Sato acknowledges Watanabe's vanguard pawn and plays a Silver Crown
castle instead of the Anaguma.

43.N8i-7g    02:08:00  02:40:00
44.P3d-3e    02:08:00  03:49:00
45.P3fx3e    02:22:00  03:49:00
46.S4dx3e    02:22:00  03:49:00
47.P*3f      02:22:00  03:49:00
48.S3e-4d    02:22:00  03:49:00
49.G7h-6g    02:22:00  03:49:00

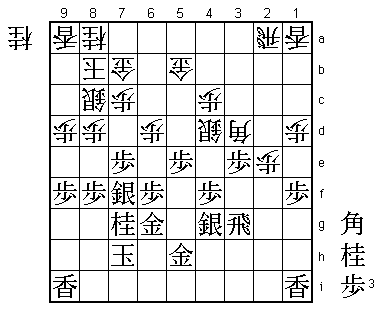
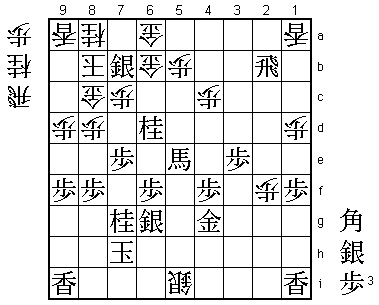
It looks like this gold is moving in the wrong direction, but Watanabe's
plan is to start an attack on the head of the white king with K7h
followed by R8i and P8e. If Sato allows this to happen he runs the
risk of being blown away quickly, so he has to do something quick.

50.P6c-6d    02:22:00  04:33:00
51.K8h-7h    03:03:00  04:33:00

52.B*3d      03:03:00  04:36:00

This is Sato's counter to Watanabe's attacking plans. Of course white
prefers to keep this bishop in hand, but at this square it is perfectly
placed because it both aims indirectly at the black king and supports an
attack on the second file.

53.P5g-5f    04:39:00  04:36:00
54.G4b-5b    04:39:00  05:11:00
55.R2i-8i?!  04:42:00  05:11:00

Watanabe still thought that his plan could work, but he should have
defended differently here.

56.P2d-2e    04:42:00  05:16:00
57.P2fx2e    04:44:00  05:16:00
58.P5d-5e!   04:44:00  05:18:00

Watanabe had underestimated the power of this pawn sacrifice to open the
bishop diagonal.

59.P5fx5e    05:11:00  05:18:00
60.N3cx2e    05:11:00  05:27:00
61.R8i-2i    05:11:00  05:27:00

Admits the mistake, but it is not too late. Even though white now gets
a slight advantage by being able to attack first, this is not decisive
yet and black can wait for a chance to counter. Of course, the fact that
white is able to attack first is a sign that Watanabe's opening strategy
has failed.

62.P*2f      05:11:00  06:14:00
63.R2ix2f    05:11:00  06:14:00
64.P*2d      05:11:00  06:14:00
65.R2f-2g    05:22:00  06:14:00
66.N2ex3g+   05:22:00  06:28:00
67.R2gx3g    05:25:00  06:28:00
68.P2d-2e    05:25:00  06:28:00
69.P3f-3e    05:46:00  06:28:00

70.B3dx6g+?  05:46:00  06:28:00

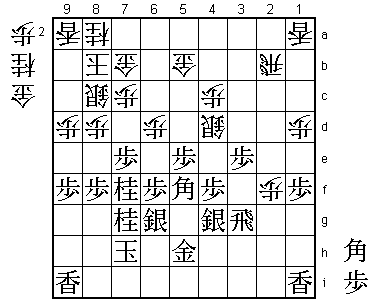
This is an overplay. Correct was the quiet 70.B1b. Sato feared 71.N*3d
P2f P*2b after this with pressure on white's major pieces, but after R3a
the position is unclear. Watanabe didn't think Bx6g+ was possible here
and admitted after the game that it had come as a big surprise to him.

71.S7fx6g    05:46:00  06:28:00
72.P2e-2f    05:46:00  06:28:00
73.P*2c      05:57:00  06:28:00
74.R2ax2c    05:57:00  06:33:00
75.B*5f!     05:58:00  06:33:00

The problem for white. This bishop works very well here as it attacks
both the white rook and the head of the white king.

76.R2c-2a    05:58:00  07:16:00

Or 76.P2g+ R3i +P3h R8i and black rides the tokin attack to move the rook
in the perfect position for the attack after P8e next. White can promote
the rook with R2h+ but the black attack is faster.

77.P*2b      06:12:00  07:16:00
78.R2ax2b    06:12:00  07:20:00
79.N*7f      06:15:00  07:20:00

This attacks both 8d and 6d, which are vital squares in the white camp.
The general opinion in the press room here was that Watanabe had a clear
advantage here.

80.S4dx5e    06:15:00  07:22:00
81.B5fx8c+   06:18:00  07:22:00
82.G7bx8c    06:18:00  07:24:00
83.B*3c      06:18:00  07:24:00
84.P*5g      06:18:00  07:38:00
85.G5h-6h    06:28:00  07:38:00
86.B*5i      06:28:00  07:49:00
87.B3cx2b+   06:52:00  07:49:00
88.B5ix3g+   06:52:00  07:49:00
89.+B2bx5e   06:52:00  07:49:00
90.+B3gx4g   06:52:00  07:49:00
91.N7fx6d    06:52:00  07:49:00

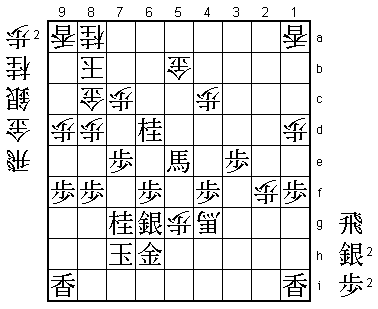
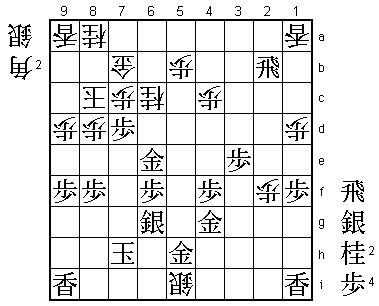
A large amount of pieces has changed hands and the position has become rather
complicated. Sato actually thought that he might be winning here because
the promoted bishop on 4g works well in defense.

92.G5b-6b?   06:52:00  07:56:00

This is an important mistake based on a oversight. In the post-mortem
analysis a lot of time was spent on this position and the conclusion
seems to be that after 92.S*5i instead, the position still would have
been unclear. For example, if black tries to go straight for the kill
with 93.R*7b K9c P9e (threatening mate after S*8b) then Sx6h+ K8g
(Kx6h leads to mate after N*7f) R*8i K7f Rx9i+ black can take away the
mating threat while putting pressure on the black king. Numerous other
variations were looked at, but no clear win for either side was found.

93.R*2b      07:01:00  07:56:00
94.G*6a      07:01:00  07:58:00
95.S*7b      07:08:00  07:58:00
96.S*5i      07:08:00  07:58:00
97.G6hx5g!   07:23:00  07:58:00

Sato had overlooked that he cannot take this gold because after 98.+Bx5g
the promoted bishop no longer defends 8c so black can win after Rx6b+!.
White has no mate and after Gx6b S*7a K9c Sx8c+ Kx8c G*8b K9c G*8c is
simple mate.

98.P*5b      07:23:00  07:59:00
99.G5gx4g    07:23:00  07:59:00

A free bishop and the end of the game.

100.G6ax7b   07:23:00  07:59:00
101.N6dx7b+  07:23:00  07:59:00
102.G6bx7b   07:23:00  07:59:00
103.G*5h     07:23:00  07:59:00
104.N*6c     07:23:00  07:59:00
105.+B5e-6e  07:23:00  07:59:00
106.P*6d     07:23:00  07:59:00
107.+B6ex8c  07:35:00  07:59:00
108.K8bx8c   07:35:00  07:59:00
109.B*5f     07:35:00  07:59:00
110.N*6e     07:35:00  07:59:00
111.N7gx6e   07:35:00  07:59:00
112.P6dx6e   07:35:00  07:59:00
113.B5fx6e   07:35:00  07:59:00
114.N*7d     07:35:00  07:59:00
115.P7ex7d   07:35:00  07:59:00
116.R*7e     07:35:00  07:59:00
117.G*7f     07:35:00  07:59:00
118.R7ex6e   07:35:00  07:59:00
119.G7fx6e   07:35:00  07:59:00
Resigns      07:35:00  07:59:00

Black has an easy win after Rx5b+ which threatens mate after
+Rx7b Kx7b N*6d etc. White has nothing he can do about that and
also has no effective attack, so Sato resigned here. This now gives
Watanabe a 3-1 lead in this match and he needs only one more win to
take the Osho title from Sato.
