52nd Oza Match Game 2
[Black "Habu Yoshiharu, Oza"]

[White "Moriuchi Toshiyuki, Challenger"]

[Event "52nd Oza-sen, Game 2"]

[Date "September 14th 2004"]

1.P7g-7f     00:00:00  00:00:00

2.P3c-3d     00:00:00  00:00:00

3.P2g-2f     00:02:00  00:00:00

4.P5c-5d     00:02:00  00:00:00

5.K5i-6h     00:05:00  00:00:00

6.P5d-5e     00:05:00  00:05:00

7.S3i-4h     00:06:00  00:05:00

8.R8b-5b     00:06:00  00:05:00


The Gokigen Nakabisha. A very popular opening, so no real surprise.


9.K6h-7h     00:06:00  00:05:00

10.K5a-6b    00:06:00  00:06:00

11.P4g-4f    00:08:00  00:06:00

12.K6b-7b    00:08:00  00:08:00

13.S4h-4g    00:08:00  00:08:00

14.K7b-8b    00:08:00  00:08:00

15.S7i-6h    00:10:00  00:08:00

16.S7a-7b    00:10:00  00:12:00

17.G4i-5h    00:14:00  00:12:00

18.P6c-6d    00:14:00  00:20:00

19.P2f-2e    00:42:00  00:20:00

20.B2b-3c    00:42:00  00:20:00

21.S4g-3f    00:42:00  00:20:00


Moving this silver up in this way is one of the latest strategies.

Black wants to attack the weak point 3d.


22.P5e-5f    00:42:00  00:26:00

23.B8hx3c+   00:45:00  00:26:00

24.N2ax3c    00:45:00  00:26:00

25.P5gx5f    00:45:00  00:26:00

26.R5bx5f    00:45:00  00:26:00

27.P2e-2d    00:46:00  00:26:00

28.P2cx2d    00:46:00  00:43:00


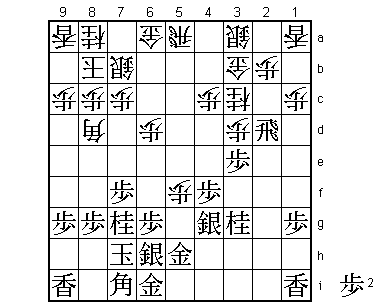
In the press room often wild variations are being analyzed, just

because these are more interesting. Murayama (4-dan) proposed

29.Rx7f here. Then, if 30.S7g Rx4f P*4g R5f Px2c+ P*2g Rx2g B*4i R2h

P*2g, black is in trouble: Sx2g fails to N4e and if black plays R1h,

the white pawn on 2g becomes a thorn in his side. However, if after

R4f, black plays S4g instead of P*4g, it seems that black has the upper

hand.


29.R2hx2d    00:49:00  00:43:00

30.P*2b      00:49:00  00:43:00

31.S3f-4g    01:10:00  00:43:00

32.R5f-5a    01:10:00  00:45:00

33.P3g-3f    01:14:00  00:45:00

34.G4a-3b    01:14:00  01:01:00

35.N2i-3g    01:24:00  01:01:00

36.P*5f      01:24:00  01:35:00

37.P3f-3e    01:48:00  01:35:00

38.B*4d      01:48:00  02:43:00

39.B*7g      02:03:00  02:43:00

40.B4dx7g+   02:03:00  02:52:00

41.N8ix7g    02:03:00  02:52:00

42.B*8d      02:03:00  02:57:00

43.B*7i!     02:20:00  02:57:00

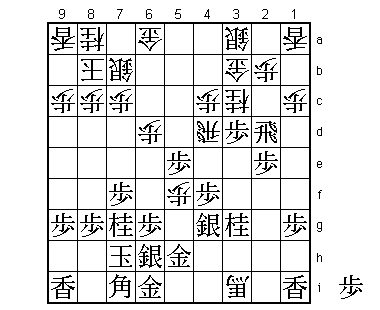
The move that was also proposed by Morishita, probably one of the best

defenders in the game. However, the other professionals preferred

43.B*6f. However, then 44.Bx6f Px6f Px3e P*3d P3f Sx3f B*3i and the

pawn on 6f becomes a liability. Morishita reasoned as follows:

If everything else on the board is even, dropping a bishop on 7i

would be out of the question, but here black has no pawns in front

of the rook, two pawns in hand and a good attack on the head of the

knight on 3c. There is no need for black to become greedy here by wanting

to use the bishop in a perfect way as well.


44.B8d-3i+?  02:20:00  03:15:00


A big mistake caused by completely overlooking a move. White has to

play 44.P2c here, but even then 45.R2f R5d P*5e Rx5e Px3d R3e R3f Rx3f

Sx3f R*3i Px3c+ Gx3c R*4a S3b Rx1a+ is good for black. It seems that

white is already in trouble after the strong bishop drop on 7i.


45.P3ex3d    02:30:00  03:15:00

46.R5a-5d    02:30:00  03:15:00

47.P*5e      02:30:00  03:15:00

48.R5d-4d    02:30:00  03:15:00

49.P*2e!     02:31:00  03:15:00

The move Moriuchi overlooked. He probably only considered 49.P1f here,

which looks promising after 50.P2c Px3c+ Rx2d P*2e R1d P1e. However, if

white just replies 50.P6e to 49.P1f, the position is unclear. After

49.P*2e, white loses a full knight without compensation. "With one move,

the game is over" (Moriuchi).


50.P2b-2c    02:31:00  03:54:00

51.P3dx3c+   02:43:00  03:54:00

52.P2cx2d    02:43:00  04:00:00

53.P4f-4e    02:44:00  04:00:00

54.G3bx3c    02:44:00  04:01:00

55.P4ex4d    02:44:00  04:01:00

56.P*3f      02:44:00  04:03:00

57.S4gx3f    02:57:00  04:03:00

58.R*3h      02:57:00  04:16:00

59.R*3e      03:18:00  04:16:00

60.S3a-2b    03:18:00  04:37:00

61.S3f-4g    03:25:00  04:37:00


A nice combination to save the knight. White gets no chance to get back

in the game.


62.R3h-2h+   03:25:00  04:37:00

63.N3g-4e    03:25:00  04:37:00

64.G3cx4d    03:25:00  04:41:00

65.R3e-3b+   03:25:00  04:41:00

66.G4dx4e    03:25:00  04:41:00

67.+R3bx2b   03:25:00  04:41:00

68.+R2hx1i   03:25:00  04:44:00

69.N*5c      03:32:00  04:44:00

70.G6a-7a    03:32:00  04:45:00

71.S*6c      03:32:00  04:45:00

72.N*5g      03:32:00  04:57:00

73.S6cx7b=   03:52:00  04:57:00

74.G7ax7b    03:52:00  04:57:00

75.S*6c      03:52:00  04:57:00

76.L*7a      03:52:00  04:57:00

77.S6cx7b=   03:55:00  04:57:00

78.L7ax7b    03:55:00  04:57:00

79.G*6b      03:55:00  04:57:00

80.P8c-8d    03:55:00  04:59:00

81.G6bx7b    03:57:00  04:59:00

82.K8b-8c    03:57:00  04:59:00

83.S6hx5g    03:57:00  04:59:00

84.P5fx5g+   03:57:00  04:59:00

85.G7b-8b    03:57:00  04:59:00

86.K8c-7d    03:57:00  04:59:00

87.+R2b-6b   03:57:00  04:59:00

Resigns      03:57:00  04:59:00

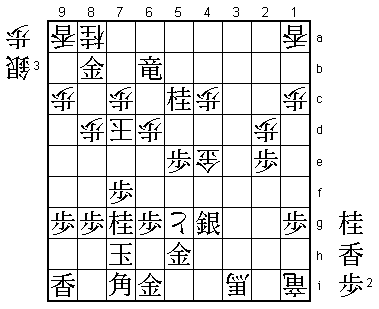
No defence against the double mating threat N*6f and N*8f and also

no effective checks. An unusual loss for Moriuchi, who does not miss

much and is famous for giving his opponents the feeling that they are

playing against a wall. After losing the Kisei match in straight games

against Sato, he is in danger of doing the same in the Oza. On the other

hand, Habu is now on the brink of claiming his 13th consecutive Oza title.

Can Moriuchi use the long three-week break until game 3 to recover?
