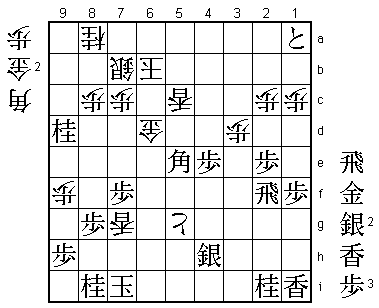
51st Oi Match Game 5 (Replay)
[Black "Fukaura Koichi, Oi"]
[White "Hirose Akihito, Challenger"]
[Event "51st Oi-sen, Replay Game 5"]
[Date "August 25th 2010"]
1.P7g-7f     06:00:00  00:00:00

This replay of the fifth game started one hour after the sennichite game finished.
The game is played with reversed colors with each player playing with the remaining
time on the clock from the first game, with a minimum of two hours. Fukaura had used
two minutes longer in the first game than Hirose, so he starts with two hours on the
clock, while Hirose starts with two hours and two minutes.

2.P3c-3d     06:00:00  05:58:00
3.P2g-2f     06:00:00  05:58:00
4.P4c-4d     06:00:00  05:58:00
5.S3i-4h     06:00:00  05:58:00
6.R8b-4b     06:00:00  05:58:00
7.K5i-6h     06:01:00  05:58:00
8.K5a-6b     06:01:00  06:00:00
9.K6h-7h     06:01:00  06:00:00
10.K6b-7b    06:01:00  06:00:00
11.P5g-5f    06:01:00  06:00:00
12.S3a-3b    06:01:00  06:00:00
13.B8h-7g    06:02:00  06:00:00
14.S3b-4c    06:02:00  06:00:00
15.K7h-8h    06:02:00  06:00:00
16.K7b-8b    06:02:00  06:00:00
17.G6i-7h    06:05:00  06:00:00
18.B2b-3c    06:05:00  06:00:00
19.P2f-2e    06:05:00  06:00:00
20.G4a-5b    06:05:00  06:01:00
21.S4h-5g    06:05:00  06:01:00
22.S4c-5d    06:05:00  06:03:00
23.P5f-5e    06:10:00  06:03:00

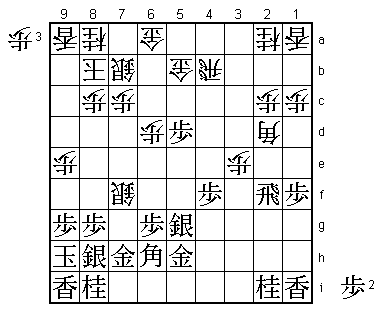
Despite the lack of opening success in the sennichite game, Fukuara again plays
the similar idea of inviting the silver up the board. Of course, the position is
quite different, if only because the colors are reversed.

24.S5d-6e    06:10:00  06:04:00
25.R2h-2f    06:10:00  06:04:00

This time Fukaura doesn't allow the immediate capture of the pawn at the head of
the bishop, but this will still happen eventually.

26.P4d-4e    06:10:00  06:06:00
27.K8h-9h    06:10:00  06:06:00
28.S7a-7b    06:10:00  06:07:00
29.G4i-5h    06:13:00  06:07:00
30.P4e-4f    06:13:00  06:16:00
31.P4gx4f    06:18:00  06:16:00
32.S6ex7f    06:18:00  06:16:00
33.B7g-6h    06:18:00  06:16:00
34.P6c-6d    06:18:00  06:24:00
35.P3g-3f    06:21:00  06:24:00
36.P9c-9d    06:21:00  06:26:00
37.P3f-3e    06:26:00  06:26:00
38.P3dx3e    06:26:00  06:27:00
39.P1g-1f    06:27:00  06:27:00
40.P9d-9e    06:27:00  06:29:00
41.S7i-8h    06:29:00  06:29:00
42.P5c-5d    06:29:00  06:47:00
43.P2e-2d    06:32:00  06:47:00
44.B3cx2d    06:32:00  06:54:00
45.P5ex5d    06:32:00  06:54:00

46.R4b-4d    06:32:00  06:58:00

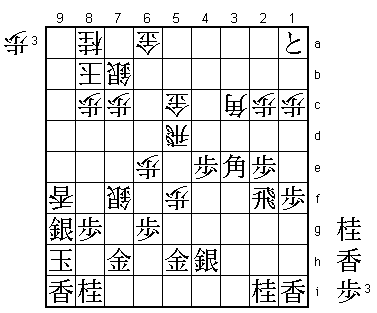
This is a change of plan, because Hirose originally wanted to pull back the silver
 with 46.S6e followed by Sx5d, but here he realized that the black bishop would be
too strong after 47.B7g. Then the only way to defend against Bx1a+ is to drop a pawn
on 4d, but there is no way white can win this game with a pawn blocking both the rook
and an important bishop diagonal. A huge positional oversight by Hirose, but like in
the first game, he is lucky that there are no dire consequences.

47.P*2b      06:39:00  06:58:00
48.N2a-3c    06:39:00  06:58:00
49.P5d-5c+   06:39:00  06:58:00
50.G5bx5c    06:39:00  06:58:00
51.P2b-2a+   06:39:00  06:58:00
52.R4d-5d    06:39:00  07:02:00
53.P*2e      07:01:00  07:02:00
54.P*5f      07:01:00  07:09:00
55.S5g-4h    07:01:00  07:09:00
56.N3c-4e!   07:01:00  07:09:00

This knight sacrifice opens the lines for rook and bishop and white still has fighting
chances despite the loss of material.

57.P4fx4e    07:01:00  07:09:00
58.B2d-3c    07:01:00  07:09:00
59.+P2ax1a   07:04:00  07:09:00
60.P6d-6e    07:04:00  07:23:00
61.B6hx3e    07:04:00  07:23:00
62.P9e-9f    07:04:00  07:24:00

Hirose said after the game that he was not happy with having to start a desperate attack
here with a lance and knight down, but this edge attack is very strong.

63.P9gx9f    07:05:00  07:24:00
64.P*9g      07:05:00  07:24:00
65.S8hx9g    07:06:00  07:24:00
66.L9ax9f    07:06:00  07:25:00

67.P*7g?     07:12:00  07:25:00

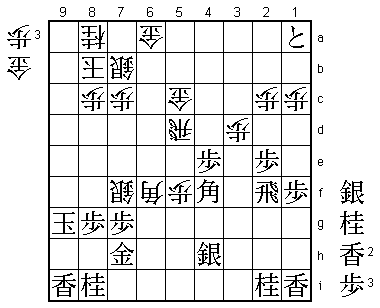
It is easy to imagine that Fukuara wanted to remove the silver from 7f which is a thorn
in his side. However, because the bishop on 3c is so strong, black doesn't get the
opportunity to actually take this silver until much later, which makes 67.P*7g more or
less a waste of time. Correct was 67.Sx9g P*9e Sx9e P*9g Nx9g P*9f which looks pretty
strong, but as Hirose pointed out, white has no pieces in hand to back up the attack.
After 67.P*7g, the white attack becomes very strong.

68.L9fx9g+   07:12:00  07:43:00
69.K9hx9g    07:12:00  07:43:00
70.S*6i      07:12:00  07:43:00
71.G5h-6h    07:12:00  07:43:00
72.P*3d      07:12:00  07:43:00
73.B3e-4f    07:23:00  07:43:00
74.S6ix7h+   07:23:00  07:44:00
75.G6hx7h    07:23:00  07:44:00
76.P6e-6f    07:23:00  07:47:00
77.P6gx6f    07:24:00  07:47:00
78.B3cx6f    07:24:00  07:47:00

79.L*5e?!    07:27:00  07:47:00

After the game Fukaura said that he regretted this move and should have played 79.K8h
instead. Hirose countered that putting the king into the diagonal of the bishop looks
very dangerous and the post-mortem analysis seemed to back this up. For example, 79.G*6g
looks very strong for white because he can still take the silver on 4h at any time.

80.B6fx5e    07:27:00  07:49:00
81.B4fx5e    07:27:00  07:49:00
82.L*9a      07:27:00  07:50:00
83.K9g-8h    07:28:00  07:50:00
84.L9ax9i+   07:28:00  07:50:00
85.P7gx7f    07:30:00  07:50:00
86.R5dx5e    07:30:00  07:51:00
87.N*9d      07:30:00  07:51:00
88.K8b-7a    07:30:00  07:55:00
89.L*6i      07:32:00  07:55:00
90.L*6e      07:32:00  07:56:00
91.K8hx9i    07:39:00  07:56:00
92.L6ex6i+   07:39:00  07:56:00
93.L*6g      07:39:00  07:56:00
94.P*6d      07:39:00  07:56:00
95.P*6b      07:45:00  07:56:00
96.K7ax6b    07:45:00  07:56:00
97.S*4b      07:45:00  07:56:00
98.P*9g      07:45:00  07:56:00
99.P*9h      07:45:00  07:56:00
100.P9gx9h+  07:45:00  07:56:00
101.K9ix9h   07:45:00  07:56:00
102.P*9g     07:45:00  07:56:00
103.K9hx9g   07:45:00  07:56:00
104.P*9f     07:45:00  07:56:00
105.K9g-8h   07:45:00  07:56:00

106.G6a-5b!  07:45:00  07:56:00

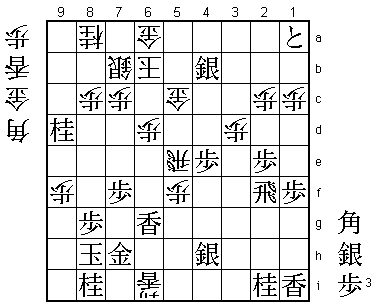
Fukaura has been fighting hard to make something out of nothing, but this decides the
game. With the silver in hand, white has a mating threat, so this combines attack and
defense.

107.S4bx5c=  07:50:00  07:56:00
108.G5bx5c   07:50:00  07:57:00
109.P*9h     07:51:00  07:57:00

Defends against the mate, but the white attack cannot be stopped.

110.S*7i!    07:51:00  07:57:00

This next blows strips the king of its defenders.

111.G7hx7i   07:52:00  07:57:00
112.+L6ix7i  07:52:00  07:57:00
113.K8hx7i   07:53:00  07:57:00
114.P5f-5g+  07:53:00  07:57:00

Threatening mate again and there is no defense.

115.L6gx6d   07:53:00  07:57:00
116.G5cx6d   07:53:00  07:57:00
117.B*4d     07:53:00  07:57:00
118.L*5c     07:53:00  07:57:00
119.B4dx5e   07:53:00  07:57:00
120.L*7g     07:53:00  07:57:00
Resigns      07:53:00  07:57:00

A nice lance sacrifice to end the game, because this blocks the escape route through 7g.
Both 120.Bx7g and 120.Nx7g lead to mate after 121.G*7h Kx7h B*6g etc. After a total of
269 moves spread over two games and well after one o'clock in the morning the fifth game
of this Oi match is finally decided in Hirose's favor. From the way he played, this was
very much deserved, putting the pressure on Fukaura almost all of the time. He may have
been a bit lucky to escape with the victory, but he is now only one win from winning his
first major title.
