51st Oi Match Game 3
[Black "Hirose Akihito, Challenger"]
[White "Fukaura Koichi, Oi"]
[Event "51st Kio-sen, Game 3"]
[Date "August 3rd and 4th 2010"]
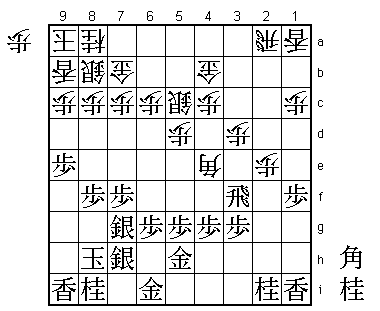
1.P7g-7f 00:00:00 00:00:00
2.P3c-3d 00:00:00 00:01:00
3.P2g-2f 00:02:00 00:01:00
Hirose changes the opening pattern of this match by showing his willingness to play
Ibisha instead of Furibisha here. If this was an attempt to throw his opponent off
balance, Fukaura's next move will have been a surprise.
4.B2b-3c!? 00:02:00 00:07:00
Fukaura answers Hirose's invitation for a different opening with the unusual 4.B3c
strategy, which is not often seen at this level.
5.B8hx3c+ 00:06:00 00:07:00
6.N2ax3c 00:06:00 00:07:00
7.P2f-2e 00:06:00 00:07:00
8.R8b-2b 00:06:00 00:10:00
9.P9g-9f 00:14:00 00:10:00
10.S3a-4b 00:14:00 00:16:00
11.P9f-9e 00:15:00 00:16:00
12.K5a-6b 00:15:00 00:17:00
13.S7i-7h 00:21:00 00:17:00
14.K6b-7b 00:21:00 00:21:00
15.K5i-6h 00:22:00 00:21:00
16.K7b-8b 00:22:00 00:25:00
17.K6h-7i 00:26:00 00:25:00
18.P5c-5d 00:26:00 00:25:00
19.P8g-8f 00:43:00 00:25:00
20.S4b-5c 00:43:00 00:32:00
21.K7i-8h 01:02:00 00:32:00
22.L9a-9b 01:02:00 00:48:00
23.S3i-4h 01:17:00 00:48:00
24.K8b-9a 01:17:00 00:52:00
25.S4h-5i 01:24:00 00:52:00
26.S7a-8b 01:24:00 01:37:00
27.S5i-6h 01:24:00 01:37:00
28.R2b-2a 01:24:00 01:49:00
29.S6h-7g 01:32:00 01:49:00
30.G4a-4b 01:32:00 01:50:00
31.G4i-5h 01:36:00 01:50:00
32.G6a-7b 01:36:00 01:58:00
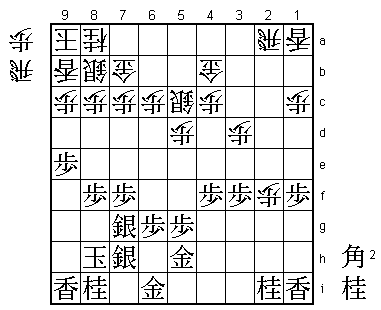
33.P1g-1f 02:10:00 01:58:00
34.N3cx2e 02:10:00 03:08:00
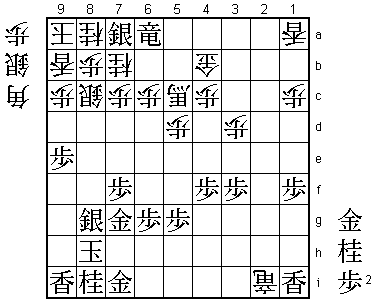
Fukaura has moved into the Furibisha Anaguma and Hirose has taken the time to build
this castle to move the silver over to the king side. Both players have been very
careful not to allow their opponent effective bishop drops while building their
position. This sacrifice of the knight on 2e is always a major theme in this opening,
but the timing is difficult. Fukaura decides to play it here, because 33.P1f takes
away an escape square for the rook. Also, black has still many moves to improve his
position, while white is starting to run out of moves.
35.R2hx2e 02:22:00 03:08:00
36.P2c-2d 02:22:00 03:08:00
37.R2e-2f 02:22:00 03:08:00
38.P2d-2e 02:22:00 03:14:00
39.R2f-3f 02:25:00 03:14:00
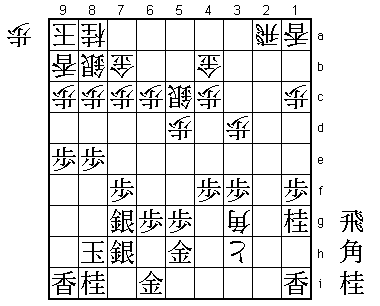
40.B*4e 02:25:00 03:15:00
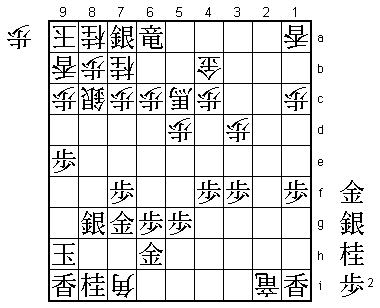
41.P4g-4f    04:23:00  03:15:00

Hirose took almost two hours for this move, which was also the sealed move in this
game. The alternative 41.R6f is not so appealing after 42.B2g+ P8e +B2h which threatens
to pick up the lance and knight next, thus forcing black into premature action. The
meaning behind 41.P4f will become clear soon.

42.B4ex3f    04:23:00  03:28:00
43.P3gx3f    04:23:00  03:28:00
44.P2e-2f    04:23:00  03:28:00
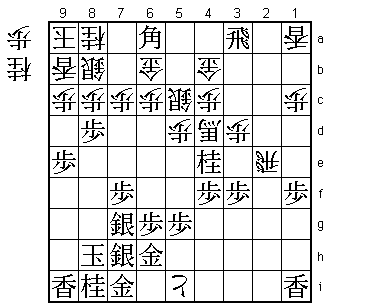
45.B*4g      04:29:00  03:28:00

This is what Hirose was aiming for. The bishop aims at the weakest point of the
Anaguma at 8c.

46.P2f-2g+   04:29:00  03:47:00
47.B*6e      04:40:00  03:47:00

A second bishop drop on this line, which now looks very dangerous.

48.R*6d!     04:40:00  04:38:00

The cheap alternative is 48.P6d but after either 49.B6e-5f P5e B4e or the immediate
49.N*8d, white seems to be in trouble. 48.R*6d acknowledges the power of the two
bishops, as Fukaura is willing to trade back the rook for the bishop.

49.P8f-8e    04:57:00  04:38:00
50.R6dx6e    04:57:00  04:38:00
51.B4gx6e    04:57:00  04:38:00
52.B*3h!     04:57:00  04:38:00

This not only eliminates the second bishop on this diagonal, but activates the
tokin at the same time.

53.B6ex3h    05:01:00  04:38:00
54.+P2gx3h   05:01:00  04:39:00
55.N2i-1g    05:03:00  04:39:00
56.B*3g!     05:03:00  04:39:00
This is a going to be a very strong promoted bishop. The general opinion in the
press room was that Fukaura had the advantage here, but the post-mortem analysis
seemed to indicate that the position is still very much unclear.
57.N*4e 05:32:00 04:39:00
58.+P3h-4h 05:32:00 04:50:00
59.G5h-6h 05:32:00 04:50:00
60.+P4h-5i 05:32:00 04:52:00
61.G6i-7i 05:32:00 04:52:00
62.B3g-2f+ 05:32:00 04:53:00
63.N1g-2e 05:41:00 04:53:00
64.R2ax2e 05:41:00 05:11:00
65.R*3a 05:43:00 05:11:00
66.+B2f-4d 05:43:00 05:25:00
67.B*6a 06:17:00 05:25:00
68.G7b-6b 06:17:00 05:51:00
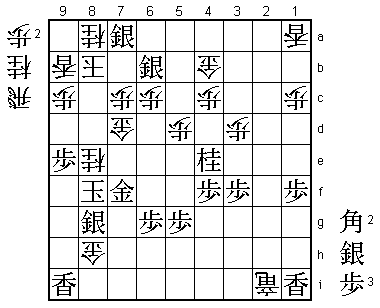
69.P8e-8d 06:18:00 05:51:00
Hirose has found a way to attack the weak point of the Anaguma again. The black
attack is quite difficult to defend against.

70.N*7b      06:18:00  05:52:00

Not much choice. 70.Px8d is met by 71.P9d and the black attack is only gaining
steam.

71.P8dx8c+   07:29:00  05:52:00
72.S8bx8c    07:29:00  05:52:00
73.N4ex5c+   07:34:00  05:52:00

In the press room the variation 73.P*8d Sx8d Nx5c+ +Bx5c Bx4c+! Gx4c P*8c was
analyzed, but can be met with R*8e and the black king is suddenly in a lot of
danger.

74.+B4dx5c   07:34:00  05:52:00
75.R3a-5a+   07:34:00  05:52:00
76.P*8b      07:34:00  06:26:00
77.S7h-8g!   07:34:00  06:26:00

Hirose isn't afraid to switch back to defense in the heat of the semeai. The position
is still unclear.

78.+P5i-5h   07:34:00  06:47:00
79.G6hx5h    07:34:00  06:47:00
80.R2e-2i+   07:34:00  06:47:00
81.S*7a      07:39:00  06:47:00
82.G6bx6a    07:39:00  07:03:00
83.+R5ax6a   07:39:00  07:03:00
84.N*8e      07:39:00  07:03:00
85.G5h-6h    07:51:00  07:03:00
86.N8ex7g+   07:51:00  07:16:00
87.G6hx7g    07:51:00  07:16:00
Looks dangerous, but 87.Nx7g is met by 88.S*9g Lx9g B*9i K7h +Bx7i +Rx7a S*8h which
seems to give white a decisive attack.

88.S*6h      07:51:00  07:18:00
89.G7ix6h    07:51:00  07:18:00
90.B*7i      07:51:00  07:18:00

The moves 88.S*6h and 90.B*7i look like simple chasing moves, but they seem to be
the best option Fukuara had.

91.K8h-9h    07:51:00  07:18:00
92.B7ix6h+?  07:51:00  07:23:00

Probably the only mistake Fukaura made in this game. Correct was 92.+Bx7a +Rx7a
S*8h! (threatening mate with Sx8i= Kx8i Bx6h+ etc.) N*8e! (defending the mating
threat with a mating threat) N*8d! which defends against mate and threatens the
long mate Sx8i= Kx8i Bx6h+ K9h +Rx9i Kx9i +Bx7g G*8h L*9g etc. Difficult to spot,
but Hirose seems to have seen it during the game as he pointed out this variation
to Fukaura in the post-mortem analysis.

93.S*8h      07:55:00  07:23:00

This fixes the important hole on 8h and white now suddenly has no good moves to
continue the attack while a knight drop on 7e is looming.

94.+B5cx7a   07:55:00  07:54:00

Fukaura spent 31 minutes of his remaining 37 minutes on this move, a clear indication
that he had realized his mistake and desperately was looking for a way it. Unfortunately
for him, there isn't any.

95.+R6ax7a   07:55:00  07:54:00
96.S*7i      07:55:00  07:54:00
97.G*7h      07:55:00  07:54:00
98.S7ix8h+   07:55:00  07:54:00
99.K9hx8h    07:56:00  07:54:00
100.G*7i     07:56:00  07:54:00
101.N*7e     07:56:00  07:54:00
102.G7ix8i   07:56:00  07:56:00
103.K8h-9g   07:56:00  07:56:00
104.S*7d     07:56:00  07:58:00
105.S*6b     07:56:00  07:58:00
106.N*8e     07:56:00  07:58:00
107.K9g-8f   07:56:00  07:58:00
108.S7dx7e   07:56:00  07:58:00
109.P7fx7e   07:56:00  07:58:00
110.+B6hx7g  07:56:00  07:58:00
111.G7hx7g   07:56:00  07:58:00
112.S8c-8d   07:56:00  07:58:00
113.+R7ax7b  07:57:00  07:58:00
114.S8dx7e   07:57:00  07:58:00
115.K8fx7e   07:58:00  07:58:00
116.+R2i-2e  07:58:00  07:58:00
117.N*4e     07:58:00  07:58:00
118.G*7d     07:58:00  07:58:00
119.K7e-8f   07:58:00  07:58:00
120.G8i-8h   07:58:00  07:58:00
121.G7g-7f   07:58:00  07:58:00
122.+R2e-2i  07:58:00  07:59:00
123.+R7bx8b  07:58:00  07:59:00
124.K9ax8b   07:58:00  07:59:00
125.S*7a     07:58:00  07:59:00
Resigns      07:58:00  07:59:00
Mate after 126.K8c B*6a N*7b (K8d S*7e Gx7e Gx7e mate) Bx7b+ Kx7b B*6a. Another
strong game by the young challenger, who takes a 2-1 lead in the match. Fukaura
may have won the Oi title three times in a row, but he has his hands more than
full this time. He is not in the same dire situation he was in last year against
Kimura, but there will be a lot of pressure for him in the next game. The good
news: this crucial fourth game will again be played in his hometown of Sasebo on
the southern island of Kyushu.