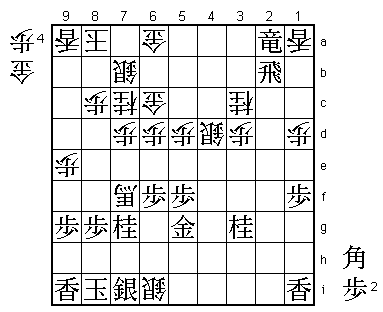
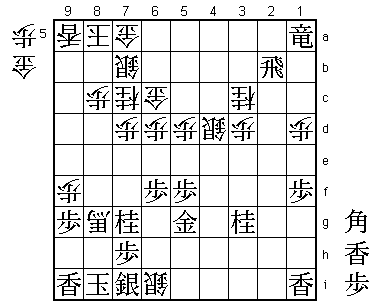
48th Oza Match Game 1
Black: Habu Yoshiharu, Oza
White: Fujii Takeshi, Challenger
48th Oza-sen, Game 1, August 29th 2000
1.P7g-7f     0/0       0/0
2.P3c-3d     0/0       3/3
3.P2g-2f     3/3       0/3
4.P4c-4d     0/3       2/5
5.P2f-2e     1/4       0/5
6.B2b-3c     0/4       0/5
7.S3i-4h     0/4       0/5
8.S3a-3b     0/4       4/9
9.P5g-5f     5/9       0/9
10.R8b-4b    0/9       1/10
11.K5i-6h    4/13      0/10
12.P9c-9d    0/13      2/12
13.K6h-7h    2/15      0/12
14.S3b-4c    0/15      4/16
15.G4i-5h    6/21      0/16
16.S7a-7b    0/21      3/19
17.S4h-5g    9/30      0/19
18.P9d-9e    0/30      6/25
19.B8h-7g    12/42     0/25
20.P7c-7d    0/42      12/37
21.P6g-6f    12/54     0/37
22.P6c-6d    0/54      12/49
23.G5h-6g    12/66     0/49
24.N8a-7c    0/66      8/57

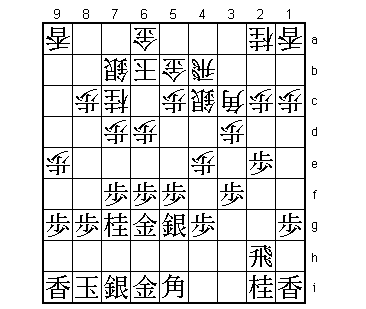
A long awaited battle between the Ryu-O and the holder of five major crowns.
Fujii is one of the few players with a positive score against Habu, leading
5-2. Not too many games, so it is too early to label Fujii as a "Habu killer",
but he will have been a lot more confident going into this match than most
of the other players. We will know a little more after this match and the
upcoming Ryu-O match, where Fujii and Habu will also meet.

The opening in the games between Fujii and Habu is easy to predict. Fujii will
play the Furibisha system that has his name, and Habu will have to come up
with some new ideas.

25.B7g-5i    2/68      0/57
26.P4d-4e    0/68      61/118
27.N8i-7g    2/70      0/118
28.K5a-6b    0/70      1/119
29.P3g-3f    11/81     0/119
30.G4a-5b    0/81      0/119
31.K7h-8i    4/85      0/119

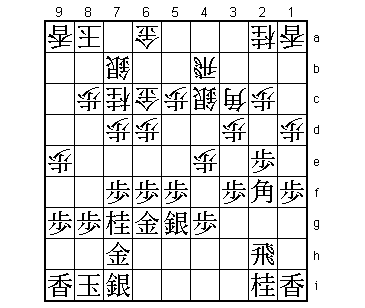
In this game, Habu chooses the castle that has been named "Millennium" as it
has only recently become popular among professionals. The basic structure
is L9i-K8i-N7g-S7i-G7h-G6g-S5g where the silver on 5g can be pulled back to
7i (after S7i-8h) to make the castle even stronger. The Millennium is not
as strong as the anaguma, but it is far from easy to break down.

32.K6b-7a    0/85      0/119
33.G6i-7h    2/87      0/119
34.G5b-6c    0/87      3/122
35.P1g-1f    6/93      0/122
36.P1c-1d    0/93      0/122
37.B5i-2f    6/99      0/122

This is a new idea. In the semi-final of the Oza challenger tournament between
Fujii and Sato, Sato used this bishop on 6h (actually on 4b as the colours were
reversed in that game) after pulling back the silver from 5g to 7i.

38.K7a-8a!?  0/99      14/136

Deep judgement. The normal square for the king is 8b, but Fujii is anticipating
a fight on the edge and on the 7th file, where the weak points of the black
castle are. If this would happen, the king on 8a is in a better position, as
it is further away from the danger area. In this game this move does not make
a difference, but it shows Fujii's deep understanding of this type of position
that he moves his pieces to unexpected squares.

39.S5g-6h    22/121    0/136
40.P5c-5d    0/121     28/164
41.N2i-3g    33/154    0/164
42.S4c-4d    0/154     27/191
43.R2h-4h    9/163     0/191
44.S4d-5c    0/163     0/191
45.S6h-5g    6/169     0/191
46.B3c-4d    0/169     8/199
47.B2fx4d    13/182    0/199
48.S5cx4d    0/182     0/199
49.P2e-2d    1/183     0/199
50.P2cx2d    0/183     7/206
51.P4g-4f    0/183     0/206
52.P4ex4f    0/183     25/231
53.S5gx4f    0/183     0/231
54.B*2g      0/183     13/244
55.P*4c      26/209    0/244
56.R4bx4c    0/209     3/247
57.R4h-2h    26/235    0/247

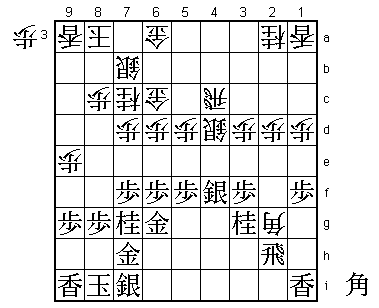
A change of plan that makes clear that Habu's opening strategy has failed.
His original idea was 57.B*3b R4b Bx2a+ Bx3f+ +B3a R6b G5g, but when he
looked at it again here, he suddenly lost confidence in his position after
P7e next.

58.B2gx3f+   0/235     18/265
59.R2hx2d    0/235     0/265
60.P*2c      0/235     4/269
61.B*3b      0/235     0/269
62.R4c-3c    0/235     1/270
63.B3bx2c+   0/235     0/270
64.+B3fx4f   0/235     0/270
65.+B2cx3c   0/235     0/270
66.N2ax3c    0/235     0/270
67.R2d-2a+   0/235     0/270
68.S*6i!     0/235     3/273

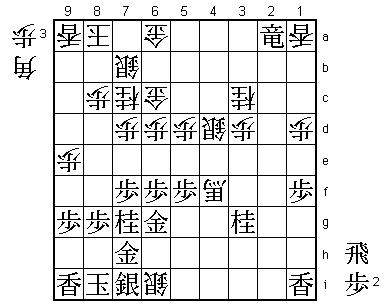
"That's too quick" was a comment heard in the press room, but Fujii again has
judged this well. Not worried at all by Habu's magical endgame powers, he
trusts his own calculations and goes straight for the black king.

69.G7h-6h    26/261    0/273

The least attractive looking move, but 69.R*4b Sx7h+ Kx7h G*5a Rx4d+ B*3e
is bad for black because of the big difference in king position. Also,
69.G6g-6h Sx7h+ Gx7h and white has managed to exchange a general from
black's castle and B*3e is now very strong.

70.B*4i      0/261     6/279
71.G6g-5g    0/261     0/279
72.+B4fx5g   0/261     1/280
73.G6hx5g    0/261     0/280
74.B4ix7f+   0/261     1/281
75.R*2b?     5/266     0/281

Uncharacteristic endgame error by Habu. Despite Fujii's confident and strong
looking attack, Habu could still have caused him some problems with dropping
the rook on square to the left. After 75.R*3b, the game move 76.G7a fails to
77.R3a+ and now white has to drop a gold in defence after which K8h is good
enough to survive. The correct reply to 75.R*3b is 76.P*4a, and after
77.+Rx4a G*5a +Rx4d +Bx7g P*7h N6e Px7g Nx5g+ white still is better, but
things are still a little complicated.

76.G6a-7a    0/266     3/284
77.P*7h      8/274     0/284
78.P9e-9f    0/274     4/288
79.+R2ax1a   15/289    0/288
80.+B7fx8g   0/289     5/293
Resigns      6/295     0/293
Time:        04:55:00  04:53:00

After both 80.P*8h G*9h and 80.Px9f G*8h Sx8h Sx7h+ black is mated. A perfect
start for challenger Fujii in this match. Not only did he win the game, he
won it by outplaying Habu, establishing the dominance of the Fujii system
in the process. Habu's recent endgame errors (in this game and in the 4th
game of the Oi match against Tanigawa) seem to indicate that his exhausting
schedule is giving him problems with his concentration. He will have his
hands full against a rested and confident Fujii...
