|
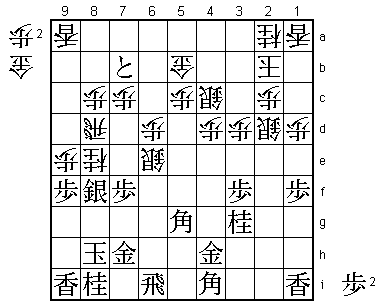
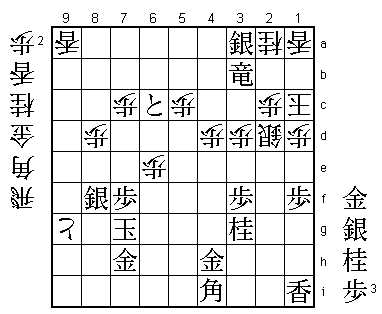
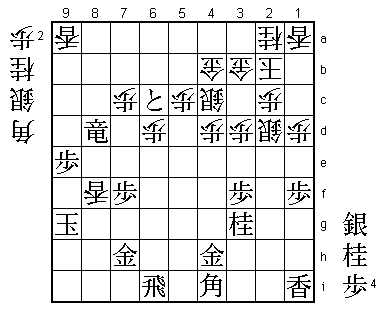
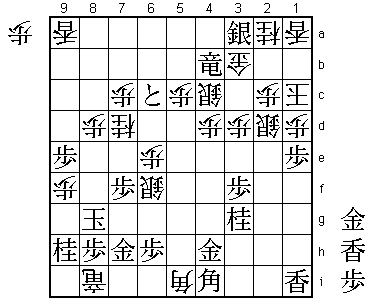
| Diagram 1 |
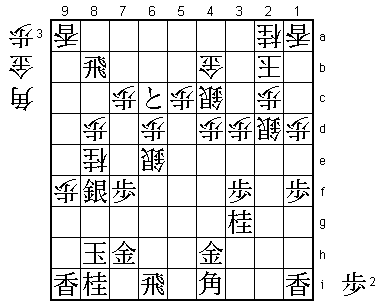
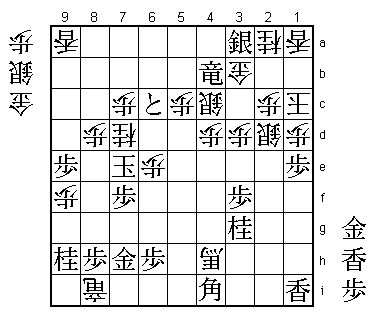
The position in Diagram 1 is from the endgame of the 6th Game of the 46th Meijin Title Match. The Meijin Nakahara had just dropped his pawn on 8c in reply to my bishop drop B*5g. At this point, both players had just over one hour left, so we were under pressure from the clock. The advantage had already changed hands a couple of times, and in the back of both players' minds was the nagging feeling that we had missed opportunities. This was also a very big game. If I won I would become Meijin, but if I lost the score would be three all and the title would be decided in the final, 7th game.
During the 30 or so moves played from this position, we both made one bad move each. In a normal shogi game at this level such mistakes would be unthinkable, but they happen in big matches. Time pressure, lingering regrets about earlier moves, the importance of the occasion. These factors combined to bring about two serious mistakes.
After 13 minutes' thought, Nakahara had defended his rook on 8d with ... P*8c in response to my B*5g. Instead of this, he could have counterattacked with ... N-9g+; Kx9g Px9f; K-8g Px9g+; Lx9g P*8e; S-7e G*8f; Sx8f Px8f; K-7g Lx9g+; Nx9g, reaching the position in Diagram A.
 |
| Diagram A |
I think Nakahara must have spent most of those 13 minutes looking at this variation. This is certainly a frightening line for Black, but White has a large material deficit and if he cannot finish Black off in this position he will lose. It is actually very difficult to find a clear win here, so Nakahara avoided these rapids for the quieter waters of ... P*8c.
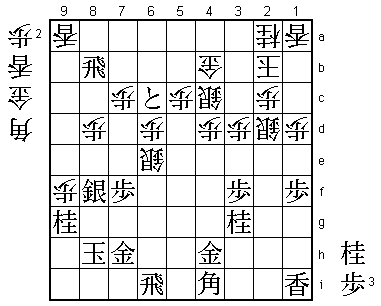
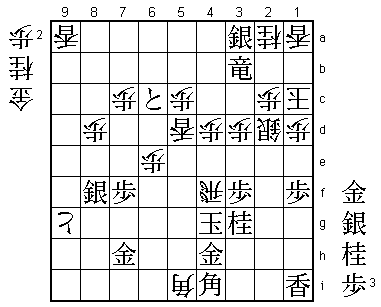
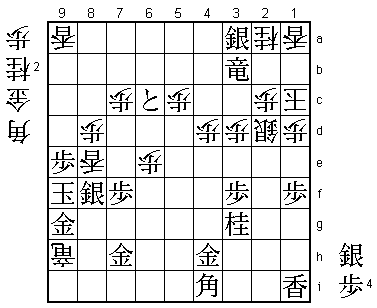
I played +P-6b. If ... Gx6b; Bx8d Px8d; R*4b wins, so White has to escape with G-4b, to which I replied +P-6c (Diagram 2).
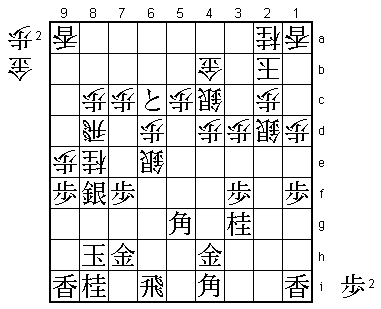 |
| Diagram 2 |
This tokin move +P-6c was an over-refinement or perhaps the product of too much thought. At any rate, it lacks punch. If I had simply played Bx8d Px8d; R*8a (Diagram B), I would have had a clear advantage. If I get a bishop or silver in hand, the drop on 3a will be very unpleasant for White, and I can always take the lance on 9a and use it to extinguish any attack. I was a little concerned about ... B*5e, but after P*6f Sx6f; P*5f Black is fine. The two pawns in hand enable Black to defend in this line.
 |
| Diagram B |
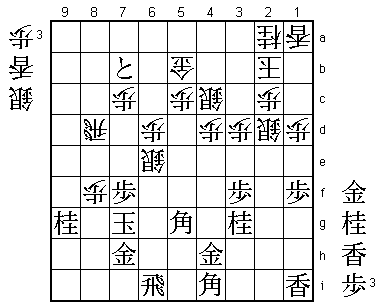
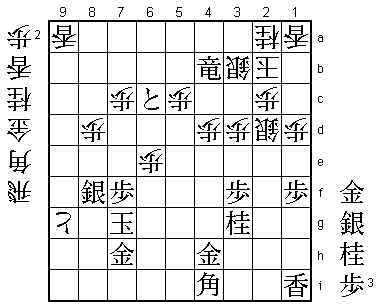
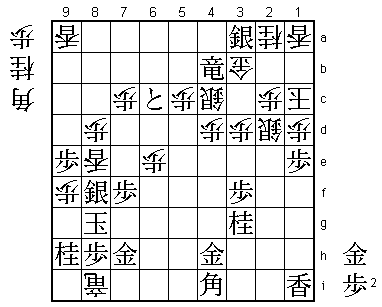
From Diagram 2, play continued ... Px9f; Bx8d Px8d; R*8b, reaching Diagram 3.
 |
| Diagram 3 |
R*8b was the move I pinned my hopes on when I played +P-6c. If White replies ... G-3b or S-3c, I have +Px5c. And if White drops his gold defensively with G*3b, he no longer has any attacking forces. When you have no suitable defense, you have to counterattack. Of course I knew that Nakahara would not defend in this position.
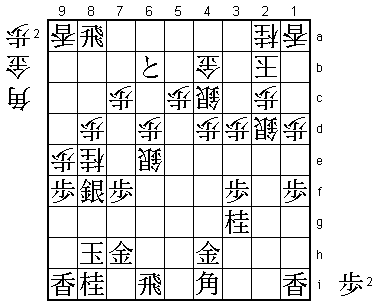
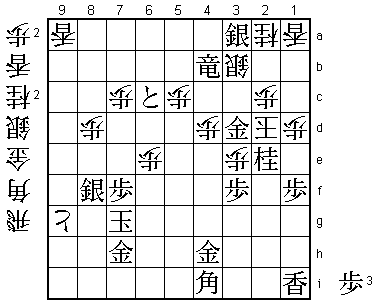
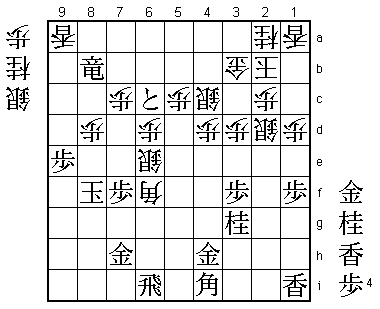
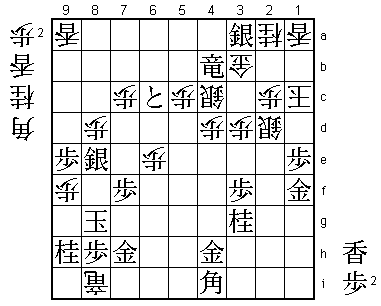
From Diagram 3, the game continued ... P-9g+; Lx9g Nx9g+; Nx9g P*9f (Diagram 4).
 |
| Diagram 4 |
At this point I froze. It may seem incredible, but I had completely overlooked ... Nx9g+. Somehow I had thought that, because I recaptured on 9g with the lance, White would play ... Lx9g+ and did not even consider the simple ... Nx9g+. I can only put this down to the pressure of the occasion.
If you look at the position in Diagram 4, you will appreciate the vital difference between ... Nx9g+ and ... Lx9g+. After ... Lx9g+, White has a knight on 8e instead of a lance on 9a, and when he plays P*9f, Black can escape while removing the knight with Nx8e. But in Diagram 4 this is not possible. So can I actually press home my attack first in this position? If Rx4b+ G*3b; +R-6b Px9g+; K-7i N*6f and White's attack is one move faster. On the other hand, if Rx6e Px9g+; K-7g Px6e; Rx4b+ S*3b, we reach the position in Diagram C.
 |
| Diagram C |
Now if S*3a K-1c; N*2e Sx2e; Nx2e K-2d; S*3e Px3e; G*3d (Diagram D).
 |
| Diagram D |
If White takes the gold here with ... Kx3d, it is forced mate after +Rx3b, but if ... Kx2e; Gx3e K-2f, Black has no mate (P*2g being illegal).
Returning to Diagram C, how about putting White in brinkmate with S*3a K-1c; +Rx3b (Diagram E)?
 |
| Diagram E |
But here White can force mate with ... B*5i; K-6g R*6f; K-5g (or K-5h N*4f) ... L*5d; K-4g R-4f (Diagram F), etc.
 |
| Diagram F |
At first sight, it looks as though White will have not enough material to mate if he interposes a piece after Rx4b+, but this forcing line from Diagram E shows that he can interpose with ... S*3b and still have just enough pieces in hand to deliver mate.
After we reached the position in Diagram 4, I thought for 12 minutes. Having concluded that I would lose the fight if I attacked directly, I turned to defense with P*9e. But having aimed for a decisive attack with R*8b, it was clear that something had gone wrong. When I played P*9e, I was already half prepared to play the final, 7th game.
 |
| Diagram 5 |
I gambled everything on Rx6e. If instead Rx4b+ G*3b; +R-8b P*9f; Kx9f Lx8f; Kx8f B*6f (Diagram G), hitting the gold on 4h and covering 7g and 8h to create a mating net around Black's king. After four minutes' thought, without looking into the possibilities too deeply, I played Rx6e. Since I was prepared to lose at this point, it might seem strange to say I took this silver lightheartedly, but I was able to do so in a bold and decisive frame of mind.
 |
| Diagram G |
Nakahara replied with ... Px6e. This was the losing move.
During the post-mortem, it was suggested that White could have won by turning to defense here with the gold drop ... G*3b. After Black plays R-6i to defend against the unpleasant bishop drop ... B*5i, both Nakahara and I had thought that White had nothing after ... Lx8f; Kx8f, but in fact he can play ... B*9c (Diagram H) and after R-8a+, ... P-8e, with a discovered attack on the gold on 4h, it's all over.
 |
| Diagram H |
But I later found that after ... G*3b; R-6i Lx8f, if Black plays ... +Rx8d (Diagram I) instead of Kx8f, White may not be able to press home the attack.
 |
| Diagram I |
If now ... B*9c; +Rx9c Lx9c; Kx8f and it is not easy for White to catch the king. What should White play in Diagram I? He could try ... S*8g and if Gx8g B*7h, but the position is not clear. I was tired during the post-mortem and concluded that ... G*3b would win for White, but in the cold light of day I cannot see anything decisive. Even so, this is a position where there is no way of getting to the White king, so the outcome would depend on whether Black can get an entering king. Considering how much I dislike playing for an entering king, I suppose that means I probably would have lost.
 |
| Diagram J |
 |
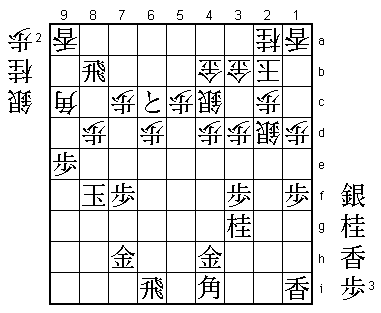
| Diagram 6 |
From Diagram 6, the game went ... R*9i; N*9h P*9f; K-8g R-8i+; P*8h (Diagram 7). Black could also have answered ... P*9f with Kx9f, but K-8h would have lost immediately to the bishop drop ... B*5e.
 |
| Diagram 7 |
Unfortunately, ... Px1e does not give White the breathing space he needs. After Lx1e P*1d (if ... Sx1e; P*1d Kx1d; G*2e mates); Lx1d Kx1d; P*1e Kx1e; G*1f K-1d; P*1e K-1c; Sx8e (Diagram K) when White is in brinkmate and has no way of mating Black.
 |
| Diagram K |
With my bishop on 4i working so well in defense and attack, I felt confident at last that I was winning. P-1e was stronger than it looked, which may been the reason for Nakahara's miscalculation.
From Diagram 7, the game continued ... Lx8f; Kx8f B*5i; P*6h N*7d; K-7g S*6f; K-8g (Resignation Diagram) and Nakahara resigned.
 |
| Resignation Diagram |
The final important point is ... N*7d; K-7g. If I had panicked and played K-7e here, White could turn the tables by taking the gold with Bx4h+ (Diagram L) and then (after K-6d) the knight on 3g, also with check. In the final position, White has no mate and no defense.
 |
| Diagram L |
I can count myself lucky that I was the one who made the first of these two endgame mistakes. But if I can be allowed an excuse, I think this happened because it was such a big occasion and a key game. The strange atmosphere produced by the big occasion causes strange things to happen.
I can only apologize to those who were expecting a lightning-speed finish, but I hope they will forgive me, considering that I did finally manage to win this vital 6th game of the 1988 Meijin Title Match.