 |
| Diagram 1 |
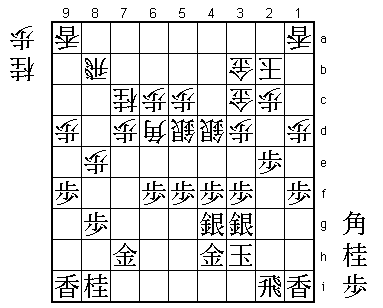
This position comes from the second game of the Kio Title Match. As shogi fans may recall, the Kio titleholder Takahashi made a decisive oversight that caused quite a stir in the shogi world. At the final stage of the endgame, both players had the same blind spot, completely overlooking the move ... K-1c, not normally a hard move to find. This was such a huge oversight that it left its mark not only on Takahashi but also on me, even though I had won the game.
I suppose you could just dismiss it as bad shogi, but apart from that extraordinary blind spot (... K-1c), this was quite a powerfully played endgame battle. I don't particularly enjoy remembering it, but it is still worth taking up as an endgame theme.
In the position in Diagram 1, I had just exchanged knights on 3c with Nx3c+ G4cx3c and it was my move. I had no reason to be dissatisfied with my position - the gold and two silvers around my king form the kind of ideal defensive shape taught in opening books. White could also be quite satisfied with his set-up, having redeployed the climbing silver on 8d to a good position on 5d. Both sides' pieces are deployed effectively and the chances are equal.
In spite of this, I had trouble deciding what to play here. Having achieved this ideal shape with S-3g, S-4g and G-4h, I had no clear vision of the next stage. Sometimes you succeed in realizing your plan quite smoothly, but don't quite know what to do when you actually reach the position you were aiming for.
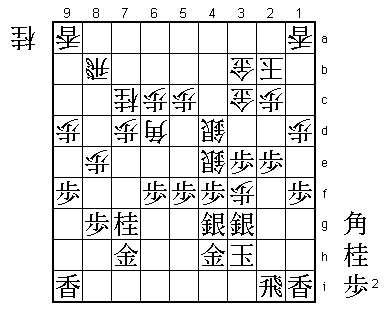
One possibility here is N*4e. This would be quite effective if the gold escaped with ... G3c-4c, but after ... S5dx4e; Px4e P*4f; S4gx4f N*5d White gets a strong counterattack. At the same time, I was afraid that if I awaited events with N-7g, ... P-3e; Px3e P*4e; Px4e S5dx4e; P*4f P*3f (Diagram A) would also give White good attacking chances.
 |
| Diagram A |
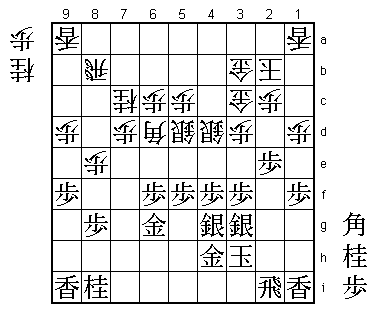
On sober reflection, an attack like this would also take quite a lot of nerve on White's part, because the scene of battle is close to his king. He probably would not have chosen this line. N-7g, developing Black's remaining inactive piece, was the best move in Diagram 1. The move I actually played was G-6g (Diagram 2).
 |
| Diagram 2 |
G-6g was a questionable move. My idea was to get the gold as close as possible to my king to prevent an attack along the third and fourth files. White can break through on the eighth file and promote his rook, but I didn't mind that because my rook is defending the knight on 8i. I was more worried about the area around my king than the 8th file. G-6g was the product of 38 minutes' thought. Although it was a questionable move, I did not stand worse after it.
 |
| Diagram 3 |
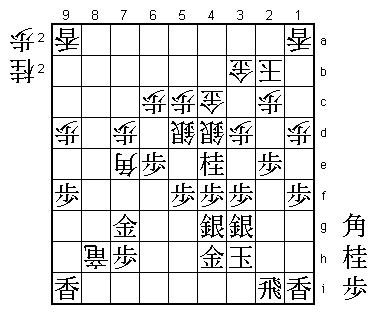
Though it may be a straight road, it is not without its perils. When we actually reached this position, I became acutely aware that both White's promoted rook and his bishop are eyeing the vital point in Black's camp. There is no time to lose. I must take the fight to my opponent before his promoted rook and bishop exert their full effect.
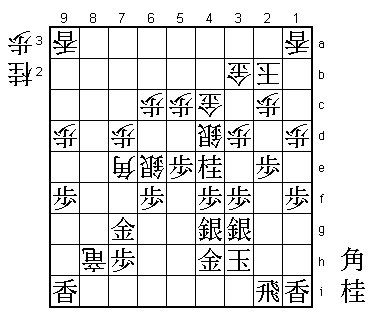
Here I gambled everything on P-5e. After ... Sx6e; P*6f we reached the position in Diagram 4.
 |
| Diagram 4 |
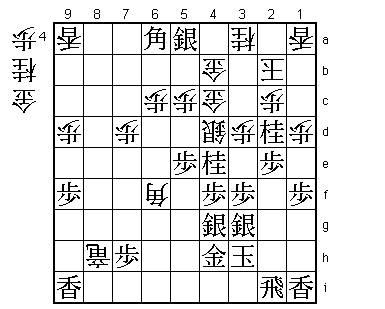
What happens if White takes this pawn with his silver? After ... Sx6f; Gx6f Bx6f; N*2d G3b-4b; B*6a N*3a; S*5a we reach Diagram B.
 |
| Diagram B |
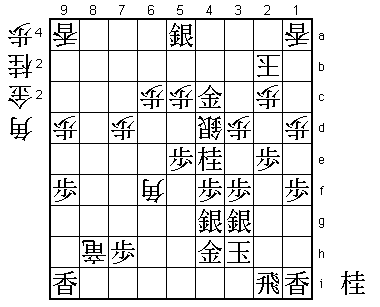
If White counterattacks here with ... +Rx7h, Black has Sx4b+ Gx4b; Bx3d+ with the threat of winning the promoted rook by N-3c+. If White goes on the defensive with G-4a, Black wins with Bx4c+ Nx4c; G*3b Gx3b; Nx3b+ Kx3b; G*4b K-2b; Gx4c (Diagram C), when Black's attack is one move faster as his king cannot be mated unless he gives White material. These were the main lines I analyzed in Diagram 4.
 |
| Diagram C |
But the Kio titleholder Takahashi played found an "all or nothing" move that I had overlooked. This was the knight drop ... N*2f, putting me in check. This knight sacrifice took me completely by surprise. If Sx2f, the file of the rook bearing down on White's king becomes blocked and ... N*5f or ... Sx6f seem to win. I therefore had no choice but to play Rx2f, to which White replied ... +Rx9i.
After ... N*2f we entered new territory that I had not explored at all. Having been taken out of the lines I had analyzed, I did not have enough time left to re-analyze the position in detail. From this point on, I had to play without looking at all the variations, and this no doubt led to the final oversight.
 |
| Diagram 5 |
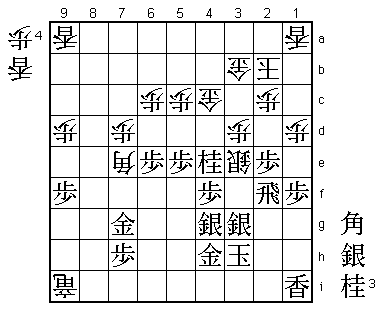
With Px6e I took up the challenge. If I had played N*4i, Takahashi said after the game that he intended to play N*1c followed by Nx2e, when Rx2e would be answered by L*2d with a winning attack.
In the position in Diagram 5, I became aware of a line that would lead to mate. If my pieces in hand - bishop, silver and three knights - could be supplemented by another bishop and a rook, I felt I would surely be able to deliver checkmate. So I set about formulating a plan that would bring me an extra bishop and a rook.
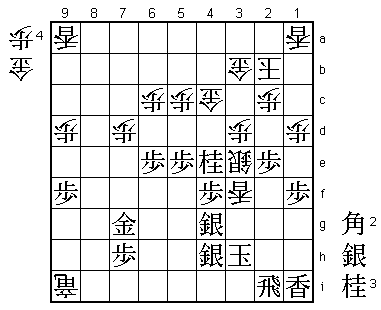
From Diagram 5, play continued R-2i Bx4h+; Sx4h L*3f (Diagram 6).
 |
| Diagram 6 |
As expected, the second bishop has joined my camp. Now I was convinced that if I could also get a rook in hand, and provided White had no pieces in hand that could move sideways (i.e. gold or rook), I could deliver mate.
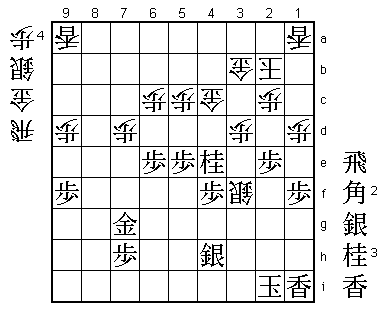
The way to mate I envisaged was S*3c G4cx3c; Nx3c+ Gx3c; R*5b. If White interposes a knight or a silver on 3b, Black mates with B*3a Kx3a; B(or G)*4b, etc. But if White is able to interpose a gold or rook on 3b, there is no drop on 4b and therefore no mate. So I had to find a way of getting a rook in hand without letting my opponent get a gold. For example, if I take the lance with Sx3f here, White continues ... +Rx2i; Kx2i Sx3f (Diagram D).
 |
| Diagram D |
If I now play for mate with S*3c, White can answer R*5b with the gold drop ... G*3b and Black loses.
I was convinced that getting White to use his sideways-moving pieces was necessary condition to win, and this preconception dominated my thinking right up to the end of the game.
 |
| Diagram 7 |
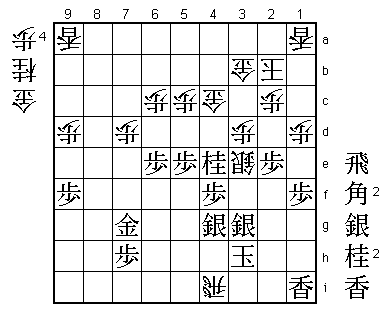
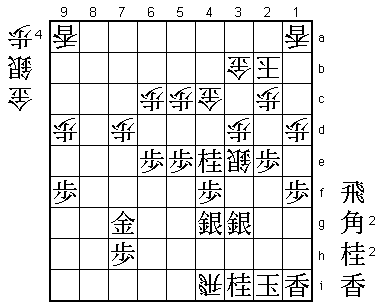
It was all going exactly according to plan and with K-3h I thought the game had been decided in my favor. But during our post-mortem analysis, we made some surprising discoveries. First of all, if Black is actually losing after N*3g, then this is the decisive mistake. Here it was apparently necessary to play S*3g. After ... Lx3g+; Sx3g +Rx2i; Kx2i R*4i, Black can hang tough with N*3i (Diagram E). Since N*3g would give White a knight in hand, he could finish Black off with ... N*2g in this position.
 |
| Diagram E |
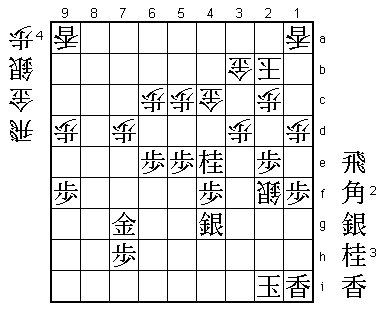
That is not all. In Diagram 6, Takahashi immediately took the rook on 2i after ... Lx3g+; Sx3g, but he should have first played ... N*2f; Sx2f and then ... Rx2i, when he would be threatening mate after Kx2i Sx2f (Diagram F) and, as Black has no mate, this would be winning for White.
 |
| Diagram F |
If Black plays S*3g instead of N*3g, this line could also have been avoided. And if I had noticed this variation with ... N*2f before ... Rx2i, and also realized that the final mating line I had envisaged was a hallucination, I would have thought harder about which piece to interpose after ... L*3f. But since I believed that N*3g and K-3h perfectly fitted my overall concept, I did not seriously examine S*3g. Let us now return to Diagram 7.
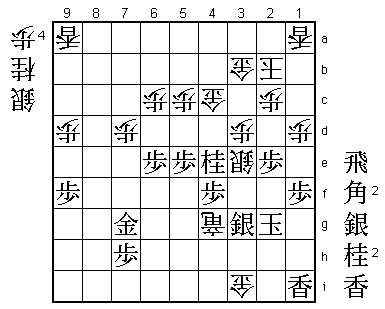
K-3h threatens White's rook, so he has no choice but to play ... G*3i, when K-2g Rx4g+ brings us to the position in Diagram 8.
 |
| Diagram 8 |
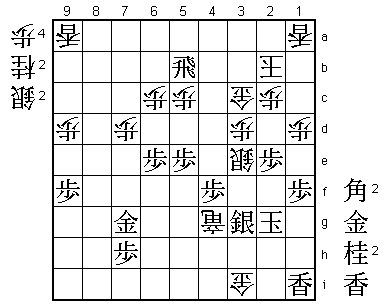
Here my "conditions" for mating White's king had all been satisfied. I have a rook, two bishops, silver, two knights and a lance in hand, and I have succeeded in denying White the sideways-moving pieces (gold and rook) I thought he needed. I boldly played the silver drop S*3c and after ... G4cx3c; Nx3c+ Gx3c; R*5b, Takahashi resigned (Resignation Diagram).
 |
| Resignation Diagram |
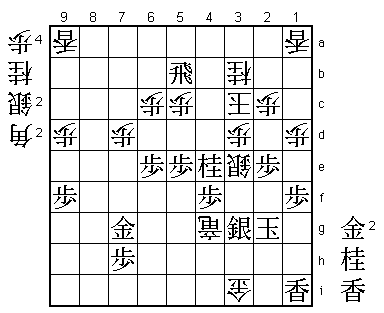
After ... N*3b; B*3a Kx3a; B*4b K-2b (or ... K-2a; R-5a+ K-1b; G*2b Kx2b; B-3a+); Bx3c+ Kx3c; N*4e (Diagram G) ... K-2b; Rx3b+ K-1c; +Rx2c Kx2c; G*3c and mates.
 |
| Diagram G |
If ... S*3b; B*3a Kx3a; G*4b K-2a; Gx3b Gx3b; N*3c K-2b; Rx3b+ Kx3b; B*2a (Diagram H) with forced mate. If ... Kx3c; N*4e K-4d; G*5d and mate.
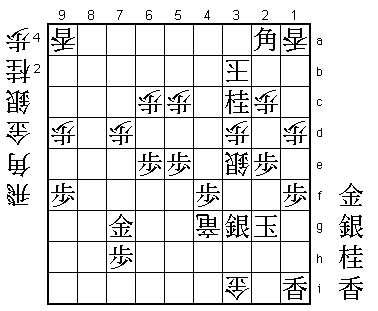 |
| Diagram H |
When you win a game of shogi, you often mate with precise and pretty variations like these. I thought I had succeeded in doing just that. The piece dropped on 4b varies according to whether White interposes on 3b with a knight or silver, but in either case Black has a beautiful mating finish. I felt very proud of these mating lines and the way I had satisfied the conditions necessary to realize them. Everything had been prepared to converge at this point, and I had put together the endgame to achieve this convergence.
But after I played S*3c, to my horror, I suddenly noticed a move that completely undermined the whole concept at its very foundations. After S*3c G4cx3c; Nx3c+, instead of ... Gx3c, White's king can escape with ... K-1c (Diagram I), when I don't even have a check, let alone checkmate.
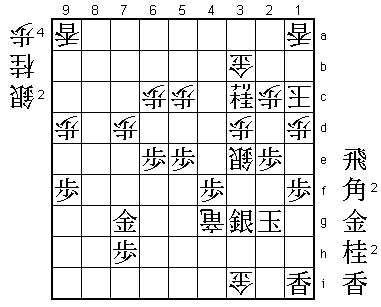 |
| Diagram I |
Somehow or other, both Takahashi and I had the same blind spot. Takahashi took two minutes over ... G4cx3c in reply to S*3c, but it seems he was just confirming that it was mate after R*5b. And I took a minute to play Nx3c+, a move that should have been played instantaneously. Having noticed my hallucination, I froze momentarily but I was afraid that if I started thinking here, my opponent would realize something was wrong. Looking back, I think this showed a lack of sufficient toughness as a professional shogi player. To tell the truth, I was so filled with self-disgust at missing such a simple and huge oversight that I suddenly no longer cared whether I won or lost. But Takahashi didn't notice the hallucination and replied ... Gx3c. After a further two minutes' thought, I played R*5b and White resigned. You may not believe it, but during those two minutes, I was even considering resigning myself. That's how disgusted I felt with myself. But of course it would be quite strange to resign in a position where you have mate. I composed myself and, after two minutes' thought, quietly placed the rook on 5b.
K-1c was a blind spot on a straight line. The straighter the line leading to a blind spot, the more fatal it will be. With just one move, all my analysis would have come to nothing.