 |
| Diagram 1 |
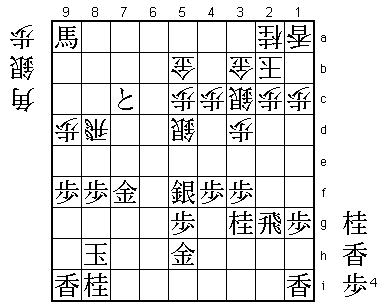
In the position in Diagram 1, Kiriyama 9-dan had just played ... R-8d after I promoted my pawn with P-7c+. Black has a material advantage, with a knight and a lance in exchange for a silver as well as a tokin on 7c. But in view of the badly damaged shape around his king, it's too early to call this a winning position. Black stands better, but he still has to be very careful.
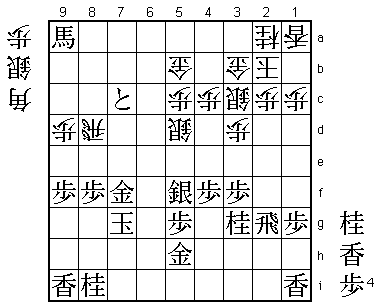
The first thing to worry about in this position is the bishop drop ... B*4i, attacking rook and gold. How should Black defend against this? Here I played K-7g (Diagram 2).
 |
| Diagram 2 |
This move has two aims. First, if Black's king can advance up the board, this might activate the promoted bishop on 9a and the tokin on 7c, neither of which is very effective at the moment. Second, Black can use his king to menace the rook on 8d.
The rook is a powerful piece, but it can be vulnerable in skirmishes at close quarters. It is most effective to attack the weak point of a piece, and the stronger the piece is, the more effect this will have.
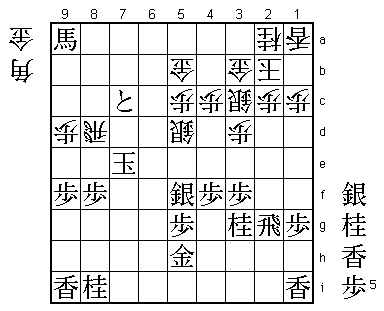
In Diagram 2, for example, the line ... P*7e; Gx7e S*6f; K-7f Sx7e; Kx7e (Diagram A) highlights the weakness of White's rook.
 |
| Diagram A |
If now ... B*6f; Kx6f Rx8f; S*7f Rx8i+; P*8g, Black immediately succeeds in getting an entering king.
But what if White answers K-7g with ... B*4i? After R-2h S*3i; R-1h B-2g+ Black will have to hand over his rook, but here G-7e wins White's rook and Black's king escapes quite easily. In other words, K-7g defends indirectly against the threat of B*4i.
 |
| Diagram 3 |
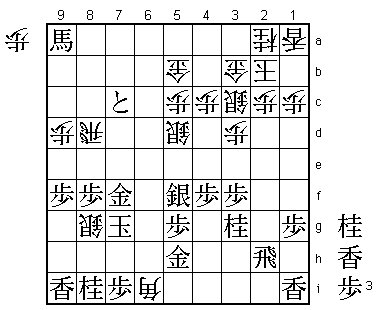
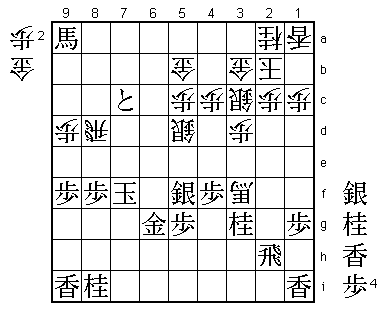
The defensive pawn drop P*7i took a bit of nerve. The normal defense G-6g may be safer, but I didn't relish the prospect of a long drawn-out struggle after ... Sx7f+; Kx7f Bx3f+ (Diagram B). In this position, the promoted bishop threatens Black's knight on 3g and may also get the chance to go to 5d, where it would occupy an ideal attacking and defensive position.
 |
| Diagram B |
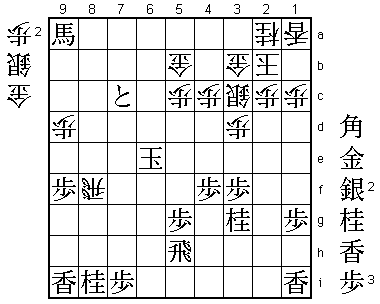
P*7i deliberately avoids this safe course and aims to force the pace with White's bishop hemmed in on 6i. By trapping a piece, you can often make your opponent hurry his attack. The pawn drop P*7i might be described as a defensive "meltdown move." White's most violent response would be ... Sx7f+; Kx7f Bx5h+; Rx5h G*6e; Sx6e Sx6e; Kx6e Rx8f (Diagram C).
 |
| Diagram C |
In this position White is threatening mate with ... S*5d; K-7e G*8e, but I had calculated that, though the situation looks quite dangerous, N-7g defends adequately.
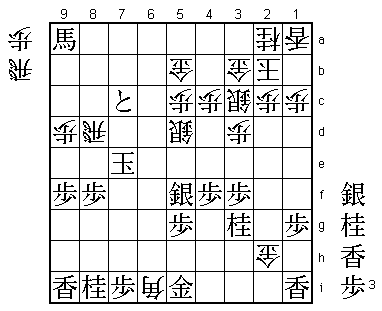
Another idea for White in Diagram 3 is ... Sx7f+; Kx7f G*2g, but after K-7e Gx2h; G-5i (Diagram D) and White has no way of preventing Black's king from entering.
 |
| Diagram D |
In a fight at close quarters with an entering king on the cards, the gold and silver generals are often even more effective pieces than the rook and bishop.
 |
| Diagram 4 |
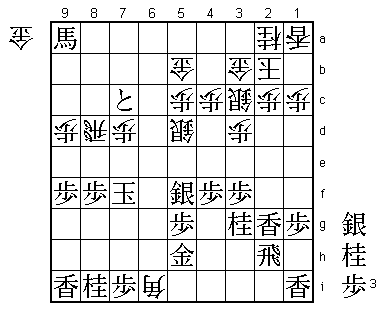
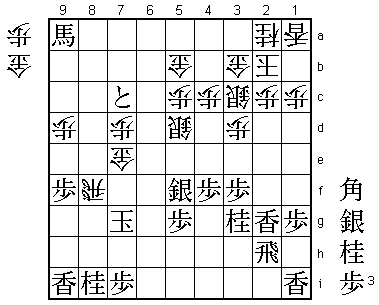
In this position, the gold drop ... G*7e looks frightening, but I had calculated that K-7g Bx5h+; Rx5h Rx8f; R-2h (Diagram E) would win for Black.
 |
| Diagram E |
Without a bolt hole because his pawn is still on 1c, White's king position here is terrible and it is actually quite difficult to defend against the threat of mate by Lx2c+ Gx2c; Rx2c+ Kx2c; B*4a, etc.
Another reason why L*2g is a good move is that it deprives White of the possibility of the gold drop G*2g. If the lance were not on 2g in Diagram 4, ... G*2g; R-4h Gx3g would be very nasty for Black.
Following the proverb "drop a piece where your opponent wants to drop" and envisaging the threat of mate if Black gets a bishop in hand, L*2g is an ideal defensive and attacking move.
Kiriyama 9-dan replied to L*2g with ... P-1d. In the close-fought endgame that followed, these two moves proved important.
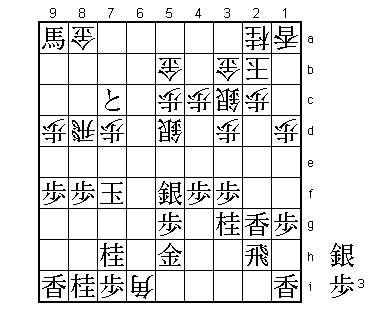 |
| Diagram 5 |
From Diagram 5, play continued: P-8e Gx9a; Px8d Bx5h+; Rx5h B*4i; S-6g (Diagram 6).
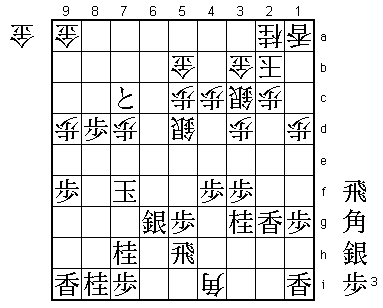 |
| Diagram 6 |
During the game, I thought this position was still quite difficult. If White can take the lance on 2g and knight on 3g, his king would also be very difficult to mate. Although this would not necessarily be bad for Black, the game could become a long drawn-out struggle. The variation I disliked most in this position was ... G*7e; K-7g Bx2g+. After +Px7d Gx7d; R*7a, Black is still better as White only has a lance and pawn in hand, but this line would be have been much more difficult for me than the game continuation.
Instead of pushing my king back with ... G*7e, Kiriyama simply took the lance with ... Bx2g+, but after K-8e (Diagram 7), White cannot stop the king from entering.
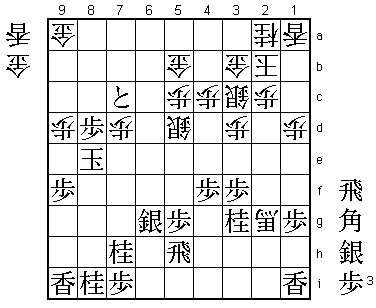 |
| Diagram 7 |
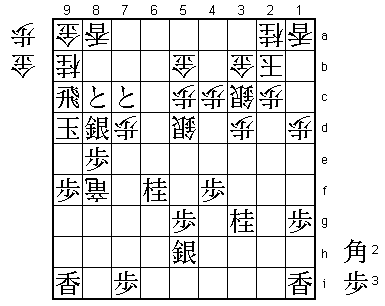
From Diagram 7, play continued ... +Bx3f; P-8c+ P*6f; Nx6f +Bx5h; Sx5h R*8h; P*8f L*8a; S*8d Rx8i+; R*9c N*9b; Kx9d +Rx8f; P*8e Resigns (Resignation Diagram)
 |
| Resignation Diagram |
In the final position, Black is ready to proceed with +Px9b. If White takes the silver with Nx8d, Black has Rx9a+. If White could play ... S*7f here he could almost put Black in brinkmate, but he only has a gold in hand.
In this game, I made up my mind to play fearlessly. This state of mind may have enabled me to play K-7g at just the right moment, boldly menacing the weak point of White's strongest piece, his rook on 8d. It takes nerve to attack an attacking piece of your opponent's, but if this proves effective, the effect is very great indeed.
Another effect of K-7g was that it breathed life into the promoted bishop on 9a and tokin on 7c. If my king had been forced back to 8h, these two pieces would probably have remained on the sidelines until the end.
There are a few basic things you need to know about entering kings.
The player who gets an entering king first has a considerable advantage, even if he does not have anything like enough points. Since the player who enters second usually has to give up a lot of pieces, the tables are often turned in the point score.
Once you have got an entering king, it will be very hard for your opponent to mate, but a king often gets caught when you rashly try to force an entry. The ideal method of getting an entering king is to enter in reaction to the flow of your opponent's attack. Always keep this in mind. The chaser should not chase too far and the escaper should try to make use of the strength of the opponent's attack. It is a relationship of action and reaction.
Another important point is not to let your opponent attack as he pleases, however good your chances of entering are. You must try to impose restrictions so that the opponent knows that the counterattack will be severe if he goes for broke. In this game, I achieved this with the lance drop L*2g. This made it difficult for White to give up his bishop, thereby restricting his attacking options.
The timing of entering with your king is very difficult, so judge it precisely. Use the "counterflow" from your opponent's attack to enter. However good the chances of entering are, always keep the fires of a potential counterattack burning. These three points are what you need to know about the entering king.
Of course I don't like having this done to me, but I don't particularly enjoy doing it either. I would rather win by a clean knock-out in the endgame.