|
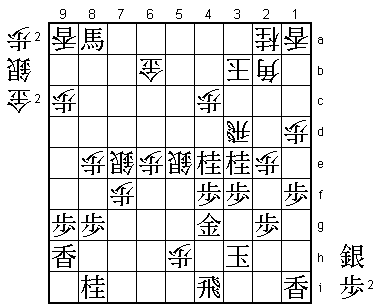
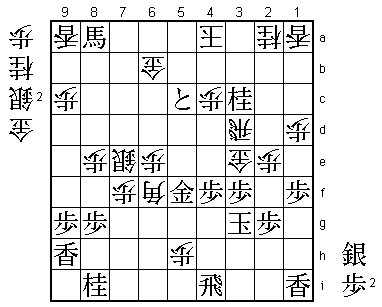
| Diagram 1 |
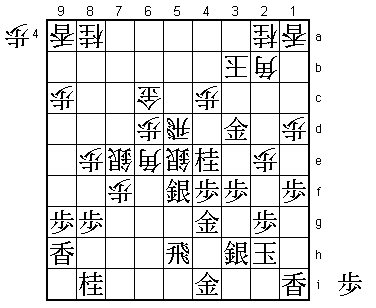
The position in Diagram 1 is from my game against Yasuharu Oyama, the 15th Lifetime Meijin, in the A-Class Junisen League on January 18, 1988. We are on the verge of taking the plunge from the middlegame into a fierce endgame battle. I had just advanced my rook from 5b to 5d, attacking the gold on 3d, and Oyama responded by moving his silver on 6g into the fray with ...S-5f. This move took me by surprise. I had expected him to withdraw the gold to 3e, leading to calmer waters.
S-5f requires some explanation. If ...Sx5f, after Gx5f Bx5f, Black drops the silver with S*3c and after ...Nx3c; Rx5f Rx5f; Nx3c+ Bx3c; B*2c K-4b; Gx3c Kx3c; Bx5f+ (Diagram A), he has succeeded in capturing White's rook. In Diagram A, White has no clear way of attacking while Black's king is safe in its solid Mino Castle, enabling him to focus on an immediate assault. S-5f is a good example of the basic ranging rook concept of taking advantage of a solid castle to achieve sabaki.
 |
| Diagram A |
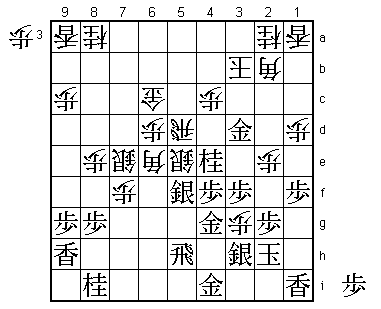
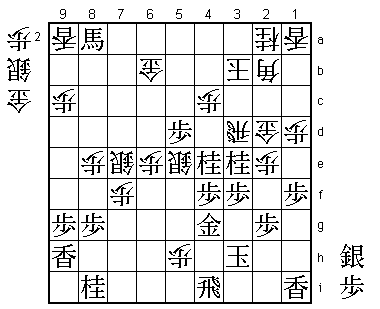
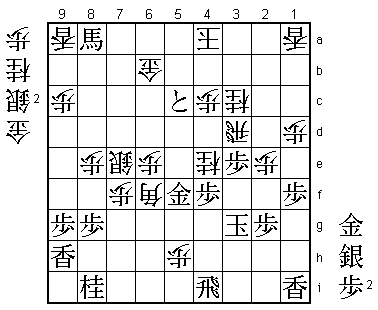
In view of this line leading to Diagram A, the position in Diagram 1 is somewhat difficult for me. My chief priority is to avoid a mating race where Black still has his solid Mino castle. I must do whatever I can to close the distance from the enemy king by one or two moves and create a situation where I can clearly grasp that distance. With this in mind, I left the gold and the silver alone and went for broke with ...P*3g (Diagram 2).
 |
| Diagram 2 |
If Black answers ...P*3g with Gx3g, the silver on 5f loses its protection, and if he takes the pawn on 3g with the king or the silver, the Mino castle falls into disarray. This was not to Oyama's liking, so he decided to ignore ...P*3g and take my bishop with Sx6e. But if he had played Sx3g, a line such as ...Sx5f; Gx5f Bx5f; S*3c Nx3c; Nx3c+ K-4a; Gx4c K-5a; P*5e Rx5e; N*6g (Diagram B) would probably have been losing for me.
 |
| Diagram B |
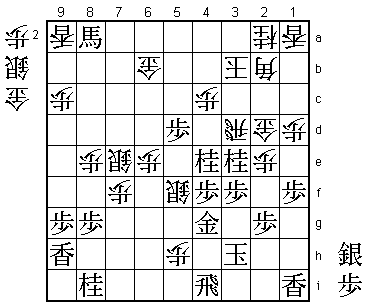
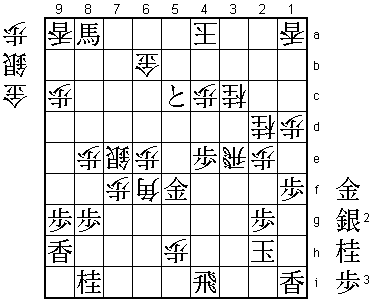
After Sx6e, the game continued ...Px3h+; Gx3h Rx3d. Now I am a silver up and have succeeded in reducing the Mino Castle by removing a piece from it. This does not mean I have made a complete recovery. Oyama's next move, B*7b (Diagram 3) was severe and I still stand a little worse. Even so, I had moved one step closer in my aim of closing the distance from the enemy king.
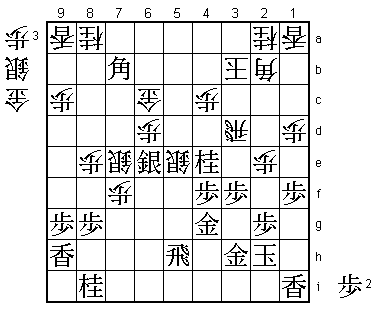 |
| Diagram 3 |
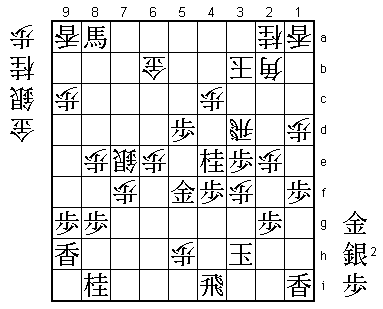
From Diagram 3, play continued ...G-6b; Bx8a+ S*4i; R-5i Sx3h+; Kx3h P*5h; R-4i Px6e; N*3e (Diagram 4). In this line, the silver drop ...S*4i, forking rook and gold, removes a general defending Black's king but gives him a silver in hand, so it may even turn out to be a bad move. However, my primary aim is to close the distance from the enemy king, and I must pursue this consistently.
 |
| Diagram 4 |
Black's N*3e may have been a little too hurried. It would have been harder for me if he had simply taken the lance with +Bx9a, threatening L*3e.
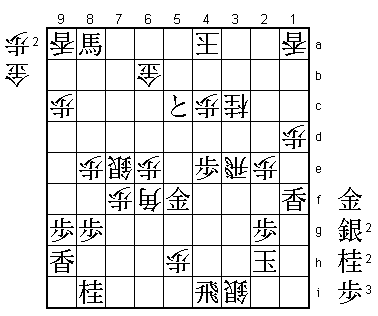
In Diagram 4, I defended against the threat of S*2c with ...G*2d and Oyama dangled a pawn with P*5d, reaching Diagram 5. Having cut off the king's escape via 2c with N*3e, Black attacks on the 5th file. Attacking from the left and right seems like the ideal method of closing in on White's king. However, P*5d is the first move of a two-move sequence which is only completed when Black promotes the pawn with P-5c+. What is more, the pawn on 5d blocks the diagonal of the promoted bishop on 8a, creating a dangerous situation for Black. If I have a chance of turning the tables, this is the moment. The first move of a two-move sequence usually opens a window of opportunity.
 |
| Diagram 5 |
In Diagram 5, after nine minutes' thought, I played ...S-5f (Diagram 6). I hear that people who later played through the game mistakenly assumed that I had dropped a silver on 5f. In fact ...S*5f was the move I first considered, but I did not feel confident of my prospects after either P-5c+ or G-3g.
 |
| Diagram 6 |
If Black answers ...S-5f with Gx5f, ...Gx3e; Px3e P*3f (Diagram C) and Black has no way of defending against the mating attack. This is the first point. Playing ...S-5f rather than S*5f may look like a silver sacrifice, but actually it cannot be taken. The second point is that advancing the silver vacates the 5e square. This means that the wall bishop on 2b, which is hemming in my king, can both join the attack with ...B-6f and give my king more space, killing two birds with one stone.
 |
| Diagram C |
I did not notice ...S-5f until we reached the position in Diagram 6. 15th Lifetime Meijin Oyama had clearly underestimated it, and this seems to have been the reason I won this game. When I played ...S-5f, I felt I had good winning chances and this all-or-nothing shot altered the course of the game.
Nevertheless, the position in Diagram 6 is still quite unclear and difficult. To illustrate this with a rather long variation, if now P-5c+ Sx4g+; Rx4g Gx3e; Px3e Rx3e; P*3f (Diagram D) S*5f; S*4a K-2c; S*3b Rx3b; Sx3b= Kx3b; R*4b K-2c; Rx4c+ P*3c; Nx3c+ Nx3c; +B-4e Sx4e; Px4e (Diagram E), resulting in a completely unclear endgame. It is not at all certain whether Black's king can be mated in this position. If White plays ...Rx3f instead of ...S*5f in Diagram D, after S*3g S*5f; Sx3f, the silver on 3f helps defend Black's king and, with no way of mating, White is clearly lost.
Let us return to the game. In Diagram 6, instead of the straightforward P-5c+, Oyama dropped a silver with S*4a. This aims to start the mating attack immediately, before White can move his bishop out from 2b, but it is too elaborate. P-5c+ was apparently the right move. After S*4a, the game continued ...Kx4a; P-5c+ B-6f; Gx5f P*3g; Kx3g Gx3e; N-3c= (Diagram 7).
 |
| Diagram 7 |
If Black had answered ...Gx3e with Px3e, White mates with ...P*3f; Kx3f N*2d, etc. N-3c= defends against this mate by vacating the 4e square so that the bishop defends 3f. Now I could have escaped with ...K-3b, when Px3e P*3f; +Bx3f N*4d; Px3d S*4h might have followed, but I decided to take the knight with ...Nx3c. After Px3e, Black is threatening mate in one by G*4b, so I must be able to mate him when the gold on 3e is captured. ...K-3b may have been a safer way of winning, but I was confident that I had forced mate.
 |
| Diagram 8 |
From Diagram 7, play continued ...Nx3c; Px3e N*4e (Diagram 8); Px4e P*3f; K-4f S*3g; Kx3f N*2d; Kx3g Rx3e; K-2h (Diagram 9). ...N*4e is a tesuji to block the bishop's diagonal that Black has just opened. If Gx4e instead of Px4e, it is still mate after ...P*3f.
 |
| Diagram 9 |
The position in Diagram 9 is the last hurdle. It was quite hard for me to find the coup de grace: ...Nx1f. Now the fierce endgame struggle came to a close with ...Lx1f; S*3i (Resignation Diagram) and Oyama resigned. From the Resignation Diagram, it is forced mate after Rx3i Bx3i+ or K-1g G*1h; Kx1h R-3h+, etc.
 |
| Resignation Diagram |
This game was a hard struggle for me until nearly one hour before the end. Looking back on it, I am once again impressed by the correct whole-board perception and clarity of vision of 15th Lifetime Meijin Oyama from the opening to the middlegame and endgame. I somehow managed to turn the tables because, with the two moves ...P*3g and ...S*4i, I was able to remove two defensive pieces and reduce my sense of distance from the enemy king to something tangible. In a difficult and unclear battle, it is important to have a clear idea of your opponent's king position and your own objectives. Then you can determine a concrete plan of action. In the endgame, losing sight of the enemy king can be fatal. In that sense, those two moves were the main reason for my victory, enabling me to turn the tables with the all-or-nothing move ...S-5f.