Lightning Speed Endgame Technique
Koji Tanigawa, Meijin
Part Four: Table-Turning Technique
Chapter 6: A Surprising Variation
Black: Michio Ariyoshi, 9-dan
White: Koji Tanigawa, Oi Titleholder
46th A-Class Junisen League, September 7, 1987 (6 hours each)
P-7f P-8d; S-6h P-3d; S-7g S-6b; S-4h S-4b; G-7h G-3b; K-6i P-5d; P-5f K-4a; G-5h G-5b;
P-6f S6b-5c; G5h-6g P-6d; P-2f R-6b; P-2e P-6e; Px6e Rx6e; P*6f R-6a; P-3f P-7d;
P-2d Px2d; Rx2d P*2c; R-2h S-6d; S-5g N-7c; S7g-6h P-5e; K-7i P*6e; Px6e Nx6e;
S-4f P*6f; Bx6f P-7e; Px5e Px7f; N-3g R-7a; P-3e S-7e; Bx7e Rx7e; P*6f P-7g+;
Nx7g Nx7g+; Sx7g N*8e; P*7f R-7d; P*2d Px2d; P*2c B-4d; K-8h P*5h; S-6h P*7g;
G-7i P-5i+; Sx5i Px3e; S-6h P-3f; N-4e P-3g+; Sx3g; P*6e; S-4f Px6f; Gx6f B*3i;
G-6e (Diagram 1) P-7h+; Gx7h Bx2h+; Gx7d Bx5e; (Diagram 2) P*6f P*7g; Sx7g Bx4f;
Px4f S*6i (Diagram 3); R*5g (Diagram 4) Sx7h+; Kx7h Nx7g+; Kx7g R*7i; S*7h S*6h;
Kx6h +Bx4f (Diagram 5); N*6d (Diagram 6) +Bx5g; Kx5g R-5i+; S*5h (Diagram 7) G*4g;
Kx4g R*4h; K-3f (Diagram 8) P*3e; Kx3e +R-3i; G*3f (Diagram 9) P*3d (Intermediate Diagram);
Kx2d S-3c; K-2e (Diagram 10) +Rx4e; Gx4e S-2d; Kx2d +R-2h; Kx3d Gx2c; K-3e +R-3g Resigns
(Times: Ariyoshi 5 hrs 54 mins; Tanigawa 5 hrs 46 mins)
 |
| Diagram 1 |
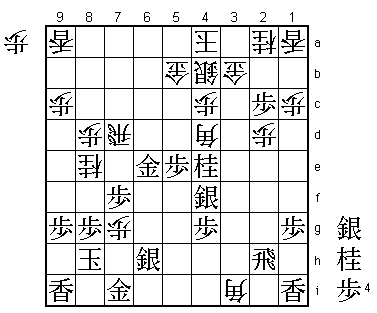
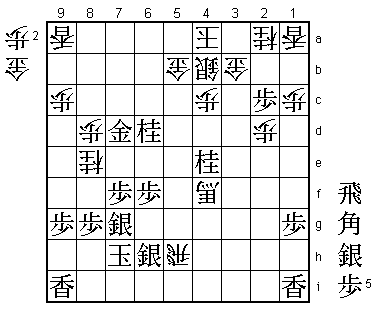
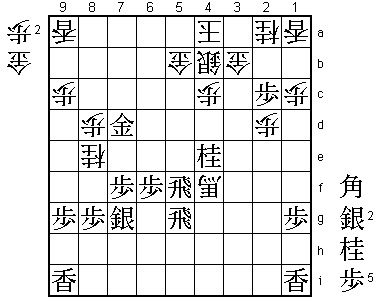
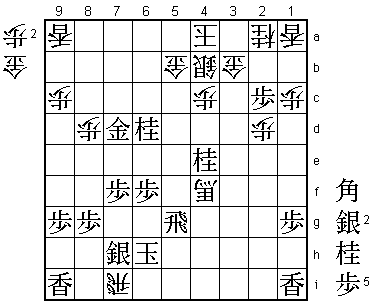
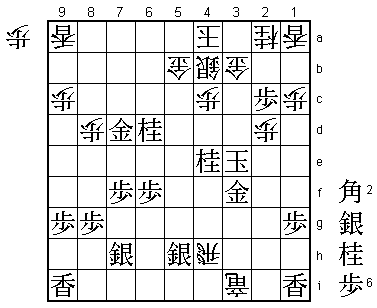
The position in Diagram 1 is from my endgame against Ariyoshi 9-dan in the 1987 Junisen
League. In response to my ...B*3i, attacking both his gold and rook, Ariyoshi has just
moved the attacked gold from 6f to 6e, attacking my own rook. Although I have a material
advantage of bishop against silver, I stand worse because of my insecure king position.
But now the fight has begun and there is no going back.
If I answer G-6e by simply taking the rook with ...Bx2h+, Black will take my rook with Gx7d,
when the threat of N*6d is very hard to meet. Alternatively, ...Rx7f would be met by
R-3h (Diagram A), winning the bishop. While thinking for 30 minutes over ...Px6f three
moves earlier, I had already decided on my next move, which combines the aims of ...Bx2h+
and ...Rx7f.
 |
| Diagram A |
Taking advantage of the opportunity provided by G-6e, I played the pawn promotion
sacrifice ...P-7h+. If now Kx7h, I can win a silver by ...Rx7f; P*7g Rx4f; Px4f Bx2h+.
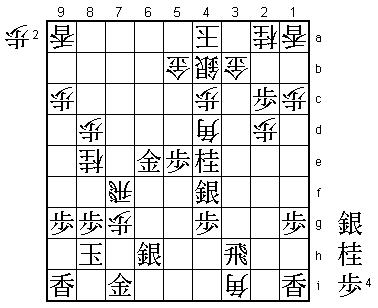
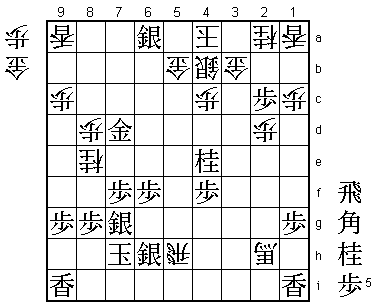
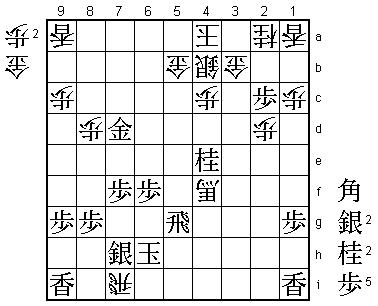
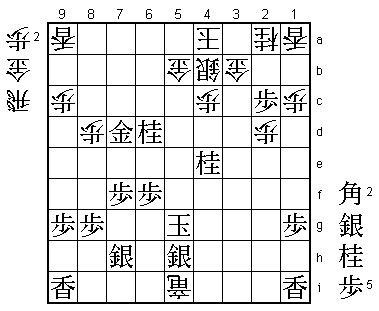
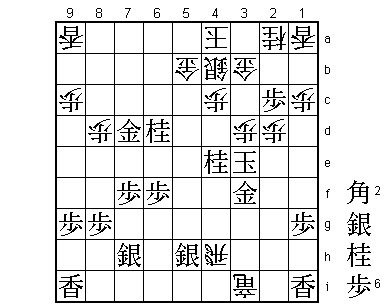
Ariyoshi 9-dan took the promoted pawn with Gx7h and after ...Bx2h+; Gx7d, I was able
to play ...Bx5e (Diagram 2) with check. If I had not played the promotion sacrifice
at this moment, Black could have answered it with Kx7h, when ...Bx5e is not check and
White is immediately threatened with N*6d. I therefore played ...P-7h+ at the optimal
moment.
 |
| Diagram 2 |
Checking to Escape Mate
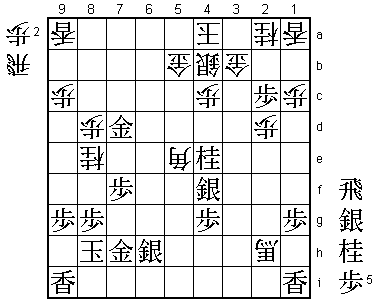
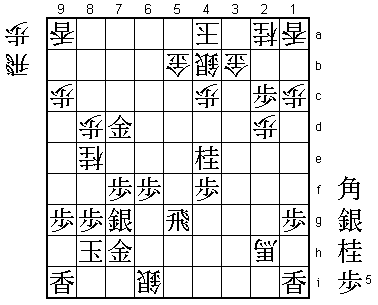
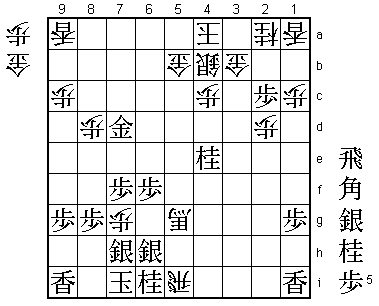
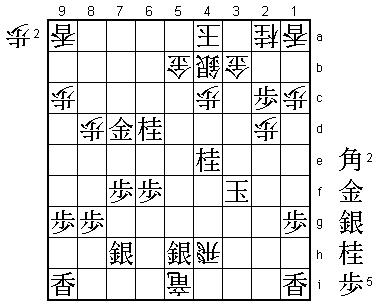
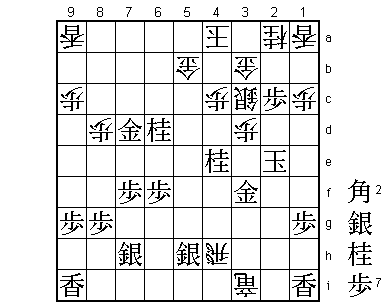
From Diagram 2, play continued P*6f P*7g; Sx7g Bx4f; Px4f S*6i (Diagram 3). Looking at
this position, I began to think it might be winning for me. ...S*6i does not threaten
mate, but it is also very hard to threaten White's king with mate. Even if Black
succeeds in doing so, after ...Sx7h+; Kx7h R*5h, the rook gives check and covers
the 5th file, with a high likelihood of eliminating the mate threat.
 |
| Diagram 3 |
Let us look at some concrete variations. In Diagram 3, the most obvious mate threat
is N*6d. After ...Sx7h+; Kx7h R*5h; S*6h +Bx4f (Diagram B), White wins as Nx5b+ is
met by Rx5b+. Instead of N*6d, how about S*6a? This is also answered by ...Sx7h+;
Kx7h R*5h; S*6h (Diagram C). If now ...+Bx4f, Black has N*5c and mates, regardless
of whether White takes it with the gold or the silver. However, in Diagram C, White
can play ...G-5a, and it is very difficult for Black to continue threatening mate
now that he has dropped silvers on 6a and 6h.
 |
| Diagram B |
 |
| Diagram C |
Since White can give check to escape mate with the sequence Sx7h+ and R*5h, I had
the impression that I might be winning in Diagram 3. But in fact I still stand worse.
Even so, compared to the position in Diagram 1, it has become much more complicated
and I still have chances of turning the tables.
A Difficult Position
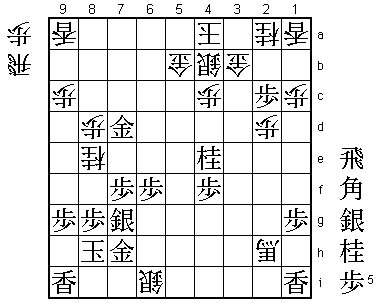
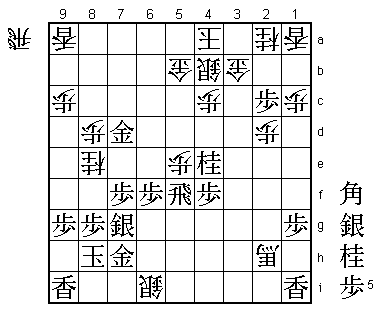
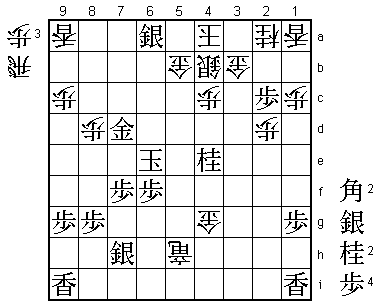
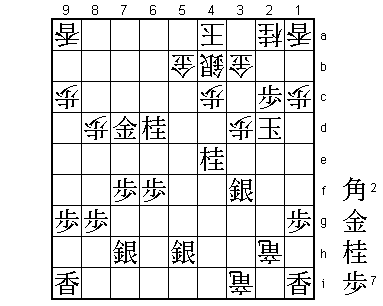
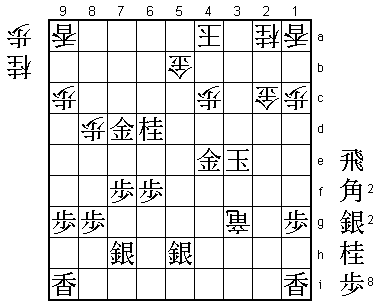
In Diagram 3, Ariyoshi 9-dan played R*5g (Diagram 4). This is a good move. Dropping the
rook on the 5th file, which is vital for both sides in this position, is effective for
both defense and attack. While eliminating the tactic ...Sx7h+ followed by ...R*5h, this
rook drop threatens mate by Rx5b+, etc. If White defends with a move such as ...P*5c, Black
can drive the attack home with successive mate threats starting with N*6d. White therefore
needs to escape the mate threat with one of his own. Does he have such a sequence? I now
spent 22 minutes trying to find a way.
 |
| Diagram 4 |
Instead of R*5g, R*5f was also possible, with the idea of eliminating the possibility
of ...+Bx4f. But White can answer R*5f effectively with ...P*5e (Diagram D). After Rx5e
Sx7h+; Kx7h Nx7g+; Kx7g S*6h; Kx6h +Bx4f, winning the rook on 5e. Black would have to
launch a decisive attack the moment White plays ...P*5e, but this seems very difficult.
 |
| Diagram D |
Not Quite Enough
After Ariyoshi 9-dan played R*5g (Diagram 4), I searched hard for a line enabling me to
escape the mate threat by threatening mate myself, but none of these variations seemed
to be quite enough. In order to win in this position, White must draw Black's king to 6h
or 7i so that he can pin the rook on 5g when he plays ...+Bx4f. And while meeting this
requirement, he must also threaten mate. I considered three ways of doing this. The first
was ...Sx7h+; Kx7h G*7i; K-6g Nx7g+; Kx7g S*6h; Kx6h +Bx4f. The second was ...Sx7h+;
Kx7h R*4h; S*5h Nx7g+; Kx7g S*6h; Kx6h +Bx4f. The third, the line played in the game,
was ...Sx7h+; Kx7h Nx7g+; Kx7g R*7i; S*7h S*6h; Kx6h +Bx4f (Diagram 5). In Diagram 4,
I would have liked to play ...Sx7h+; Kx7h R*7i, but after Kx7i +Bx4f, Black has the rook
drop R*5f (Diagram E), escaping the mate threat with his own mate threat. After examining
all these possibilities, I reached the conclusion that the third line was the best chance.
 |
| Diagram E |
The Psychological Factor
 |
| Diagram 5 |
The move that worried me most in Diagram 5 was Kx7i. Can White press home his attack
after ...+Bx5g; S*6h? During the game, I felt that after ...R*5i; N*6i P*7g (Diagram F);
S7hx7g, I would have something, but there seems to be no good way of continuing here.
However, the moment Black drops the silver on 6h, White's king can no longer be
easily mated, and this causes him to fear that White will be able to attack as he
pleases. The desire to avoid this is understandable from a psychological viewpoint.
 |
| Diagram F |
In the game, Ariyoshi 9-dan chose to counterattack with N*6d (Diagram 6), but this turned
out to be the losing move. The silver drop S*6a would have been a better way of
counterattacking. If White meets this as in the actual game with ...+Bx5g; Kx5g R-5i+;
P*5h (in the game, S*5h was played) G*4g, Black's king can escape by K-5f, when
after ...+Rx5h; K-6e (Diagram G) White has no forced mate. But if Black has played
N*6d instead of S*6a, White can mate immediately by ...R*5e. Since the knight on 6d cuts
off the king's escape route, Black has no choice but to take the gold when White
plays ...G*4g. This is why S*6a would have been better than N*6d.
 |
| Diagram G |
Nevertheless, N*6d is the first move one would think of and looks right. When a player
has two ways of threatening mate, he will always want to do so using the piece of
lesser value. This was the trap my opponent fell into, and in that sense I was lucky.
 |
| Diagram 6 |
Insurance Cover
From Diagram 6, the game continued ...+Bx5g; Kx5g R-5i+; S*5h (Diagram 7). The fact that
Black can defend with P*5h instead of S*5h makes this position more practically difficult.
At this point I only had 28 minutes left and it was very hard to thoroughly calculate all
the variations during this time. After S*5h G*4g; Kx4g R*4h; K-3f (Diagram 8), even if I
do not have forced mate, I am covered by the insurance that ...Rx5h+ prevents mate while
capturing a silver. But if Black had played P*5h, I would have faced the pressure of having
to mate after I sacrifice the gold with ...G*4g because I can only take a pawn on 5h. With
time running out in a close-fought endgame where it is either mate or not mate, win or loss,
the insurance cover provided by ...Rx5h+ gave me precious breathing space. S*5h made it easier
to play ...G*4g. However, it turned out that I did not have to go into the ...Rx5h+ line
because I had forced mate.
 |
| Diagram 7 |
 |
| Diagram 8 |
From Diagram 8, play continued ...P*3e; Kx3e +R-3i; G*3f (Diagram 9). If S*3f instead of
G*3f, ...P*3d; Kx2d R-2h+ (Diagram H) is decisive. If Black interposes a piece on 2g,
then ...+Rx2g; Sx2g +R-3e mate, or if N*2e S-3c; Nx3c+ Gx3c with a simple mate. The point
of G*3f is that it enables Black to interpose a piece on 2f.
 |
| Diagram H |
 |
| Diagram 9 |
Ariyoshi 9-dan played G*3f after 10 minutes' thought. I was grateful for these 10
minutes. At this point, I had just 20 minutes left and I still had 14 minutes left
when my opponent resigned. In view of this, I might well have found the mating line
in time even if he had played G*3f instantly. However, the sense of pressure is quite
different when you are thinking from when your opponent is thinking. During your
opponent's thinking time, you can analyze the position quite calmly, but when it is
your turn to move, with the time-keeper calling out the remaining time as it steadily
decreases, it's hard to keep your cool. So those 10 minutes spent on G*3f were very
important. During that time, I was able to calculate all the mating variations.
 |
| Intermediate Diagram |
After ...P*3d (Intermediate Diagram), if K-2f R-2h+ and, whatever piece Black interposes
on 2g, it is mate after ...P-2e; Gx2e (or Kx2e +Rx2g, etc.) +R3i-3g, etc. In the game,
Ariyoshi played Kx2d, which I answered with ...S-3c. If now Nx3c+, there is no forced
mate, but after ...Gx3c; K-2e Rx5h+ defends my own camp with a winning position, though
still difficult. Black therefore met ...S-3c with K-2e (Diagram 10). I now have a mating
line that is so spectacular that it surprised even me: ...Rx4e+; Gx4e S-2d. If now K-2f
S-3e K-2g N*1e is mate, so Black had to play Kx2d +R-2h; Kx3d (if Black interposes a
piece on 2e, G-3c mates) Gx2c; K-3e +R-3g (Resignation Diagram) and Ariyoshi 9-dan resigned.
Whatever piece Black interposes, White has a simple mate after ...P*3d. I was amazed
that the position could contain such a beautiful variation. Sometimes it seems that all
the pieces on the board are on your side. Even the opponent's pawn on 2c plays a vital
role. Surprisingly, without this pawn, there would have been no mate.
 |
| Diagram 10 |
 |
| Resignation Diagram |
