|
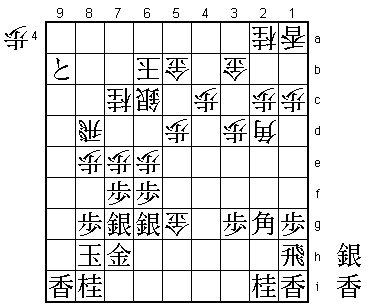
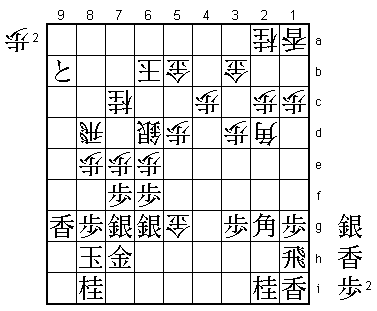
| Diagram 1 |
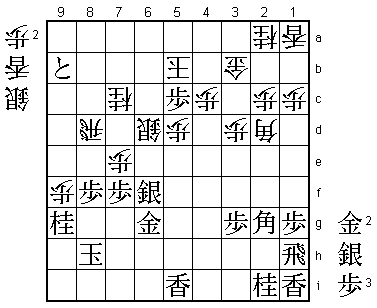
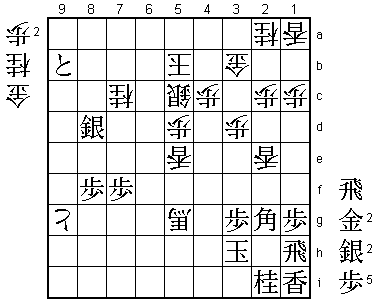
The position in Diagram 1 is from the first game of the 13th Kio Title Match. The middlegame is over and we are entering the endgame. In the opening I had made a slight error, allowing Black to open his rook's file with a clear advantage. From this strategic defeat, I had gradually recovered ground and the position in Diagram 1 is rather unclear.
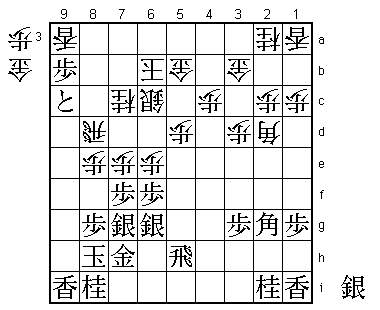 |
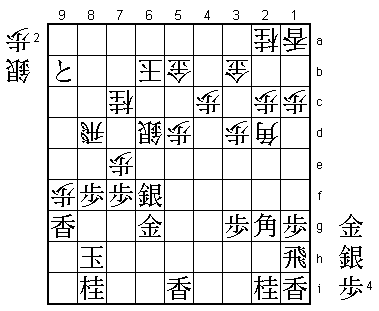
| Intermediate Diagram |
These complications were the result of Black's rather dubious move P*9b (Intermediate Diagram) a few moves earlier. White's aim here is to play the attacking gold drop ...G*5g. If he cannot play this move, he has no quick way of attacking. Therefore, instead of P*9b, Black's best move would have been the rock-solid S*6h (Diagram A), preventing ...G*5g. After this, he would have had ample time for an attack using his tokin on 9c.
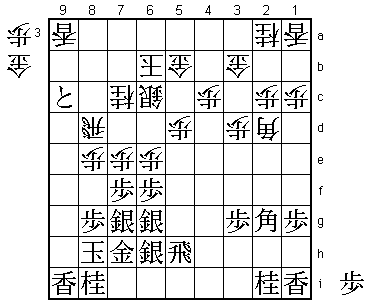 |
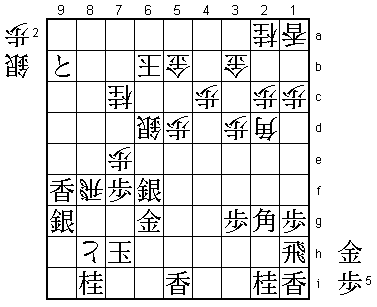
| Diagram A |
However, Kio Titleholder Takahashi overlooked S*6h, a move normally typical of his solid style, and played the pawn drop P*9b. After ...Lx9b; +Px9b, I succeeded in getting in ...G*5g and, after the rook escaped with R-1h, we reached the position in Diagram 1.
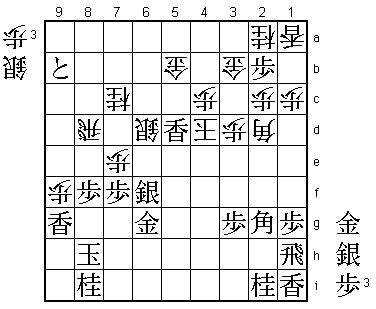
Here I examined the possibility of an all-out offensive, but it didn't seem to work. After ...P*9h; Lx9h P*9g; Lx9g Gx6g; Gx6g P-8f; Sx8f Px6f; Gx6f S*7i K-7h (Diagram B), White has no good way of continuing. It seems that the attack runs out of steam if White strikes too quickly in Diagram 1. As a result, my own rook on 8d is threatened and even my king might be in danger.
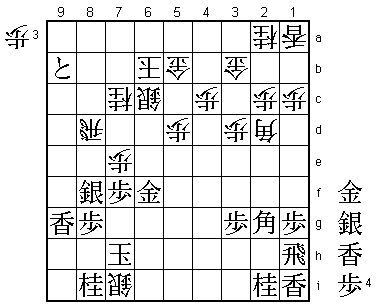 |
| Diagram B |
In Diagram 1, there is no immediate fear of the rook on 8d being attacked, but once White has opened hostilities with ...Px7f or ...Px6f, a silver comes to 7f or 6f, threatening to trap the rook. Sometimes when you attack, you draw the opponent's pieces forward and your own main attacking pieces come under threat. In such cases, it is essential to deliver mate quickly and efficiently.
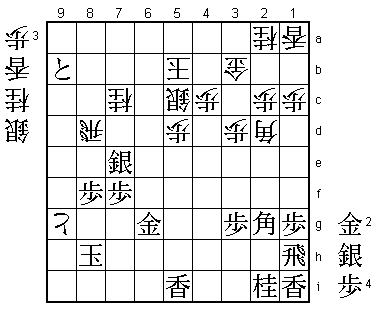
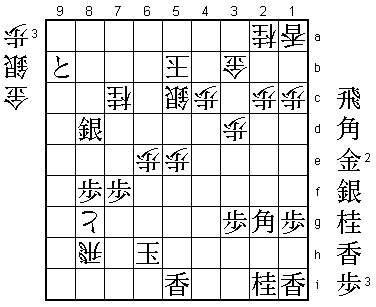
Therefore, from Diagram 1, after ...P*9h; Lx9h P*9g; Lx9g, I built up the attack with ...S-6d (Diagram 2). I did not play this move with much confidence. My opponent has a tokin and also the material advantage of a lance. In such adverse circumstances, giving up the initiative takes a fair amount of courage. The idea behind ...S-6d is that, after ...Gx6g; Gx6g Px6f; Gx6f, White can play ...N-6e. In Diagram B, White's attack has run out of steam, but with a knight on 6e, the situation would be quite different.
 |
| Diagram 2 |
In response to my ...S-6d, Takahashi thought for 62 minutes. This long think gave me the gratifying feeling that the position had now become quite difficult. Building up the attack with ...S-6d rather than rushing in immediately was one of the reasons I won this game.
 |
| Diagram 3 |
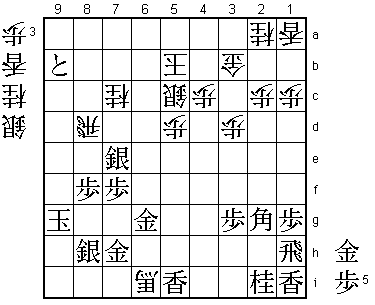
After 62 minutes' thought, the Kio Titleholder dropped a lance on the back rank with L*5i. Seeing that he had no effective defense, he aims to get counterattacking chances by bringing on White's attack and putting pressure on the 5d square. In response to L*5i, I executed my planned attack with Gx6g; Gx6g Px6f; Sx6f (if ...Gx6f; N-6e) P-8f; Px8f P-9f (Diagram 3). If Black now takes the pawn with Lx9f, ...Rx8f can be answered effectively by S*8g B-7i+; Kx7i Rx8g+; G-7g, but instead of ...Rx8f, White can play ...P*8g, and if Kx8g B-7i+, or K-7h Rx8f; S*9g P-8h+ (Diagram C) followed by taking the lance (after Sx8h).
 |
| Diagram C |
In response to my ...P*9f, Takahashi went for broke with P*5c. This gave me further cause for concern. If now ...Kx5c; Lx5d K-4d, I had no confidence in my position after either Lx5b+ or P*2b (Diagram D). P*2b may seem too slow, but after Px2a+ followed by R-4h and N*2e, White is close to being threatened with mate. If I were to simply ignore the pawn on 5c and continue with my attack, I would end up a whole gold down. However, after Px5b+ Kx5b, my king would be able to move with tempo from 5b to 4b, where it has greater freedom of movement. Taking the pawn with ...Sx5c or ...Gx5c (instead of ...Kx5c), leaving the king on 6b, would make it easier for Black to get counterattacking chances.
 |
| Diagram D |
In the endgame, you must give the highest priority to speed over material or any other considerations. By allowing Black to capture material with Px5b+ Kx5b, White's king escapes with tempo to more open seas where it will be difficult to catch. In the meantime, White wins time to play one more attacking move, giving him sufficient compensation for the material deficit. After ...Kx5b, it is very difficult to threaten White's king with mate, which makes my task easier.
 |
| Diagram 4 |
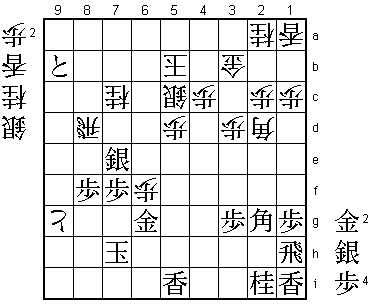
In fact, after P*5c, I realized that I had already turned the tables. When you have the advantage, it is best to simplify the position and quicken the pace. I therefore ignored the pawn on 5c and went for a direct attack with ...Px9g+; Nx9g P*9f, and Takahashi responded with Px5b+ Kx5b; P*5c (Diagram 4). I took this pawn with ...Sx5c and, after Sx7e, continued my attack with ...Px9g+ (Diagram 5).
 |
| Diagram 5 |
Here Takahashi escaped with K-7h, but I was more worried about Kx9g. After Kx9g B-7i+; S*8h +B-6i; G*7h we reach Diagram E. Dropping two generals in hand with S*8h and G*7h was a difficult decision to make but, from a psychological viewpoint, being faced with the capture of my rook and the possibility of an entering king would have been more unpleasant for me than the line he chose. After K-7h, I was able to play ...P*6f (Diagram 6) without worrying about the attack on my rook. Depending on whether Black's king is on 9g or 7h, the value of taking the rook is completely different. With the king on 9g, the rook is an important piece restricting its forward movement, but with the king on 7h, White need not worry about an entering king.
 |
| Diagram E |
 |
| Diagram 6 |
With ...P*6f (Diagram 6) I started the decisive attack. If now Sx8d Px6g+; Kx6g S*6f; K-5f (or Kx6f L*6e) S-5g+; Lx5g L*5e; K-4g Bx5g+; K-3h L*2e (Diagram F) and Black has no defense. Since Black cannot take the rook on 8d, he played Gx6f and play continued ...P*6e; G-5f L*6f; P*6h (Diagram 7). If Sx8d instead of P*6h, White forces mate by ...S*6g; K-8i P*8h; Rx8h N*7g; K-9i +Px8h; Kx8h B-7i+, etc. When you win with this kind of forced mate or decisive attack after ...S-5g+, the winning lines are often very close and pretty.
 |
| Diagram F |
 |
| Diagram 7 |
From Diagram 7 the game continued ...Lx6h+; Rx6h +P-8g; K-6g N*5e; Gx5e Px5e; P*4f Bx4f; Sx8d Bx6h+; Kx6h R*8h (Resignation Diagram) and Takahashi resigned. If Black had tried to hang on with S*5g instead of Sx8d, ...S*4g would have left him with no defense.
 |
| Resignation Diagram |
Ultimately this game was characterized by the difference in activity between Black's rook and White's bishop. With such a close struggle in prospect, when I played the gold drop ...G*5g, why did Takahashi move his rook to 1h rather than 2h, where he would have had possibilities of discovering an attack on the bishop on 2d? Moving a rook to the square above the lance is a solid way of playing that players usually chose when they think they have a clear advantage. The rook and the lance defend each other, which alleviates concerns about a possible tactical shot. Takahashi may not have realized how close the gap had become when I played ...G*5g. In view of the subsequent play, his rook would have been more actively placed on 2h.
The move that enabled me to win this game was ...S-6d (Diagram 2). Usually, when your opponent has a material advantage as well as a tokin, you must quickly take the initiative, but if I had done this my attack would have failed. It took some nerve to put the ball back in my opponent's court, but it turned out well. I was fortunate that Takahashi did not have a more effective response to ...S-6d. It was an unusual move in an unusual position, achieving success by reversing one of the general principles of the endgame. I could be proud of ...S-6d if it had been the first move that came to mind, but I played it without confidence and after much agonizing. It is not a winning move I can boast about.