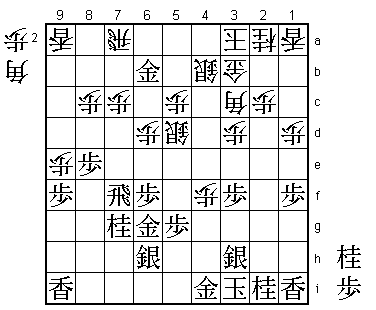
At the time of this game, I was in the depths of a slump in my playing form. I lost two very important games – the final game of the 1986-87 Junisen League and the fourth game of the 12th Kio Title Match. Thus I lost my only title and the chance to become the Meijin challenger. This game from the 28th Oi League was played after these defeats against Atsuo Ono 5-dan, who had just achieved promotion to the C1 Class of the Junisen League. While I was in my worst form ever, my opponent had just emerged victorious from the fierce struggle of the C2 Class. I very much wanted to win this game, absorb some of Ono's momentum, and break out of my slump.
 |
| Diagram 1 |
In Diagram 1, Ono 5-dan has just dropped his gold on 6b, attacking my rook. I had already spoiled my strategic victory in the opening by carelessly playing moves in the wrong order, resulting in a difficult position. I spent 57 minutes on my next move, ...B*8g. During this time I tried to assess the position in Diagram A, some thirty moves on from Diagram 1 (I will give these moves later). Black's king is very insecure and White's promoted bishop is optimally placed for both attack and defense. However, White is a whole rook down and, though I could hardly feel confident about the outcome, a close and unclear struggle was likely to continue for some time. To be frank, I was unable to reach a definite conclusion about this position even after nearly an hour's analysis.
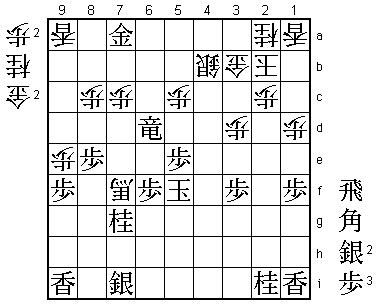 |
| Diagram A |
Next I considered ways I could avoid reaching Diagram A. Perhaps it was a symptom of my bad form, but this negative attitude of avoiding lines one doesn't understand cannot be commended. Seeing further ahead than your opponent is not the only important thing in a game of Shogi. It is also important to be decisive and bold enough to dive into positions you don't understand. When you are in poor form, however far you can see ahead, you seem to lack the courage to take the plunge.
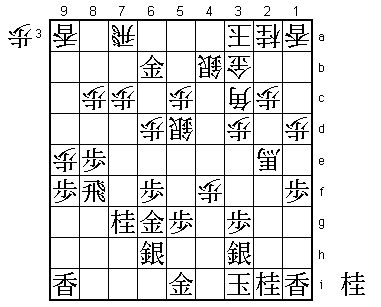
In Diagram 1, I played ...B*8g. This move loses material, but as Black's gold will be out of play after he takes the rook with Gx7a, I thought I would still have good chances. If he meets ...B*8g with R-7e, White has ...P-7d, and if R-8f, B-6i+ looks promising. Black will now try to eliminate the powerful threat of ...P-4g+ with G-5i, but the promoted bishop escapes with ...+Bx3f; P*3g +B-2e (Diagram B). If White continues to chase it with N-1g, then ...+B-3e, and if now Gx7a, ...P-1e strikes at the vital point. Even though White is material down, he has the advantage because Black's king position is so bad.
 |
| Diagram B |
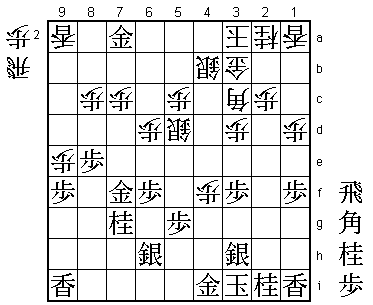
Black therefore decided to play Gx7a rather than remove his rook from attack, and after ...Bx7f+; Gx7f we reached Diagram 2. Here I am actually a gold and a knight down. Generally speaking, when you have a material disadvantage you should try to steer the game into stormy waters. The longer the position remains calm, the more likely the difference in material will tell. In Diagram 2, if the material deficit were not so great, the right approach would be to play ...R*8i and take the lance on 9i, but I thought I had to attack fast. In Diagram 2, ...R*6i is the only move to intensify the struggle. With this move, I'm sending the message to my opponent that I intend to finish him off quickly.
 |
| Diagram 2 |
Black has a rook, bishop, and knight in hand, but fortunately my king position is quite solid, so it will not be easy to launch a mating attack. If Black answers ...R*6i with S-5i, then White can be satisfied after ...Rx9i+. Rather than playing ...R*8i followed by ...Rx9i+, my aim was to make Black lose a move with ...S-5i.
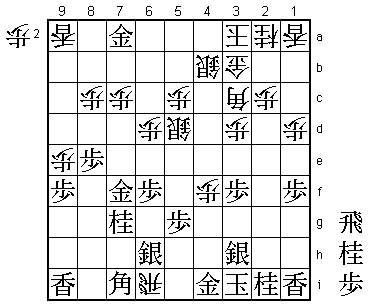
Ono 5-dan answered ...R*6i with by dropping a bishop inside his own camp with B*7i (Diagram 3). This was the move I feared most during my 57 minutes' thought, and it was the reason why I could not feel completely confident when I played ...B*8g. If Black can play G-5i and take my rook, the game will be over.
 |
| Diagram 3 |
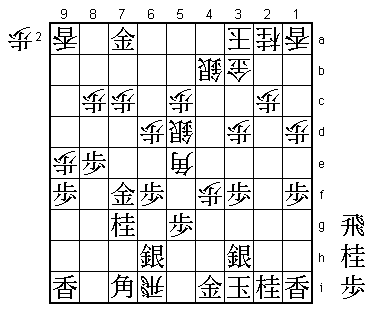
In response to B*7i (Diagram 3), I played ...B-5e (Diagram 4) in "zero time." According to the time-keeping system, if you move within one minute, the time is not recorded regardless of whether you take 10 seconds or 59 seconds. But I actually played ...B-5e instantly. Usually I look at the position for about ten seconds before making even the most natural or forced move. I played this move immediately because I was not at all confident. The aim of ...B-5e is to play ...P-4g+ and Bx1i+, and this threat is very difficult to meet. The only way of defending would be N*3g, but to part with a knight in hand in this way would be too high a price to pay, not to mention the unpleasant prospect of ...P-3e.
 |
| Diagram 4 |
I played ...B-5e instantly, as if to say "this is the coup de grace," but I was actually hoping to discourage the natural reply P-5f. By dropping the bishop with such confidence, I was implying that a straightforward move like P-5f would lose at once. My 57 minutes' thought and the position in Diagram A stemmed from the variations arising from P-5f. It is an extremely difficult position. Of course, Ono 5-dan was also aware of P-5f, but after the game he told me that, because I had played ...B-5e so confidently, he had trusted me against his better judgment. It is sad to reflect that I may have won this game merely by "intimidation."
 |
| Diagram C |
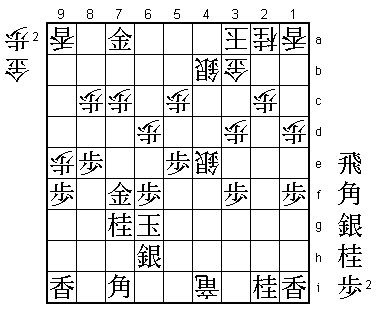
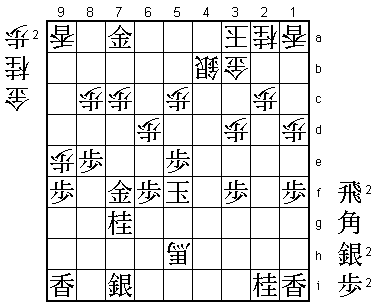
After P-5f, play would proceed ...P-4g+; Px5e +Px3h; Kx3h S*4g; Kx4g Rx4i+; K-5g S-4e; K-6g (Diagram C). Since White's material deficit has become even greater, he must find a way of creating a mating net. After a move like ...+R-6i, Black can give his king more breathing space with G-8f or G-7e. Therefore White must pursue the attack fiercely with ...+Rx7i. After Sx7i B*4i; N*5h S-5f; Kx5f B-5h+ (Diagram D) and, with White threatening mate by both ...N*4d and ...G*5g, the position is surprisingly difficult to defend. But Black has a neat way of hanging on: R*6a K-2b (or P*4a); Rx6d+. This defends against the mate threat by ...N*4d and, after ...+Bx7f, we reach the position in Diagram A given at the beginning of this chapter. This is a very difficult position, where Black will attack with moves like S*4a and P*2d and White will try to restrict the movement of Black's king by harassing the promoted rook on 6d with P*6c or N*5b. I considered this position for almost an hour and, having failed to reach a definite conclusion, decided that I should avoid it if possible.
 |
| Diagram D |
 |
| Diagram A |
 |
| Intermediate Diagram |
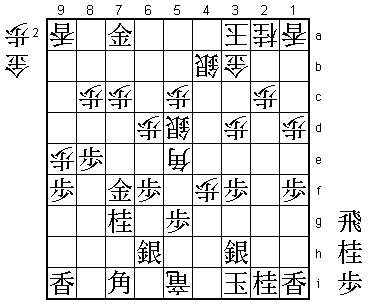
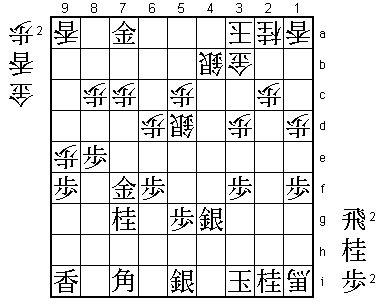
After seeing my instant reply ...B*5e, the normally cautious Ono 5-dan played G-5i after only two minutes' thought. But this was a fatal mistake. After G-5i Rx5i+ (Intermediate Diagram); Sx5i P-4g+; Sx4g; Bx1i+ (Diagram 5), my attack is decisive. The key point is taking the gold with ...Rx5i+ rather than the bishop with ...Rx7i+. In Diagram 5, Black is a whole rook up, but the material situation no longer matters. White threatens the powerful lance drop ...L*4c, and if the enemy king tries to escape, he can take the knight on 2i. Moreover, with the gold on 7a, Black cannot play R*6a (because he loses the rook after ...G*5a). If the king does move to the left, White will later be able to play ...S*7h, restricting the king's movement while attacking the bishop. It would be better for Black if he did not have a bishop on 7i. As a result of just one defensive mistake, all the pieces on the board suddenly seem to be working in White's favor.
 |
| Diagram 5 |
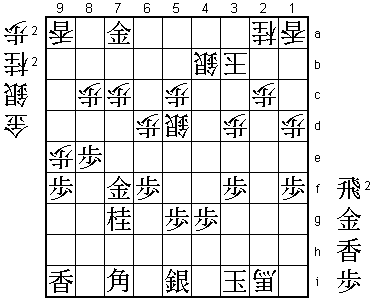
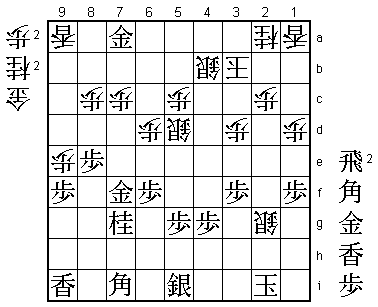
Realizing he had no good defense, Ono 5-dan accepted his fate with N*4d. The game continued ...L*4c; Nx3b+ Kx3b; P*4h Lx4g+; Px4g +Bx2i+ (Diagram 6). ...+Bx2i is a satisfying and decisive final blow. Since ...N*4f wins if the king escapes, Black played Kx2i, but had to resign after ...S*2g. This is a textbook brinkmate position with a gold and knight in hand. Defensive rook drops such as R*3h or R*2h are answered by ...N*3g.
 |
| Diagram 6 |
 |
| Resignation Diagram |
This win came after successive losses and I cannot feel very proud of my play. But when you are losing a lot, a win is the best medicine regardless of how you achieve it. When Ono 5-dan told me after the game that he had "trusted me," I replied, "Surely you must be aware of my recent form." The next time we play, I will try to ensure that his trust is well founded.
This way of winning is not really commendable. In that sense, it was part of a series of losses which gave me much food for thought. But it is also true that the harder the victory, the more strongly you feel its importance. Winning a game in which you have suffered can trigger the process of recovery. Whatever the circumstances, you must always give it everything you have.
A final thought. In the position in Diagram 2, instead of my ...R*6i, the correct solution may after all have been the steady ...R*8i, although the position would still have been slightly worse for me.