Lightning Speed Endgame Technique
Koji Tanigawa, Meijin
Part Four: Table-Turning Technique
Chapter 3: Creating a Sense of Danger
Black: Koji Tanigawa, Kio Titleholder
White: Bungo Fukusaki, 10-dan
28th Oi Tournament, Kansai Shogi Kaikan, December 23, 1986 (5 hours each)
P-7f P-3d; P-2f P-4d; P-2e B-3c; S-4h R-2b; K-6h S-4b; K-7h K-6b; G4i-5h K-7b;
P-5f K-8b; S-5g L-9b; P-3f S-4c; S-4f G-3b; G5h-6h K-9a; P-3e S-8b; R-3h P-4e;
S-5e Px3e; Rx3e P-5d; P*3d Sx3d; Rx3d Px5e; Px5e G-4c; R-3f P*3d; N-3g G-4d;
P-5d P-3e; R-1f P*5b; P-2d Px2d; P*2c Rx2c; S*3b R-2b; Sx2a= S*5e; N*5g P-4f;
N5g-4e B-5a; Px4f Gx5d; P*3c P-2e: S-3b= R-2d; S-4c= G-6e; P-3b+ R-8d; Bx5e Gx5e;
+P-4b Bx4b; Sx4b+ B*2h; B*3c G-6e; Bx1a+ Gx7f; G-7g Gx7g; +Bx7g Bx1i; Rx1c+ +Bx3g;
+R-1a G*7a; L*8f R-7d; P*7f +Bx4f; Lx8c+ Sx8c; +Sx5b P*5a; +Sx5a G6a-7b; +S-6a Gx6a;
+Rx6a N*6e; +B-6f L*7g; Nx7g Nx7g+; +Bx7g N*6e; G*6h Nx7g+; Gx7g +Bx4e; L*8f N*6e;
G-6h Nx7g+; Gx7g L*6e; G*6h S*6f; S*5h (Diagram 1) G*7a; +Rx7a Sx7g+; Gx7g Gx7a;
Lx8c+ P*8b; N*9e G*7b; N*7e B*9d (Diagram 2); G*8d Rx8d; +Lx8d R*5d (Diagram 3);
R*4h P*4g; +Lx9d Px4h+; P*5f (Diagram 4) G*6h (Diagram 5); Sx6h +Px5h; S*7i +Px6h;
Sx6h +Bx5f; P*5g Lx6g+; Gx6g (Diagram 6) +Bx6g; Sx6g R*4b; G*5h S*6f; N*8c Px8c;
N9ex8c= Gx8c; Nx8c= K-2b; S*9a K-7b; Nx7a+ Kx7a; S-8b+ K-6b; G*7b (Diagram 7) K-5b;
B*6a K-4b; B*1e S*3c; Bx4h G*7g; K-6i Sx6g+; R*1b Resigns
(Times: Tanigawa 4hrs 50 mins; Fukusaki 4hrs 59 mins)
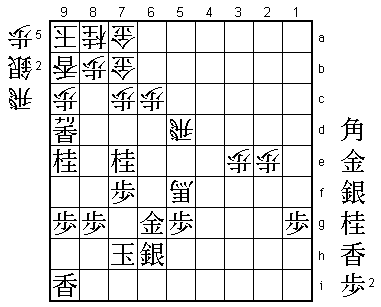
 |
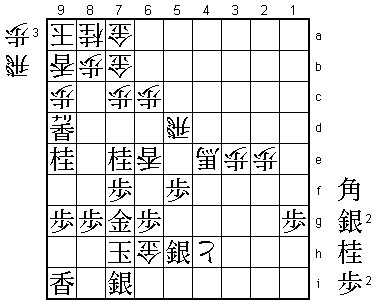
| Diagram 1 |
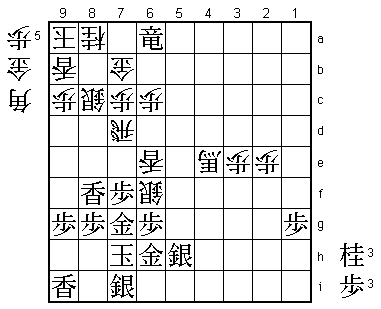
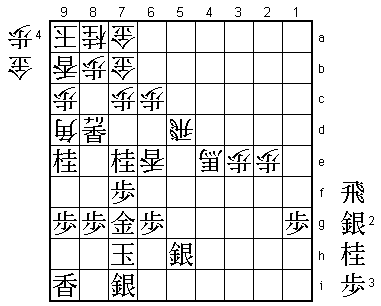
This is my game at the end of 1986 against Fukusaki 10-dan, who had something of a
reputation at the time for his unique style of play with the anaguma (bear-in-the-hole)
castle. I would have liked to tell you how I brilliantly took the anaguma apart, but
having failed to capitalize on my advantage earlier, I already have a completely lost
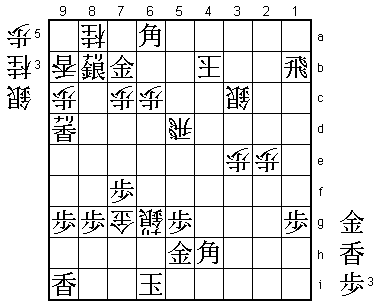
position in Diagram 1. In reply to Fukusaki's sharp silver drop ...S*6f, I have just
played S*5h but this is not an adequate defense. The correct move now is ...B*3d, and if
Fukusaki had found it, the game would have been over. I was even thinking of giving up by
playing +Rx7b and allowing myself to be mated. After ...B*3d; +Rx7b Sx6g+; Sx6g Lx6g+;
G6hx6g +Bx6g; Gx6g Rx7f (Diagram A) and mates, whichever piece Black interposes on 7g.
If S*7g Bx6g+; Kx6g G*5f (Diagram B), and now (1) K-7h Rx7g+; Kx7g G*6g; K-8h S*7g; K-9h
G*8h Sx8h S*8i; Kx8i G-7h and mates, or (2) K-5h G*5g; K-6i S*6h; S7ix6h G*5h; K-7h G5hx6h;
K-8i G-7h; Kx7h; G6f-6g K-8i; P*8h and mates. Both these lines are long, but since they
are straight with no detours, the mate is not so difficult. If the position had been
presented to my opponent as a next-move problem, I think he would have found ...B*3d
instantly. It is baffling that Fukusaki 10-dan, who is reputed for his endgame ability,
could have overlooked this move. I suppose he didn't believe there could be such a simple
win, and this highlights the difficulties players face in the heat of the battle.
 |
| Diagram A |
 |
| Diagram B |
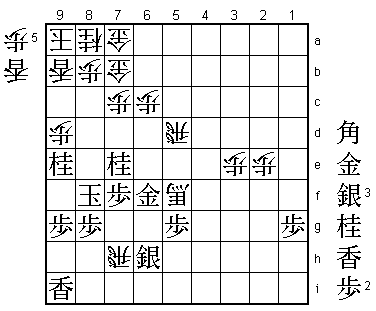
Tightening the Grip
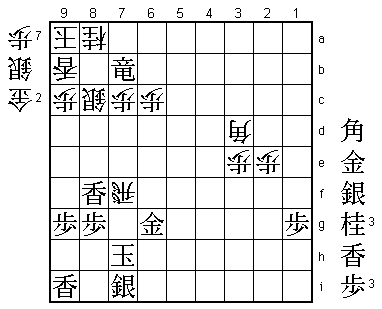
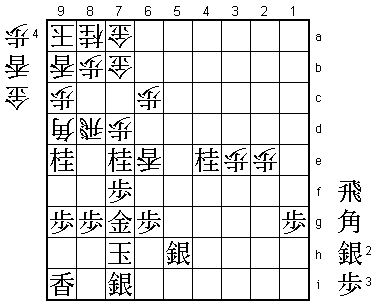
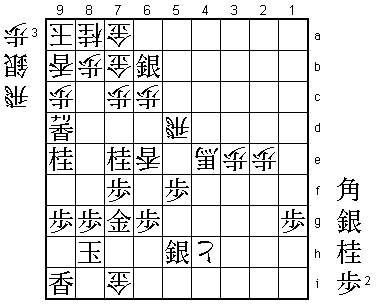
In Diagram 1, White went wrong with ...G*7a and play continued +Rx7a Sx7g+;
Gx7g Gx7a; Lx8c+ P*8b; N*9e G*7b; N*7e B*9d (Diagram 2). Fukusaki 10-dan defends
stubbornly against my assault on the 8c square, the weakest point of the anaguma
castle. Though he cannot do so immediately, White is already in a position to close
in on Black’s king. For instance, after ...P*5g and ...Px5h+, it would almost be
brinkmate. By dropping pieces defensively in his own camp, the anaguma player gains
time to play these two attacking moves. This sense of speed is a distinctive feature
of the anaguma.
 |
| Diagram 2 |
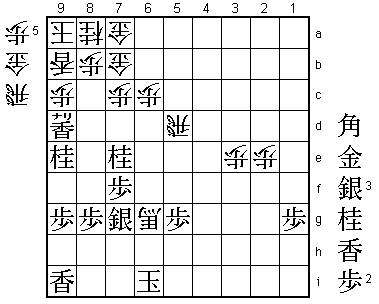
For my part, the worst possible plan in Diagram 2 would be to play for a material advantage
by +Lx7b Gx7b, etc. because I would lose the foothold for my attack. Before White has time
to play ...P*5g and ...Px5h+, I must create a situation where I can threaten mate. I therefore
played G*8d to further tighten my grip on 8c. This may well have been the key to turning the
tables.
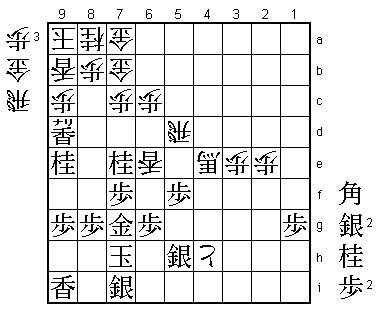
If now ...Px8c, Gx9d Px9d; N9ex8c=, forcing the bear out of his hole. For the anaguma player,
a knight on 8c poses the most dangerous threat. Once this is achieved, the opponent will have
good winning chances. White therefore did not take on 8c, but hit back with ...Rx8d; +Lx8d
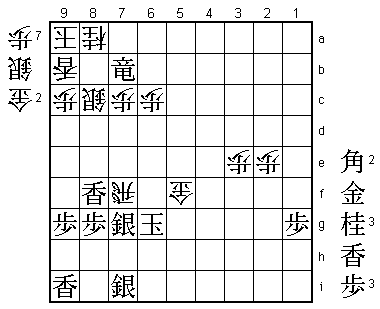
R*5d (Diagram 3).
 |
| Diagram 3 |
A Careful Move: R*4h
...R*5d threatens mate by ...Rx5h+, etc. Its aim is to remove the promoted lance on 8d after
Black defends against this threat and then take advantage of White's solid king position. It
would be fine if Black could meet this with the knight drop tesuji N*5g, but after ...Rx8d;
Nx4e P-7d (Diagram C), although Black has restored the material balance, the prospect of the
pawn advancing to 7e while taking the knight is very unpleasant. This is clearly a line where
the solid anaguma castle prevails.
 |
| Diagram C |
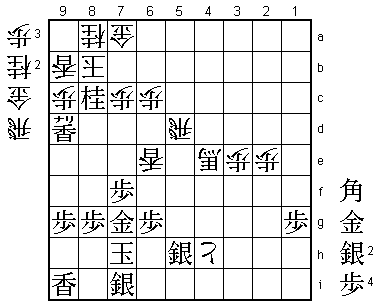
In Diagram 3, I dropped a rook in my own camp with R*4h. Instead of having a knight on 4e,
as in Diagram C, I thought that a rook on 4e would be attacking the lance on 6e and therefore
be more effective than a knight, which threatens nothing. But R*4h is not a move to be proud of.
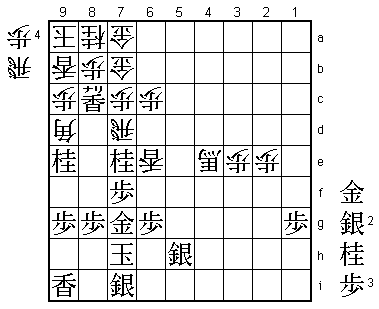
It is the prelude to a laborious defense after ...P*4g; +Lx9d Px4h+; P*5f (Diagram 4).
 |
| Diagram 4 |
Instead of P*5f, it would be nice if I could mate with N*8c, but after ...Px8c; N9ex8c= Gx8c;
Nx8c= K-8b (Diagram D), the thickness provided by White's rook and promoted bishop make it impossible
to force mate. I therefore calmly played P*5f, which immediately restricts the movement of both rook
and promoted bishop. This pawn at a key point makes it very hard for White to threaten mate. ...+Bx5f
would block out the rook and after ...Rx5f; P*5g, the promoted bishop's diagonal is blocked. These
considerations seem to justify the sacrificial rook drop R*4h.
 |
| Diagram D |
Sharp Perception
 |
| Diagram 5 |
At least I thought so until Fukusaki 10-dan, after six minutes' thought, dropped his
gold with ...G*6h (Diagram 5). This powerful and sharp move is typical of his style,
and it took me by surprise. The normal move here would be ...+Px5h, but it does not
threaten mate because, even with the tokin on 5h, Black's king escapes with K-8h
after ...G*6h. Since the king can still get away with the tokin on 5h, White plays
the sacrificial gold drop first. This sharp perception is one of the most attractive
aspects of Fukusaki's playing style.
 |
| Diagram E |
Can Black get away with K-8h after ...G*6h? White will reply with ...Gx7i, but this does
not threaten mate, so I will win if I can threaten mate myself. I therefore considered
S*6b (Diagram E). If now ...G7ax6b; N*8c Px8c; N9ex8c= Gx8c; Nx8c= K-8b; S*9a K-7b; G*7a mate,
or if ...G7bx6b; N*8c Px8c; S*8b (Diagram F) Gx8b (if ...Kx8b N9ex8c+ followed by +Nx9b mates);
N9ex8c= Gx8c; Nx8c= K-8b; B*9a K-7b; G*7a mate.
 |
| Diagram F |
It looks as if Black is winning, but in fact White has a good reply to S*6b: he can take the
promoted lance with ...Px9d. Now Black must play Sx7a= to threaten mate, and if ...Gx7a; N*8c Px8c;
S*8b Gx8b; N9ex8c= Gx8c; Nx8c= K-8b; B*7a mates. But what if White answers Sx7a= by taking the
knight with ...Px9e (Diagram G)? White has escaped the mate threat and is now threatening mate
himself by ...N*9f; Px9f R*8i; K-9h L*9g. By taking the promoted lance on 9d and knight on 9e,
White has succeeded in escaping a mate threat with a mate threat.
 |
| Diagram G |
After 13 minutes' thought, I abandoned the idea of K-8h and S*6b.
The Losing Move
I now realized that I had no choice but to answer Furusaki's fiendish ...G*6h (Diagram 5)
with Sx6h, but if this is the only move, I must be losing. White replied with ...+Px5h.
This does not seem to threaten mate, but the moment I threaten mate, White can always
remove the promoted lance and knight by ...Px9d and ...Px9e, escaping the mate threat
and threatening mate himself. With no effective means of attacking, I stubbornly resisted
with S*7i and the game continued ...+Px6h; Sx6h +Bx5f; P*5g Lx6g+; Gx6g (Diagram 6).
 |
| Diagram 6 |
In the position in Diagram 6, White has a decisive move. Here Fukusaki 10-dan
played ...+Bx6g, which turned out to be the losing move. Correct was ...S*7g. Fukusaki
is reputed for his endgame ability, but in this game he was out of form and his endgame
errors are conspicuous. After ...S*7g, Black can play either Kx7g or Sx7g. If Kx7g S*6f;
Gx6f R*7h; K-8f Px9d (Diagram H), threatening mate by ...L*8d; any interposition on 8e Lx8e, etc. White's promoted
bishop on 5f defends against mate. Alternatively, if Sx7g S*6i; Kx6i +Bx6g (Diagram I),
where Black's king is in brinkmate and, although he has many pieces in hand, there seems
to be no way of forcing mate. Fukusaki had already used up all his allotted thinking
time and was in byoyomi, having to play each move within one minute. Short of time, he may
have felt it was too dangerous to enter such a line because it involved handing over so
many pieces.
 |
| Diagram H |
 |
| Diagram I |
+Bx6g in Diagram 6 was the losing move. At last the tide had turned in my favor.
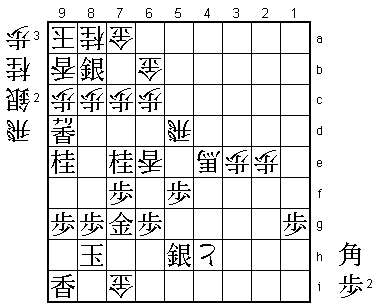
The game continued Sx6g R*4h; G*5h S*6f; N*8c Px8c; N9ex8c= Gx8c; Nx8c= K-8b; S*9a K-7b;
Nx7a+ Kx7a; S-8b+ K-6b; G*7b (Diagram 7). It may seem that I'm just chasing White's king
without any prospect of mate, but that is not the case. There is no forced mate in
Diagram 7, but wherever White's king goes, he runs into a king and rook fork or another
highly effective bishop drop. If Black had taken the rook with Gx4h instead of playing
N*8c in the above line, he would have lost after ...S*7g; K-7i Px9d, escaping the
mate threat and threatening mate.
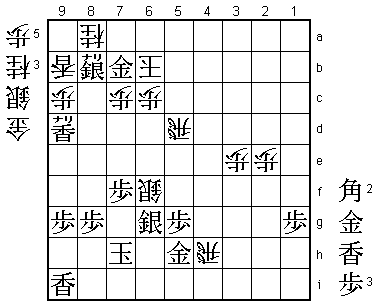 |
| Diagram 7 |
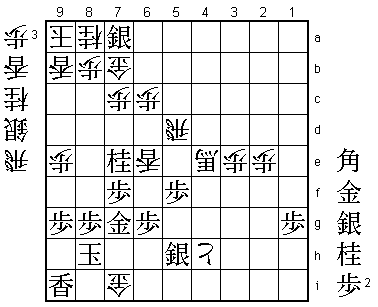
In Diagram 7, if ...K-5a; B*1e, or if ...K-5c; B*8f, continuing the attack while defending
the 7g square. If now ...N*7e; Bx7e Sx7e; Gx4h, removing the rook and threatening mate by
N*4e, etc., with a sure win for Black. White therefore had no choice but to play ...K-5b,
but after B*6a K-4b (or ...K-4a; B*2c); B*1e S*3c; Bx4h G*7g; K-6i Sx6g+; R*1b (Resignation Diagram)
and Fukusaki 10-dan resigned. It is mate after ...N*2b (or ...S*2b; Rx2b+ Sx2b; G*4c, etc.);
G*4c K-3a R-1a+, etc.
 |
| Resignation Diagram |
The strength of the anaguma castle is its solidity, speed, and the fact that the king cannot
be checked. With such a strong guard, the anaguma player can stand his ground and trade punches.
In this game, I was able to turn the tables because I kept a firm grip on the 8c square without
immediately dropping and exchanging pieces there. I only showed my trump card N*8c at the last
moment, so it remained a constant real and imagined threat for my opponent. When playing against
the anaguma, you must above all avoid letting your opponent do all the attacking. Being able to
focus entirely on the attack without worrying about his king is the ideal situation for the
anaguma player. The constant possibility of checking with N*8c prevented White from devoting
all his energy to the attack and led to the final reversal. Without this threat, his attack
would undoubtedly have prevailed. In many cases, it is this sense of danger that lies behind
a dramatic comeback.