Lightning Speed Endgame Technique
Koji Tanigawa, Meijin
Part Four: Table-Turning Technique
Chapter 2: How to Play an Unfavorable Endgame
Black: Michio Ariyoshi, 9-dan
White: Koji Tanigawa, Kio Titleholder
45th A-Class Junisen League, Shogi Kaikan, February 6, 1987 (6 hours each)
P-7f P-8d; S-6h P-3d; S-7g S-6b; S-4h S-4b; G-7h P-5d; K-6i G-3b; P-5f K-4a;
G-5h G-5b; P-3f P-7d; P-6f P-6d; P-2f N-7c; P-2e S-3c; G5h-6g S-6c; B-7i P-8e;
P-3e Px3e; Bx3e (Intermediate Diagram 1) S-4d; P-2d Px2d; P*2c Gx2c; Bx2d Gx2d;
Rx2d (Intermediate Diagram 2) S-3c; R-2c+ G-4b; +R-2h G-3b; S-3g P*2c; S-4f S-4b;
K-7i P-1d; P-1f P-9d; P-9f P*3d; +R-3h B-4d; K-8h P-6e; P-5e Px6f; Gx6f P*6e;
G6f-6g P-8f; Sx8f B*6d; G6g-7g P*8e; S-9g P-9e; Px9e P-7e; Px7e Bx7e; P*7f B7e-5c;
N-3g S-7d; N-4e B-6d; P*2b Gx2b; P-7e Bx7e; G-7f P*7g; Nx7g Bx9g+; Lx9g P*7e;
B*6d S*6b; P*6c S7dx6c; Bx7e P*7d; Bx4b+ Kx4b; +Rx3d G-3b; P*2b P*3c; +R-3h Gx2b;
P-9d S-6d; P-9c+ R-8a; Px5d P*5b; P*6c Sx6c; S*5e G-3b; +P-9b R-6a; P*2b Sx5e;
Sx5e Bx5e; S*5c Px5c; Px5c+ K-3a; Px2a+ Kx2a; P*3d (Diagram 1) Lx9b; Lx9b+
S*3g (Diagram 2); +R-5h P-7e (Diagram 3); +Rx5e Px7f; B*5g Px7g+ (Diagram 4);
K-9h P*9g; Kx9g B*7e (Diagram 5); Bx7e N*8c (Diagram 6); Nx3c= K-2b; G*2a K-1b;
B*5g P*9f; Kx9f P*9e; K-9g S*9f; K-9h Sx8g+; Gx8g +Px8g; Kx8g Nx7e; Bx7e S*8f;
Bx8f Px8f; Kx8f B*6h; P*7g G*9f Resigns
(Times: Ariyoshi 5 hrs 52 mins; Tanigawa 5 hrs 53 mins)
Since it always involves a psychological element, turning the tables is quite difficult
to discuss thematically. A bad move by the opponent is a necessary requirement, and one
of the most important factors influencing this is his mental state. If you have a bad
position and your opponent plays the best moves, it's impossible to reverse the situation.
Turning the tables can generally be divided into two types: a sudden reversal resulting
from a major blunder or a gradual reversal as the opponent repeatedly fails to find the
best move. Most table-turning incidents in professional Shogi are the latter type. For
this reason, when explaining such an incident, the process leading up to it is more
important than the position where the reversal occurred. Shogi is a curious game.
Sometimes you give up hope when you only have a slight disadvantage, but sometimes,
even when your opponent has a big advantage, you feel you still have a chance because
of what has happened so far. Underlying this are feelings and impressions that only the
players are aware of. It is not just the position on the board but their fluctuating
mental state that produces dramatic reversals.
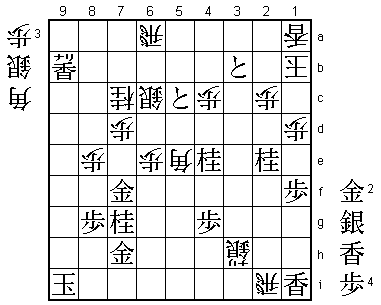
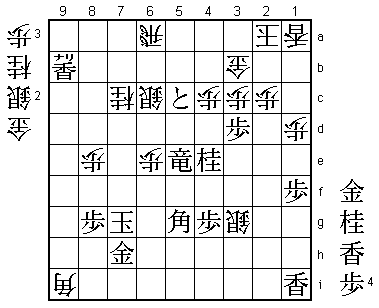
 |
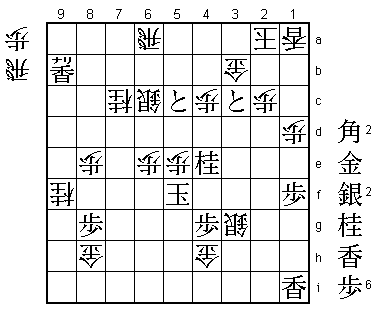
| Diagram 1 |
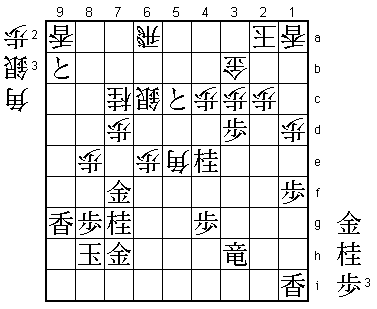
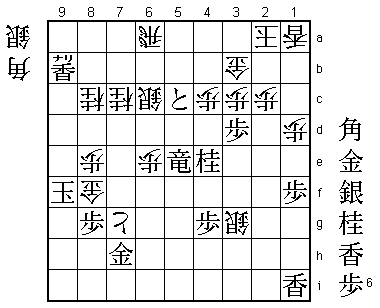
The position in Diagram 1 is from the penultimate round of the 1986 A-Class Junisen
League. It is the endgame from my game with Ariyoshi 9-dan and I am completely
lost. If I were asked to assess the position, I would have to reply that
White could consider resigning here, but only if I completely ignored what had already
happened in the game.
 |
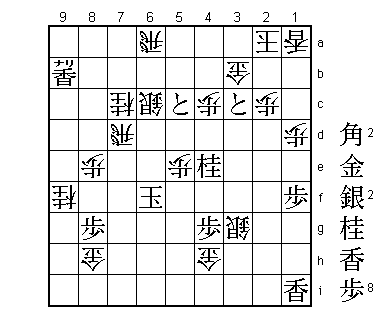
| Intermediate Diagram 1 |
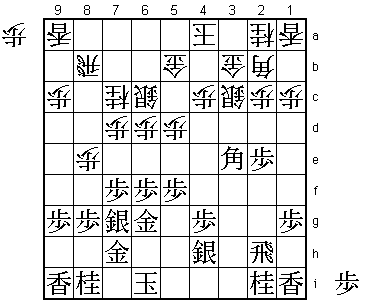
Take a look at Intermediate Diagram 1. This is from the opening, where Ariyoshi 9-dan has
just exchanged off his third-file pawn with P-3e Px3e; Bx3e. Perhaps in keeping with my style,
I now played a move that defied common sense. From Intermediate Diagram 1, the game
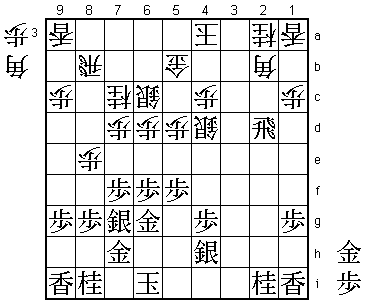
went ...S-4d; P-2d Px2d; P*2c Gx2c; Bx2d Gx2d; Rx2d (Intermediate Diagram 2). This is the
kind of sequence that might appear in a textbook explanation of how to break through on
the rook's file. I was of course aware of this, but I deliberately invited it. Simply
stated, my whole-board perception led me to believe that the exchange of gold for bishop,
with an extra pawn as well, could not be so bad. But in fact ...S-4d, rather than defying
common sense, seems to have simply displayed a lack of it. My opponent promoted his rook
with tempo and gradually increased his advantage. As a result, I spent half the day worrying
about my bad positional judgment.
 |
| Intermediate Diagram 2 |
Natural but Bad Moves
In the position in Diagram 1, Ariyoshi 9-dan played a couple of bad moves that enabled me
to turn the tables. In retrospect, it seems that it is very easy for Black to go wrong in
this position. As you will see from the subsequent play, it's a tricky position where
natural-looking moves turn out to be bad.
 |
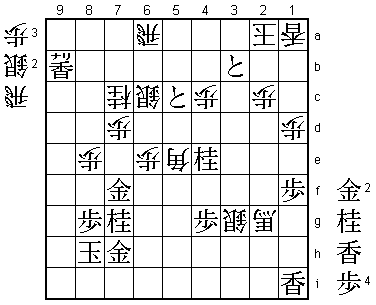
| Diagram 2 |
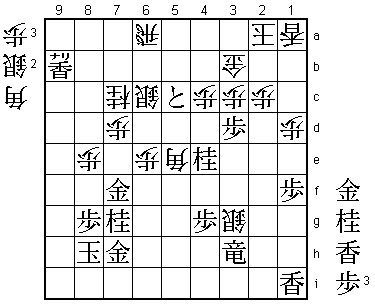
From Diagram 1, play continued Lx9b; Lx9b+ S*3g (Diagram 2) +R-5h P-7e (Diagram 3).
If ...Px3d instead of ...Lx9b, P*3c would leave White with no good reply. There does not
seem to be any way of defending, so I played ...Lx9b to put myself in a position to check
Black's king. Lx9b+ is a natural reply, but here P*9f would have sealed White's fate and
of course Px3c+ would also have won. But after ...S*3g, Px3c+ allows a tricky defense
with ...Sx3h+; +Px3b K-1b; N*2e S*9i; Kx9i R*2i (Diagram A), picking up the knight on
2e and enabling White to hang on. The best reply to ...S*3g was +R-2g, when play might
continue ...B*4i; Px3c+ Bx2g+; +Px3b (Diagram B), when the promoted bishop on 2g gets in
the way, making it impossible to remove the knight after ...K-1b; N*2e. White must therefore
play ...Kx3b, but P*3c Bx3c (if …K-2b; N*2e) Nx3c+ Kx3c; G*3e puts his king in virtual brinkmate.
 |
| Diagram A |
 |
| Diagram B |
In Diagram 2, Ariyoshi played +R-5h. Again, this is a very natural move, escaping
with the rook and attacking the bishop on 5e. But again, it is not the best move.
The moment the rook moves away from the third file, Px3c+ will no longer threaten mate.
Furthermore, after Px3c+, it will now be difficult to mate White even with several
pieces in hand.
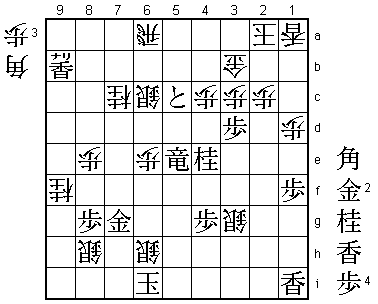
 |
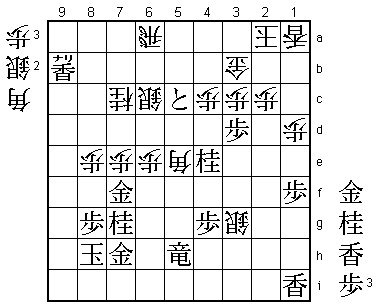
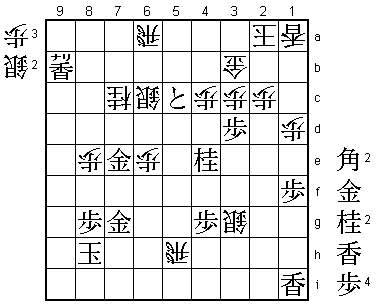
| Diagram 3 |
I answered +R-5h with ...P-7e (Diagram 3), giving up the bishop and putting pressure on the vital
point near Black's king. Although this position is also lost for me, it has become a little
difficult. But considering I was totally lost just a couple of moves earlier, you might
even say that the chances are now almost even.
Unfavorable Endgames
 |
| Diagram C |
In Diagram 3, what would happen if both sides directly pursue their attacks with +Rx5e Px7f;
Px3c+ (Diagram C)? There would follow ...Px7g+; Gx7g N*9f K-7h G*8h; K-6i S*7h; K-5h S*6g;
Gx6g Sx6g+; Kx6g B*8i; K-5h G*4h; K-5g P*5f; +Rx5f Bx5f+; Kx5f P*5e (Diagram D); K-6g P-6f;
K-7f P*7e; Kx7e R*7d; Kx6f (Diagram E) S-5d; P*6c Rx6c; +Px6c S-6e; Kx5e R-5d mate. In this
line, White uses all his pieces on the board to deliver mate, including the apparently idle
rook on 6a. In Diagram E, he no longer has any pieces in hand.
 |
| Diagram D |
 |
| Diagram E |
I did not calculate this mating line during the game, but I anticipated that the position would
be quite dangerous for Black after the knight drop on 9f. When you have an unfavorable ending, and
are short of time too, you can't expect all the difficult variations to be winning for you. And
if your opponent accurately calculates these variations and you lose the game, the fact that
the position was bad anyway helps you to accept it. The player who is aware of having a winning
advantage has to calculate each of these lines, and occasionally the resulting difference in
mental state and tiredness tell in the end.
In Diagram 3, if Ariyoshi 9-dan had chosen the line Nx3c+ Px7f; +Nx3b K-1b; +Rx5e, I would have
lost. By moving the knight from 4e, Black prepares an escape route for his king by K-4e when
White plays ...P*5e as in Diagram D, so he no longer has forced mate. If Black answers ...P-7e
with Gx7e, play would continue ...Bx7g+; Gx7g N*9f; K-9g B*8h; +Rx8h Nx8h+; Kx8h R*5h (Diagram F).
Now, after G*7h S*6f; Gx6f P*7g, since Black has no mate, White can win by successive
mate threats, which would be very hard to meet.
 |
| Diagram F |
Turning the Tables
 |
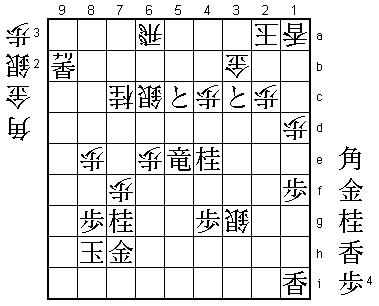
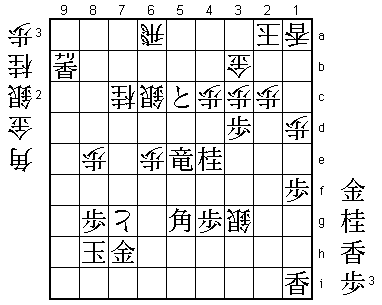
| Diagram 4 |
From Diagram 3, the game continued +Rx5e Px7f; B*5g Px7g+ (Diagram 4). B*5g threatened mate
by Nx3c=, but with ...Px7g+ I completely turned the tables. Now Kx7g is answered by the bishop
drop ...B*9i (Diagram G). Take a look at White's king in Diagram G. Black is threatening mate
by Nx3c= K-2b; G*2a K-1b; L*1c, so he cannot afford to use his lance in hand by answering ...B*9i
with L*8h. And if he plays N*8h instead, upon Nx3c= K-2b; G*2a, White can now take the gold
with ...Rx2a because Black needs a knight to drop on 3c after Nx2a+ Kx2a. Black is lost because
he has no piece he can interpose on 8h.
 |
| Diagram G |
What if Black meets ...Px7g+ with Gx7g? There now follows ...N*9f; K-9g B*8h; Kx9f P*9e; Kx9e Bx7g+
followed by removing the promoted rook with ...+Bx5e, when Black no longer has mate and White wins.
K-7h instead of K-9g is met by ...B*8i; K-6i Bx4e+; +Rx4e N*6f. ...Bx4e+ is the only move to
eliminate the mate threat, and after ...N*6f, White has a gold and two silvers in hand, so
there is no defense to his own mate threat. Black can also try K-7i in reply to ...N*9f, but
after ...B*8h; K-6i G*7i; Bx7i Bx7i+; Kx7i S*8h; K-6i S*6h (Diagram H); Kx6h Sx7g+; Kx7g B*8h;
K-6h Bx5e+, White again removes the promoted rook and wins.
 |
| Diagram H |
An Exquisite Sequence
 |
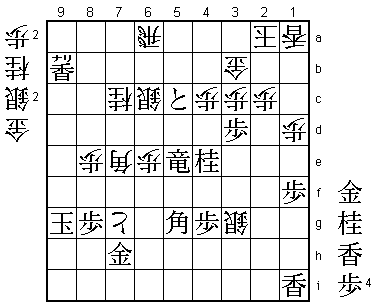
| Diagram 5 |
Having calculated that both Kx7g and Gx7g would lose, Ariyoshi 9-dan played K-9h. But now
White has the devastating sequence ...P*9g; Kx9g B*7e (Diagram 5). After K-9h, Black is
threatening mate by Nx3c=. White can defend against this threat if he can displace the
bishop from 5g. But it is not enough simply to displace it; he must also be able to threaten
mate on the next move. With ...B*7e, White sacrifices a bishop to deflect Black's bishop
on 5g and gain a move, but this itself is not so difficult. The difficult part is how to
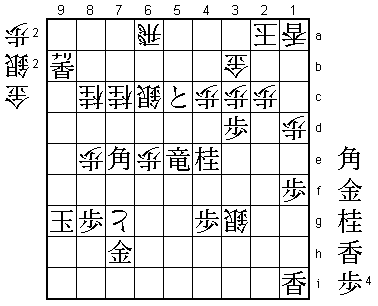
threaten mate after Bx7e. The solution to this difficult problem is the exquisite
three-move sequence ...B*7e; Bx7e N*8c (Diagram 6), deflecting the bishop and threatening mate.
 |
| Diagram 6 |
...N*8c threatens mate by ...P*9f; K-9h (if Kx9f P*9e; K-9g S*9f; K-9h Sx8g+; Gx8g +Px8g;
Kx8g Nx7e and mates as in the game) S*9g; Bx9g Px9g+; Kx9g P*9f; Kx9f G*8f (Diagram I);
Px8f S*9e; K-9g Sx8f; K-9h B*8g, etc. If Black answers ...N*8c by removing the tokin with
Gx7g, ...P*9f; K-8h (or Kx9f S*8h) Nx7e threatens mate (...B*9g; K-7h S*6g and, after
the exchanges on 6g, ...G*6f) and wins. Finally, the check Nx3c= is met by ...K-2b; G*2a K-1b;
L*1c Kx1c; B-5g P-2d, and if Black now takes the tokin with Gx7g, ...S*9i and Black
cannot defend against the mate threats above and below his king. The variations are very close,
but White comes out on top in all of them. The three-move sequence of the sacrificial bishop
drop ...B*7e followed by ...N*8c, escaping from and then threatening mate, proved to be
tremendously effective.
 |
| Diagram I |
Searching for Chances
Looking back on this game, various factors were in my favor, such the number of pawns in
hand, the position of the apparently idle rook on 6a, and the fact that the natural moves
turned out to be bad. But it was my determination not to give up in a seemingly hopeless
position and continue searching for chances that led to the dramatic turning of the tables
at the end. The game didn't go as I would have liked. Ideally, I like to win cleanly after
establishing an advantage in the opening and middlegame. The attitude of never giving up
even in a bad position is very important. Giving up is the final and worst solution.
