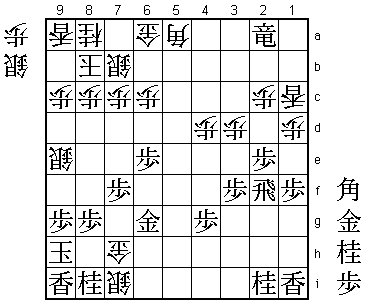
The endgame, particularly in games between professionals, is often a severe struggle where the margin of victory is just one move and a moment's relaxation can be fatal. In this violent and tense battle of speed, a "special express ticket" occasionally appears. This is the ultimate attacking-defensive move: a mate threat escaping a mate threat.
 |
| Diagram A |
The position in Diagram A is a very simple case. Here Black has a move that both defends against the threat of ...S-8h+ mate and threatens mate by N*7d. The "special express ticket" here is B*5e. In this chapter, we will examine my game against Aono 8-dan, an example in a professional game of the mate threat escaping a mate threat.
 |
| Diagram 1 |
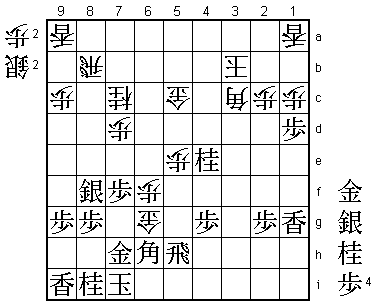
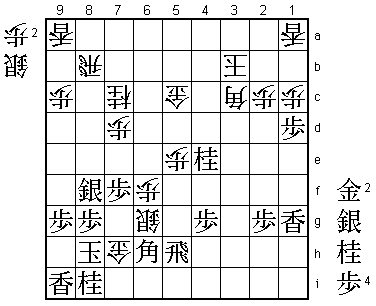
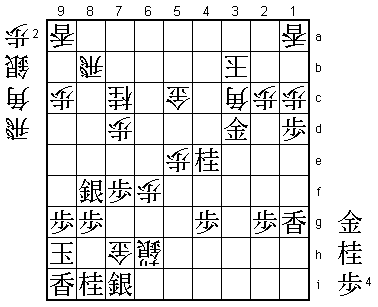
The position in Diagram 1 shows the crucial stage of a fierce endgame struggle. From here, the battle of speed continued with ...Gx7h; Kx7h S*6g; K-8h G*7h (Intermediate Diagram 1); K-9h Sx5h+; S*7i +Sx6h; G*3d (Diagram 2). If I had been thinking only of attacking it would have been better not to play the gold drop ...G*7h so soon, but I was already expecting my king to be chased up the board with checks and I thought this gold would be an effective defensive piece when my king reached 7f.
 |
| Intermediate Diagram 1 |
S*7i is a sacrifice that often occurs in close endgame battles. You should commit this tesuji to memory. Aono's idea is to force the gold to move offside by ...Gx7i to gain a vital move and ensure that his king cannot be immediately mated, enabling him to switch to the attack. This is a tactic that could only appear in the endgame, where speed is paramount.
 |
| Diagram 2 |
I did not take the silver, but played ...Sx6h+, leading to Diagram 2. This position is apparently losing for me by one move, but Aono 8-dan only had seven minutes left, while I still had eighty-one minutes' thinking time. In an earlier chapter, I said that you should try to play as simply as possible when you have an endgame advantage. Here we have the opposite situation. Complicating the position as much as possible is the right technique for turning the tables.
 |
| Diagram B |
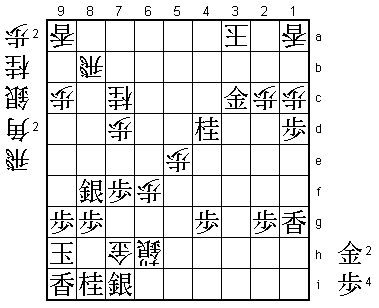
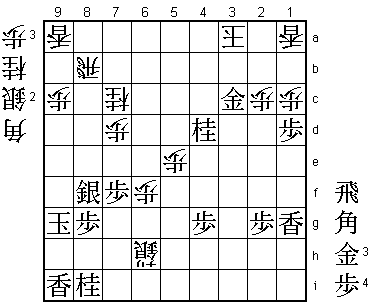
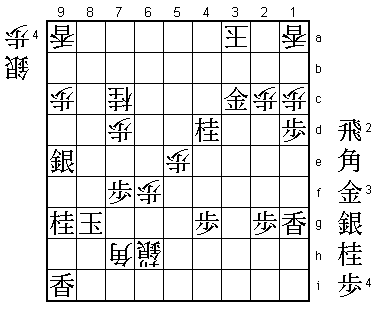
My first instinct in the position in Diagram 2 was to switch to defense with ...G-4c. After Nx3c+ Gx3c; N*4d K-4b; B*3a Kx3a (if ...K-5a, B-5c+ wins) Gx3c, we reach Diagram B. Here White has no defense against mate, but I felt intuitively that I had forced mate in this position. When I came to calculate it, I discovered that my intuition was wrong. White can press very hard with ...R*8h; Sx8h Gx8h; Kx8h B*7i; K-9h Bx9g+; Kx9g (Diagram C), but after ...N-8e; K-9f S*9e; Sx9e N-9g+; Nx9g Rx8g+; Kx8g B*7h (Diagram D), Black just manages to escape mate thanks to the knight on 9g. You should never play by intuition in the endgame and always be determined to calculate to the end. Once the pace accelerates, there will be no going back.
 |
| Diagram C |
 |
| Diagram D |
So I went back to the position in Diagram 2 and repeated my analysis. Having realized that I could not win with ...G-4c, I next considered whether Black's G*3d actually threatened mate. If my king was not threatened with mate, I could win with the most natural move, ...+Sx7i. But...
 |
| Diagram E |
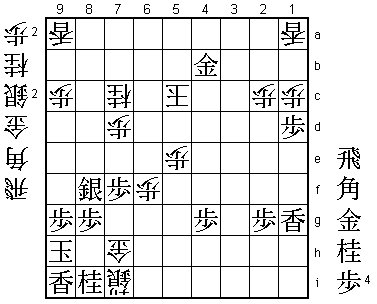
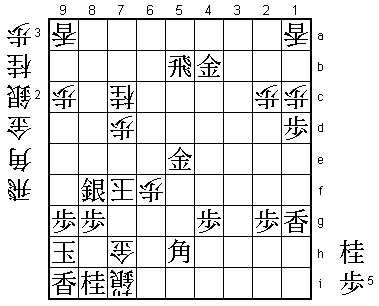
After ...+Sx7i, Black chases White's king with Gx3c K-4a; G*4b Rx4b; Nx5c= K-5b; Gx4b Kx5c (Diagram E), then continues the pursuit with ...R*5b K-6d; G*5d K-6e; Gx5e Kx7f; B*5h (Diagram F). Now, whichever piece White interposes on 6g, it is forced mate after P*7g Gx7g; Sx7g K-7e; S-8f K-8d; R-8b+, etc. So I reached the conclusion that G*3d threatens mate and ...+Sx7i would lose. I returned to the position in Diagram 2 once more and repeated my calculations.
 |
| Diagram F |
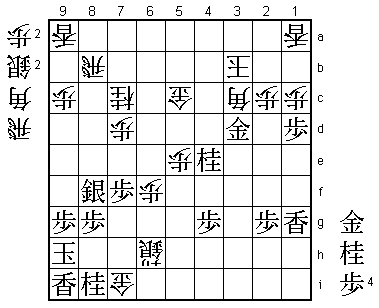
In view of these considerations, I played ...Gx7i (Intermediate Diagram 2). I had concluded that this was the only way of escaping the mate threat to my king and threatening mate. Threatening mate without moving the promoted silver on 6h has two merits: it ensures that B*5h cannot be played and it opens up an escape route from 6g to 7h in the event that Black chooses a different way of chasing my king (as in the game).
 |
| Intermediate Diagram 2 |
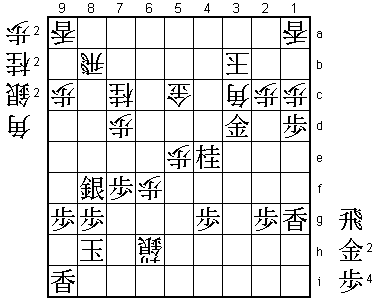
In Diagram A at the beginning of this chapter, B*5e eliminates the mate threat to Black's king while threatening mate by N*7d. The move ...Gx7i in Diagram 2 is much more complicated but the principle is the same. In defense it eliminates B*5h, while in attack it threatens forced mate by ...R*7h; N*8h Rx8h+; Kx8h Gx8i; K-9h G-8h; Kx8h (Diagram G) S*7i; K-9h S*8i; Kx8i P*8h; K-9h B*8i. It's an endgame special express ticket.
 |
| Diagram G |
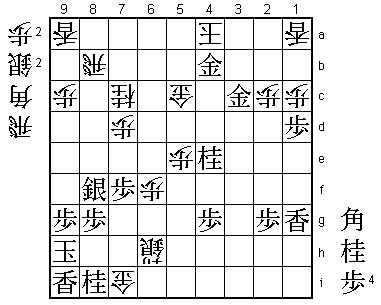
In Diagram 2, after 20 minutes' thought, I played ...Gx7i, a move that may look unnatural but which conceals a deadly aim.
 |
| Diagram 3 |
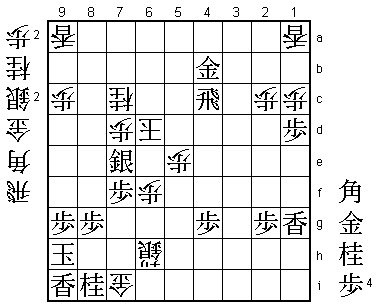
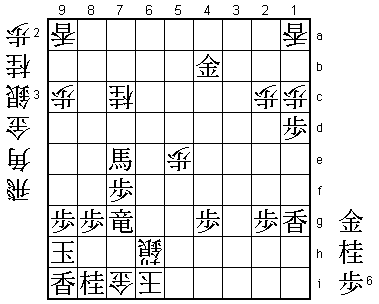
In response to my ...Gx7i, Aono 8-dan played for mate. He instinctively felt it was mate, and in such cases a professional's intuition is usually right. But this game seems to have been a rare exception: both players' intuition turned out to be wrong. From Diagram 2, play continued ...Gx7i; Gx3c K-4a; G*4b (Diagram 3) Rx4b; Nx5c= K-5b; Gx4b Kx5c; R*4c K-6d; S-7e (Diagram 4) Px7e; B*5c, but as I expected when I played ...Gx7i, my king now succeeded in escaping from 6g to 7h and into the safety zone I had prepared in advance: ...K-6e; Bx7e+ K-5f;R-4f+ K-6g; +Rx6f K-7h; +R-7g K-6i (Resignation Diagram) and Aono resigned. In this sequence, the mate threat escaping a mate threat ...Gx7i displays its maximum effectiveness.
 |
| Diagram 4 |
 |
| Resignation Diagram |
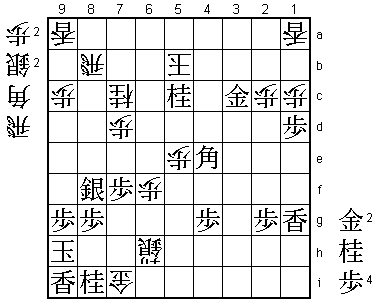
But it really wasn't so easy. In the line from Diagram 2 to the Resignation Diagram, Black himself missed two opportunities for a mate threat escaping the mate threat. The first chance was in Diagram 3, where he has just played G*4b. Instead of this, there was the sequence Nx5c= K-5b; B*4e (Diagram H). This simultaneously defends against White's mate threat of ...R*7h followed by ...Gx8i and threatens a simple forced mate. In view of this, White's only defense is to block the bishop with ...S*5d, but after G*6d, he does not have time to take the bishop in view of ...Sx4e; G*6c K-5a; N*4c mate, so Black's attack prevails. If Aono 8-dan had realized that the line he played was not mate, I think he might have chosen this sequence, but under time pressure in a position fraught with danger, he missed it.
 |
| Diagram H |
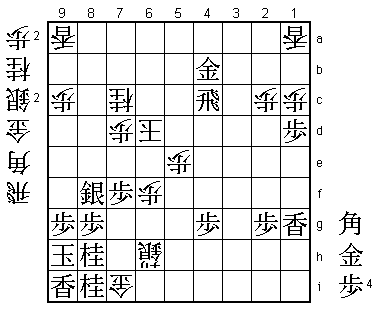
The second chance was in Diagram 4, where Black has just played S-7e. Instead of this, there was the brilliant move N*8h (Diagram I). This also defends against the mate threat and threatens mate by G*7e Px7e; Sx7e K-6e (or ...K-5d; B*4e followed by R-6c+) B*7d, etc. N*8h kills two birds with one stone, making it impossible to check Black's king and blocking the White king's escape route via 7f. White can hang on with ...G*5c, with a very difficult endgame in prospect. Moves like this are so brilliant that they send a shiver down your spine.
 |
| Diagram I |
Even endgames where the situation seems desperate contain various table-turning elements. To exploit these opportunities to the full, you need to obtain as much information as possible by calculating more deeply. The determination to calculate thoroughly is an essential attitude in the endgame. Sometimes this analysis leads to the unpleasant conclusion that you have a lost position, but the process of repeating this exercise always leads to new discoveries.
The opening and middlegame have coordinates. At the "X-coordinate" is speed; at the "Y-coordinate" are factors such as material and king position. The players select moves that keep a balance among these elements. But once the endgame has started there is only one coordinate: speed. The mate threat escaping a mate threat increases this speed to the maximum level.