Lightning Speed Endgame Technique
Koji Tanigawa, Meijin
Part Three: Winning Endgame Technique
Chapter 7: Endgame Vision
Black: Kunio Yonenaga 9-dan
White: Koji Tanigawa, Meijin
7th Game, 53rd Kisei Title Match, Shogi Kaikan, October 18, 1988 (4 hours each)
P-7f P-3d; P-2f P-8d; P-2e P-8e; G-7h G-3b; P-2d Px2d; Rx2d P*2c; Rx3d Bx8h+; Sx8h B*2e;
Rx3b+ Sx3b; S-3h S-3c; P-1f P-4d; B*6e R*3a; P-3f P-6d; B-5f R-2b; B-8c+ Bx3f; +B-5f G-5b;
+B-5e G-4c; G*3e B-7b; P*3d Sx3d; Gx4d P*3c; Gx3d Gx3d; S*4c P-5d; +B-7g G-4e; N-3g G-5e;
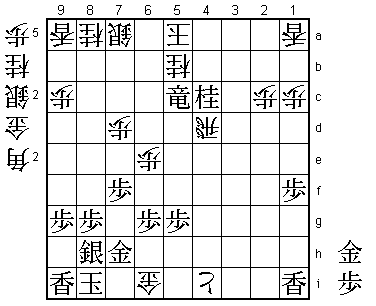
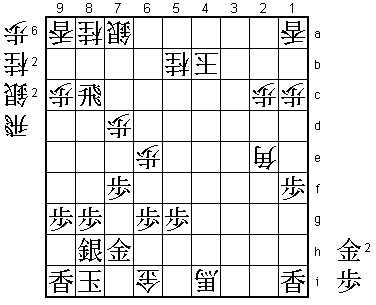
P*3b R-4a; +Bx5e Rx4c; +B-7g Rx3b; P*2b Rx2b; G*4d R-4a; N-4e (Diagram 1) P-5e; +Bx5e G*6e;
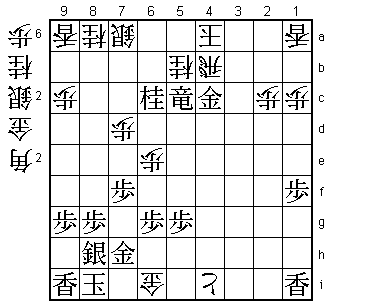
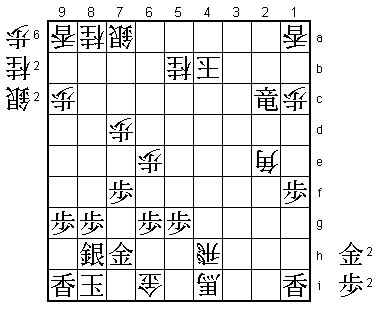
+B-7g (Diagram 2) S*5e; Nx3c+ Nx3c; Gx3c R-5b; N*3e B-5d; K-6i P*3g; Sx3g Rx4g+; S-4h +R-4d;
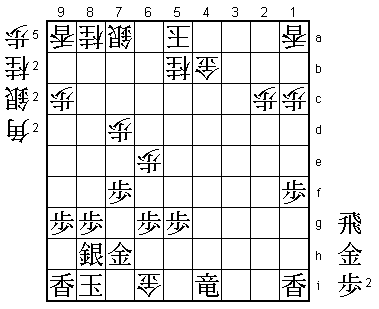
N-4c+ Bx4c; Gx4c +Rx4c; P*4d +Rx4d; P*4e +Rx4e; B*6c R-4b; Bx4e+ Rx4e; K-7i (Diagram 3) P*4f;
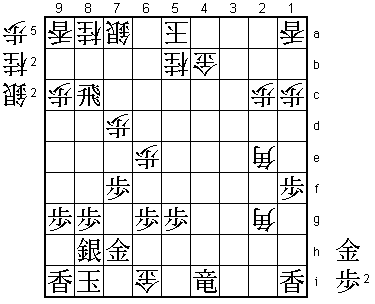
+B-9e (Diagram 4) P-4g+; N-7g +Px4h; Nx6e Px6e; +Bx8e N*7d; P*4c (Diagram 5) Rx4c; R*5d P*5b;
Rx5e (Diagram 6) +Px4i; P*4d Rx4d; S*5c Px5c; Rx5c+ N*5b; +Bx7d (Diagram 7) G*6i;
K-8i (Diagram 8) Px7d; N*4c (Diagram 9) Rx4c; +Rx4c G*4b; +Rx4i (Diagram 10) B*2e;
R*8c B*2g (Diagram 11); +Rx4b Kx4b; Rx2c+ B-5d+; +Rx2e S*6h; B*8f (Diagram 12) N*7e;
P*4c +Bx4c; +R-2b P*3b; Px7e N*7f; Px7d P*7e; K-9h Nx8h+; Gx8h S-7i=; G*8i Sx8h+;
Gx8h S*7i; G*8i Sx8h+; Gx8h S*7i; +R-2h +B-4d; P-6f G*6h; Bx6h Gx6h; G*8i P*8f;
P*4c Kx4c Resigns
(Times: Yonenaga 3 hrs 59 mins; Tanigawa 3hrs 58 mins)
 |
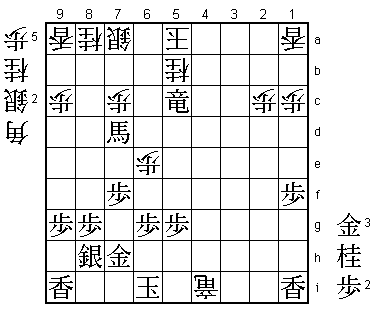
| Diagram 1 |
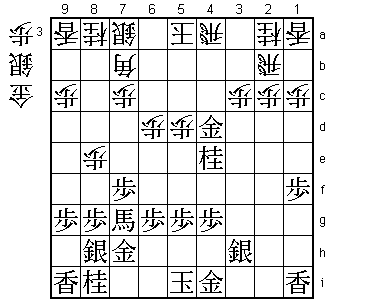
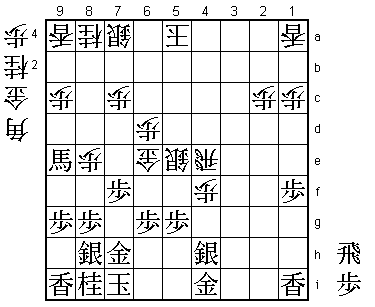
The position in Diagram 1 is from my game with Yonenaga 9-dan in the 53rd Kisei tournament.
Starting with Yonenaga's Side Pawn, a violent struggle characteristic of this opening arose
after an early exchange of rook for gold and mutual dropping of major pieces. In the opening
I was forced to drop a rook in my own camp with ...R*3a and seemed to have the worse of it,
but Yonenaga played the attack somewhat inaccurately and in Diagram 1 I stand slightly better.
Even so, my king position is very unsafe. If he can capture one of my three major pieces,
Black's attack will not run out of steam, so I must defend very carefully.
My first thought was to play ...S*5e. After Nx3c+ Nx3c; Gx3c R-5b, Black's gold is out of play,
giving White an easy position. However, if Black answers ...S*5e with Gx5d, White must
play ...Bx5d (Diagram A). If now +Bx5e Bx4e and Black's attack fizzles out, but instead of
+Bx5e, N-5c+ is a very good move here. If the bishop on 5d runs away, Black will take the silver
with +Bx5e on his next move, so White has to defend with G*4d, but after +Nx5d Gx5d;
B*6c, Black's attack shows no sign of abating.
 |
| Diagram A |
I therefore decided against ...S*5e and from Diagram 1 the game went ...P-5e; +Bx5e G*6e;
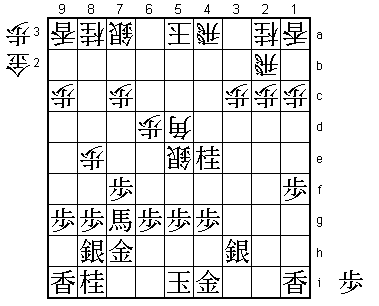
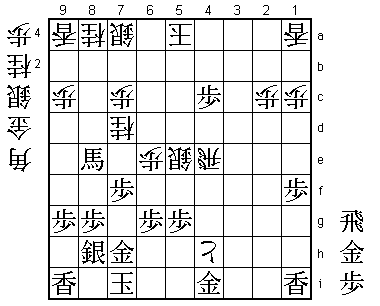
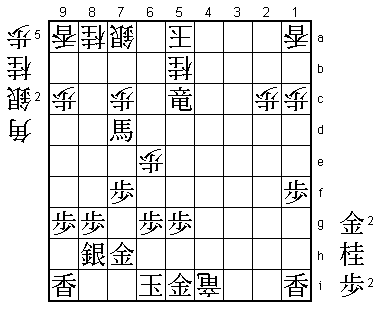
+B-7g (Diagram 2). In this position, I initially thought that ...P*5e would snuff out Black's
attack, but it's not so easy. Again N-5c+ is a very good response, and after ...Rx4d, P-6f
Black will capture the gold on 6e and keep the initiative. Once Black has a gold in hand,
White's king will be in great danger.
 |
| Diagram 2 |
Yonenaga had prepared two pitfalls for me in ...S*5e (in Diagram 1) and ...P*5e, but I managed to avoid
both of them. In Diagram 2, I played the best move, ...S*5e, when Black has no choice but to play Nx3c+.
The game continued ...Nx3c; Gx3c R-5b, and the immediate danger at the head of my king had passed.
In Diagrams 1 and 2, things will get very unpleasant for me if the knight is promoted on 5c, but I don't mind so much
if it promotes on 3c. I succeeded in that respect, but because I had to use two precious pieces in hand – gold and silver –
for that purpose, the position was still quite difficult.
 |
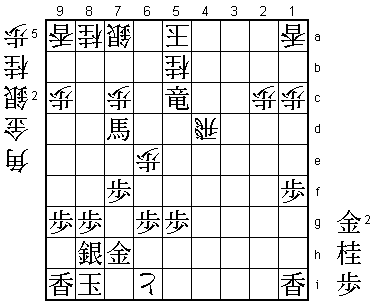
| Diagram 3 |
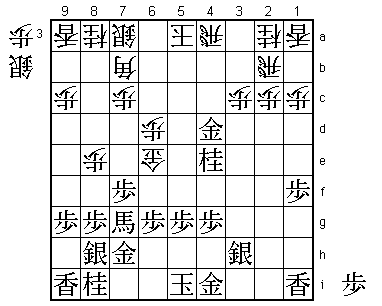
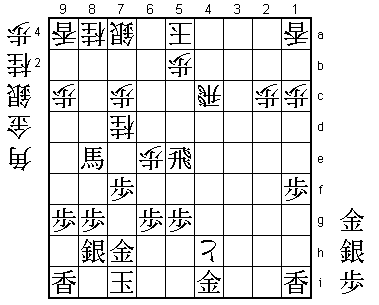
Diagram 3 is the position 26 moves from Diagram 2. Yonenaga has just moved his king from 6i to 7i. One of the two
rooks in my camp has been captured, but I am a knight up and have no cause to complain. If White's king
had remained on 6i, he would have been mated after ...B*1d, so he took evasive action. I answered this with ...P*4f.
The aim is ...P-4g+ followed by +Px4h, but since White is not threatening mate after taking the silver, it is
a very risky move. I played it only after calculating that Black does not have any fast means of attack either.
Perhaps I should instead have aimed at a quick finish with either ...N*5f or ...P*5f, aiming to answer Px5f
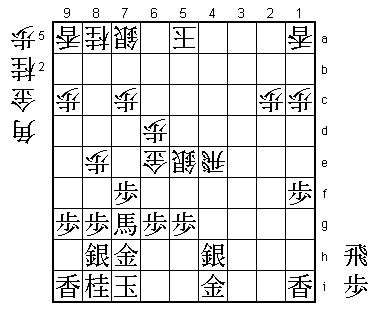
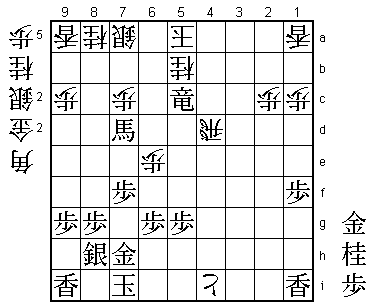
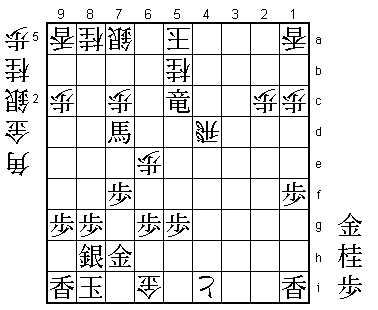
with ...N*5g, but I say that partly because I overlooked Yonenaga's superb reply to ...P*4f. This was +B-9e (Diagram 4).
With this move, Black aims to activate the promoted bishop by +Bx8e. By vacating the 7g square, he can now play N-7g,
threatening to take the gold on 6e, while also giving his king more room. +B-9e was thus a great multipurpose move.
 |
| Diagram 4 |
 |
| Diagram 5 |
From Diagram 4, the game continued ...P-4g+; N-7g +Px4h; Nx6e Px6e; +Bx8e N*7d; P*4c (Diagram 5). The effects of
+B-9e are very clear. P*4c threatens mate by R*5c, so I had to take this pawn with ...Rx4c. The game continued
R*5d P*5b; Rx5e (Diagram 6). In this position, White's best move is ...+P-5h, when I would have good chances
after Gx5h R-4i+; G*5i +R-4d, but instead I mistakenly played ...+Px4i. I chose this move rather than ...+P-5h
partly due to material considerations and the desire to avoid a lengthy struggle after G*5i, but mainly
because I thought ...+Px4i gave me a winning position.
 |
| Diagram 6 |
From Diagram 6, the game continued ...+Px4i; P*4d Rx4d; S*5c Px5c; Rx5c+ N*5b; +Bx7d (Diagram 7). During this
sequence, I thought for eight minutes on +Px4i, ten minutes on Rx4d, and one minute on Px5c. At each stage,
I was considering whether I had a forced mate when Black played +Bx7d.
 |
| Diagram 7 |
Misled by Intuition
 |
| Diagram B |
Let us look at the main variations I calculated. In Diagram 7, I sacrifice a gold with ...G*6i
and if Kx6i I play +P-5i. After Kx5i, I sacrifice another gold with ...G*6i; Kx6i R-4i+ (Diagram B),
and now:
(1) K-6h B*5i; K-7i B-8f+ followed by +Bx5c and wins.
(2) N*5i S*5h; K-6h Px7d and, without a knight in hand, Black cannot give check.
(3) G*5i (Diagram C) S*5h; K-6h B*9e; N*8f Sx5i=; K-7g S*6h; Gx6h Sx6h=; Kx6h G*5h; K-7g G*7h;
Kx7h +R-6i; K-7g +R-6h mate.
 |
| Diagram C |
In view of these variations, Black has no choice but to answer ...+P-5i with K-7i, when the tokin
continues to chase the king with ...+P-6i; K-8i (Diagram D) N*7g, and now:
(1) Sx7g G*7i; Gx7i +Px7i; Kx7i R-4i+; G*6i S*7h; Kx7h S*8i and mates.
(2) Gx7g G*7i; Sx7i +Px7i; K-8h (or Kx7i S*6h; Kx6h R-4h+ with a simple mate) R-4h+;
N*7h +Px8i; Kx8i P*8h; K-9h S*8i; Kx8h S*7i; Kx7i S*6h; Kx8i +R-5i and mates.
 |
| Diagram D |
In Diagram 7, therefore, all the variations after ...G*6i; Kx6i +P-5i are winning for White.
As I mentioned above, I had calculated all this while thinking about my previous few moves.
But Yonenaga 9-dan answered ...G*6i with K-8i (Diagram 8), upsetting all my calculations.
 |
| Diagram 8 |
Please compare Diagram 8 with Diagram D, where White has also just answered ...+P-6i with K-8i.
The biggest difference is that in Diagram 8 the tokin on 4i makes it impossible for White to
play ...R-4i+, which is a vital move in the mating sequence. Because the tokin is in the way
of the rook, Black has no forced mate. In Diagram 7, my intuition told me that it was mate.
I often trust lines that occur to me intuitively, but in this case it backfired. The best way
of developing correct intuition is the basic training of regularly solving Tsume Shogi problems
and I strongly recommend this to you.
 |
| Diagram 9 |
In Diagram 8, after only brief consideration, I took the promoted bishop with ...Px7d. I played
this with the feeling that my position was completely lost, but now it was Yonenaga's turn to
make a mistake. He played N*4c (Diagram 9), but N*6c would have been winning for Black. After
N*6c K-4a; P*4b K-3b; G*3c K-2a; +Rx4d is brinkmate, so White must answer P*4b with Rx4b, but
then G*4c (Diagram E) is very hard to defend against. If now ...G*3b, Black mates by +Rx4b Gx4b;
R*5a, or if ...S*3a, +Rx5b Rx5b; N*3c and mates. The only defensive try seems to be ...B*2d, but
this is also hopeless after Gx4b Bx4b; +R-4c. White can now remove the promoted rook on 4c
by ...N*7g; Sx7g G*7i; Gx7i Gx7i; Kx7i S*7h (if ...G*6i; K-8i); Kx7h S*6i; Kx6i B*2e, but he
is lost after K-7h Bx4c; G*2b. He has given away too many pieces.
 |
| Diagram E |
But in the game Yonenaga played N*4c, dropping the knight on the other side. Now the advantage swings back to me.
A Pessimistic View
From Diagram 9, the game continued Rx4c; +Rx4c G*4b; +Rx4i (Diagram 10). Here I made another mistake with ...B*2e.
I should have aimed for a long-term advantage by ...B*2g; +Rx6i B-6c+, but my annoyance at the thought of having
the gold I had dropped on 6i taken for nothing led me to drop a bishop on 2e.
 |
| Diagram 10 |
Yonenaga answered ...B*2e with R*8c and now I played ...B*2g (Diagram 11). If he had first played P*4c
Gx4c and then R*8c, it would still have been a close struggle. After the game, Yonenaga told me that he assessed
the material situation after ...B*2e and, seeing that he was a silver and two knights down, took
the pessimistic view that he had a lost game. This pessimism caused him to miss the chance to complicate
the position with P*4c. As we have seen, "speed is more important than material" is the overriding principle
of the endgame, but even professionals who are keenly aware of this principle make mistakes in judgment.
This shows the difficulties of the actual struggle and the psychology of the players during it.
 |
| Diagram 11 |
 |
| Diagram F |
Yonenaga met my ...B*2g by sacrificing his promoted rook with +Rx4b, but here too P*4c was the correct move.
After ...Bx4i+; Px4b+ Kx4b we reach Diagram F. If now Rx2c+, White can escape the mate threat by threatening
mate himself with ...R*4h (Diagram G). As well as threatening mate by ...Rx7h+; Kx7h N*6f, etc, this prepares
the defense ...P*4a after G*5c K-5a; +R-2a. However, instead of Rx2c+ in Diagram F, Black has G*3c K-5a; Rx8a+,
which would have been much more difficult for me than the line Black chose. Yonenaga seemed to have decided the game
was lost, and the game took a rather subdued course after +Rx4b Kx4b; Rx2c+ B-5d+; +Rx2e S*6h; B*8f (Diagram 12).
...S*6h threatens mate by ...N*7g, etc., but even here, if Black had quickly escaped to his trademark "Yonenaga king"
position with K-9h instead of B*8f, it would still have been difficult. B*8f was a move he had been planning, but
he played the trump card too early and ...N*7e sealed his fate. From Diagram 12, the game continued N*7e; P*4c
+Bx4c; +R-2b P*3b; Px7e N*7f; Px7d P*7e; K-9h Nx8h+; Gx8h S-7i=; G*8i Sx8h+; Gx8h S*7i; G*8i Sx8h+; Gx8h S*7i;
+R-2h +B-4d; P-6f G*6h; Bx6h Gx6h; G*8i P*8f; P*4c Kx4c and Yonenaga resigned.
 |
| Diagram G |
In the game, the moves end up giving a somewhat random impression. I realize that it must be very hard for
amateur Shogi players to understand every aspect of an endgame which even professionals found difficult
to comprehend. But still I hope it gives you an appreciation the narrowness of the margin between victory
and defeat in an endgame between professionals and the amount we have to calculate.
It is very important to sharpen your intuition. The more correct your intuition, the more amazing
variations you will be able to calculate. If your intuition is not sharp, they will not occur
to you at all. You therefore need to develop your intuition and the ability to calculate the
variations that spring from it. For this, basic training such as Tsume Shogi is essential.
I urge you to put this into practice and broaden your endgame vision.
