Lightning Speed Endgame Technique
Koji Tanigawa, Meijin
Part Three: Winning Endgame Technique
Chapter 6: Identifying the Key Point
Black: Koji Tanigawa, Meijin
White: Hidemitsu Moriyasu, 9-dan
7th All-Japan Professional Tournament, Kansai Shogi Kaikan, September 12, 1988 (3 hours each)
P-7f P-3d; P-2f P-4d; S-4h S-3b; P-5f R-4b; K-6h K-6b; K-7h K-7b; G4i-5h K-8b; P-9f P-9d;
S-6h L-9b; S-7g S-4c; S-5g G4a-5b; P-2e B-3c; P-7e P-6d; S-7f K-9a; P-6f G-6c; G-6g S-8b;
P-6e Px6e; Sx6e R-6b; S-6f P-4e; S-7f P*6d; B-7g G-7a; K-8h P-5d; G-7h S-4d; P-8f R-4b;
P-3f P-1d; P-1f L-1c; P-8e R-3b; S-5g P-7d; Px7d Gx7d; P*7e G-7c; P-2d Px2d; P-3e P-5e;
Px5e G-6c; P-8d Px8d; P*8e Px8e; P*8d B-5a; Sx8e P*8c; Px8c+ Sx8c; P-5d P*5e; P*8d Sx8d;
Sx8d Bx8d; Rx2d P*2b; R-2f Sx3e; R-2h P*8f; P-5c+ S*8g; Gx8g Px8g+; Kx8g Gx5c; P*8c P*8f;
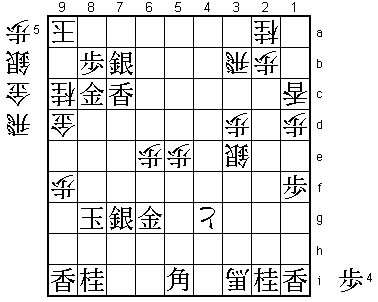
Bx8f P*8e; B-5i G-6c; S*7f P-4f; S-6f Px4g+; Sx8e G-7c (Diagram 1); P-9e P-6e; S-7g Bx7e;
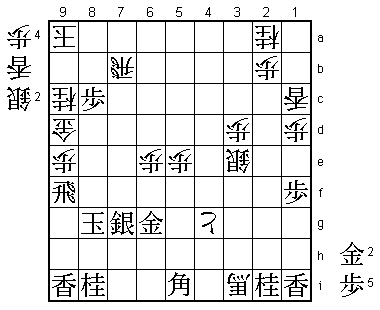
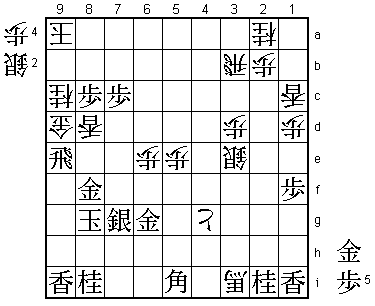
Px9d B-3i+; R-9h P*9g; Rx9g (Diagram 2) G*8d; Sx8d Gx8d; P-9c+ Lx9c; P*9d (Diagram 3) P*9f;
Rx9f P*9e; Px9c+ Nx9c (Diagram 4); L*7c G-8a; P*9d (Diagram 5) Px9f; Px9c+ R*7i; S*8b Gx8b;
Px8b+ Rx8b; +Px8b Kx8b; R*6b Resigns
(Times: Tanigawa 2 hrs 59 mins; Moriyasu 2hrs 59 mins)
 |
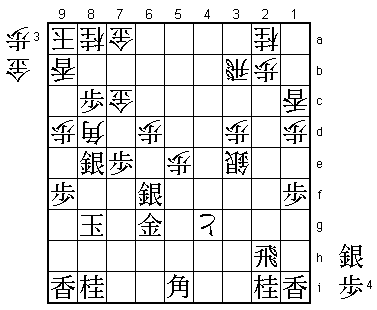
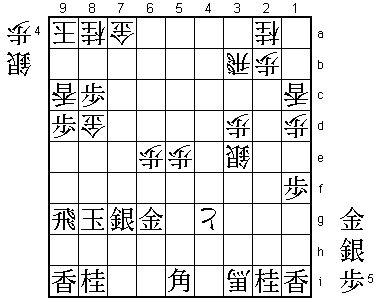
| Diagram 1 |
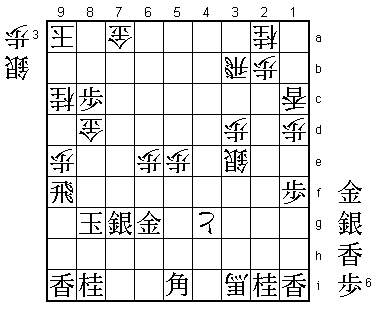
The position in Diagram 1 is from my game against Moriyasu 9-dan in the 7th All-Japan Professional
Tournament. Moriyasu has just moved his gold from 6c to 7c. In this game I countered White's 4th
file rook anaguma opening with vanguard pawns at the head of my king and got the better game, but
my opponent's stubborn resistance gave me a lot of trouble. Although the position should have
been good for me, I couldn't find a knock-out blow and my impatience resulted in the bad move
P-9e. Three moves before Diagram 1, I had spent 26 minutes on S-6f, and I thought for 11 minutes
over P-9e. But I became frustrated looking for a decisive move and the time I took was not reflected
in the accuracy of my calculation. Instead of P-9e, I could have kept my advantage with the solid
S*7d (Diagram A). While defending my pawn on 8c, this would have restricted White's ability to
confuse the situation. In the position in Diagram A, he would have been hard pressed to find a
good continuation.
 |
| Diagram A |
 |
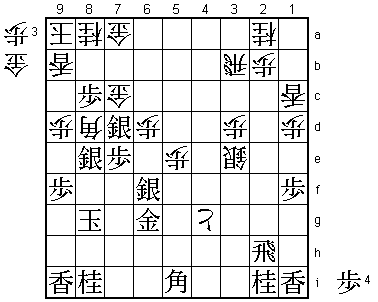
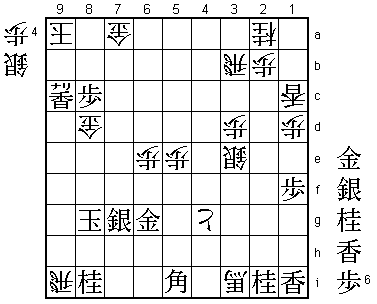
| Diagram 2 |
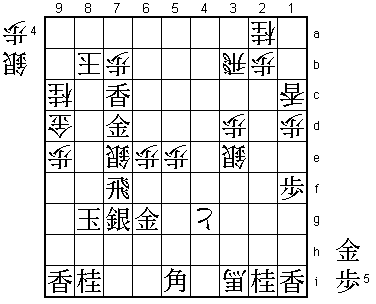
After P-9e, the game continued ...P-6e; S-7g Bx7e; Px9d B-3i+; R-9h P*9g; Rx9g (Diagram 2). In this
position, Moriyasu thought for 10 of his remaining 19 minutes and played ...G*8d. This was the crucial
moment in the endgame. In Diagram 2, ...+P-5g was another possible move. Play might proceed
P*7d Gx8c; P*8d +Px6g; Px8c+ +Px7g; Bx7g (Diagram B), and it will be difficult for White to continue
to threaten mate. The aim of Moriyasu's ...G*8d in Diagram 2 is to dislodge Black's silver on 8e, which
is very effectively placed both for attack and defense. You should make a point of remembering this
technique of targeting the most effective piece on the board.
 |
| Diagram B |
 |
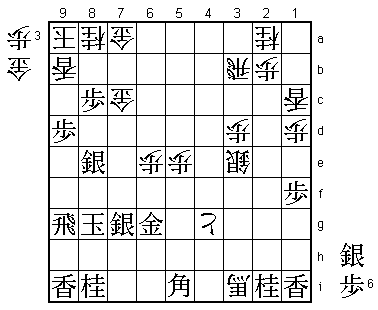
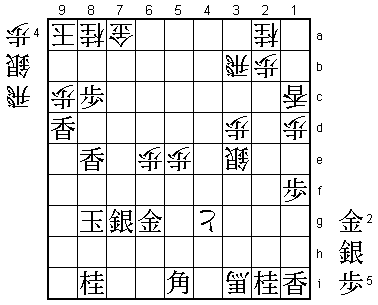
| Diagram 3 |
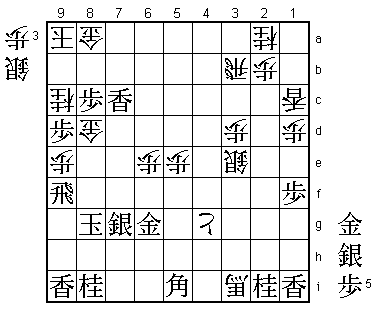
After ...G*8d, the game continued Sx8d Gx8d; P-9c+ Lx9c; P*9d (Diagram 3). I thought the position in
Diagram 2 was a little difficult for me, but my P*9d was a good confusing move that was easy to overlook.
If I had answered ...Lx9c with Rx9c+ Nx9c; Lx9c+, White would have played the fine attacking and defensive
rook drop ...R*9i (Diagram C), when Black has no way of mating and is clearly lost. White's rooks on
9i and 3b, operating both vertically and horizontally, are very effective in defense.
 |
| Diagram C |
 |
| Diagram D |
If White meets P*9d with ...Lx9d, Black wins with Rx9d Gx9d; Lx9d P*9c; L*8e (Diagram D) P*8d; G*7d R*7i;
Lx8d Rx8i+; G*8h (Diagram E). In this position, Black is threatening mate by P*9b Kx9b (or ...Rx9b; S*8b
Gx8b; Px8b+ Rx8b; Lx8b+, etc.); P-8b+ Gx8b; S*8c, etc. In the line leading to Diagram E, the lance drop
L*8e (Diagram D) is the key move. Simply playing G*7d instead allows White to drop his silver very
effectively with ...S*8e. In this game, 8e was the key point for both sides, and the side that controlled
it was able to gain the advantage. Just as there are pieces that are so effective that they should be
stubbornly defended or attacked and eliminated, there are key points in a game of Shogi. The ability not
just to notice vital pieces but to identify the key points and control them directly affects the outcome
of the game.
 |
| Diagram E |
A Difficult Struggle
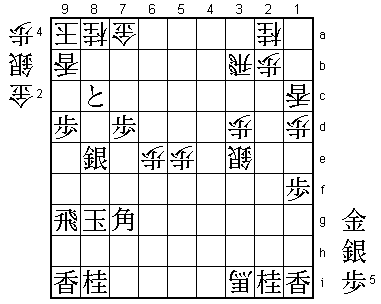
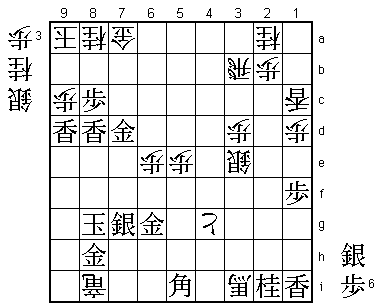
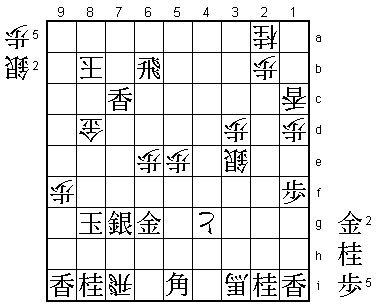
From Diagram 3, the game continued ...P*9f; Rx9f P*9e; Px9c Nx9c (Diagram 4). Allowing his lance to be
taken for nothing may seem disadvantageous for White, but if he weathers this storm he will have good
prospects. For example, if he can play ...Gx8c, White's king will not easily be mated.
 |
| Diagram 4 |
In Diagram 4, I cannot afford to run about with my rook. Simply escaping with R-7f, for instance, is
effectively answered by ...P*7e. I therefore played L*7c. If White defends with ...P*7b, R-7f is now possible
because he can no longer drop a pawn on 7e. But what if White answers R-7f with ...S*7e? Now Black can play
P*9d Gx9d; S*8b Gx8b; Px8b+ Kx8b; G*7d (Diagram F), which seems to give him the better chances.
 |
| Diagram F |
 |
| Diagram 5 |
In the game, Moriyasu responded to L*7c tenaciously with ...G-8a. This is quite a stubborn defense. In mutual
time pressure, he may have judged intuitively that this would keep his king safe. After using my remaining
three minutes, I played P*9d (Diagram 5). Play continued ...Px9f; Px9c+ R*7i; S*8b Gx8b; Px8b+ Rx8b; +Px8b
Kx8b; R*6b (Resignation Diagram) and Moriyasu 9-dan resigned. From the Resignation Diagram, after ...Kx7c;
G*7b K-8c; G-8b K-9c, or ...K-8c; G*8b K-9c, or ...K-9c; G*9b K-8c; G-8b K-9c, Black plays P*9d and,
after either ...Kx9d or K-7d, N*8f leads to a neat forced mate.
 |
| Resignation Diagram |
The game ended quickly from the position in Diagram 5 because Moriyasu played the weak move ...Px9f, resulting
in a relatively straightforward win for Black. Returning to the position after P*9d (Diagram 5), White's best
move here was ...Gx9d. What would have happened if he had taken this pawn? Although I couldn't calculate this
line to the end, I had no choice but to play P*9d in the heat of byoyomi. I would have answered ...Gx9d with S*7b.
This does not threaten mate, but if White now takes the rook with ...Px9f, Black continues his attack with G*8b
Gx8b; Px8b+ Kx8b; G*8c K-9a; P*8b (Diagram G) and, since White has no mate here, Black wins by one move. After
S*7b, therefore, White would have to play ...Gx7b; Lx7b+ Rx7b (Diagram H).
 |
| Diagram G |
 |
| Diagram H |
In Diagram H, Black would like to play G*7c but this contains a pitfall. After ...L*8d; S-8f S*7h; Kx7h Rx7c, the gold
is removed with check. The correct move in Diagram H is the cool P*7c. This does not threaten mate, but as White is not
threatening mate either after taking the rook with ...Px9f, it is not too slow. Play might continue ...L*8d; G*8f R-3b;
Rx9e (Diagram I) with a difficult and unclear struggle ahead, where Black still seems to be in the fight. But since I
was now in byoyomi, having to play each move in one minute, I very much doubt whether I would have coolly played the
correct P*7c or ridden out the storm in the difficult ending from Diagram I.
 |
| Diagram I |
The Thrill of the Endgame
When Moriyasu 9-dan dropped a gold at the key point with ...G*8d in the position in Diagram 2, I was already anticipating
a hard struggle. Perhaps I was able to win because this put me in a defiant mood. If I hadn't been able to shake off the
anxious feelings I had experienced about ten moves earlier while I was thinking for 26 minutes over S-6f and 11 minutes
over P-9e, I don't think I could have won this game.
Mistakes are an intrinsic part of Shogi. In all kinds of position, everyone makes big mistakes as well as those so
slight that they take you by surprise. The main thing is to be able to switch to a positive attitude and not get
down on yourself when you make a mistake. It is no use crying over spilt milk. It is very important to be able to
forget, think positively, and look at the board in a fresh frame of mind.
Moriyasu's ...G*8d aimed to eliminate the key silver on 8e and the ensuing struggle focused on the control of
this key point. In the endgame, the more the players strike the key points and the more precisely they do so,
the more rapidly will they achieve the ultimate aim of mating each other's king. This speed and power is the
greatest thrill of the endgame.
