Lightning Speed Endgame Technique
Koji Tanigawa, Meijin
Part Three: Winning Endgame Technique
Chapter 5: Forced Mate Rather Than Brinkmate
Black: Koji Tanigawa, Oi Titleholder
White: Makoto Nakahara, Meijin
Game 4, 46th Meijin Title Match, Asahi Hotel, Shirahama, Wakayama, May 23-24, 1988 (9 hours each)
P-7f P-8d; P-2f P-8e; B-7g P-3d; S-8h G-3b; G-7h S-6b; P-2e P-5d; P-2d Px2d; Rx2d S-5c; Rx3d Bx7g+;
Sx7g G-3c; R-3e R-2b; P*2e B*7d; G-3h G-7b; P-7e B-9b; R-3f Rx2e; P*2g S3a-4b; R-9f P-5e; S-6f G-4d;
R-9e K-5b; Rx8e P*8b; K-6h S-6d; P-3f R-2d; K-7i P-1d; S-4h P-1e; R-8f N-3c; P-9f P*2f; Px2f Rx2f;
P*2g Rx3f; S-3g R-3d; B*2b R-1d; P*3b R-1b; Bx3c+ Sx3c; N*8d K-6a; Nx9b+ Lx9b; P-3a+ P-7d; B*2c R-6b;
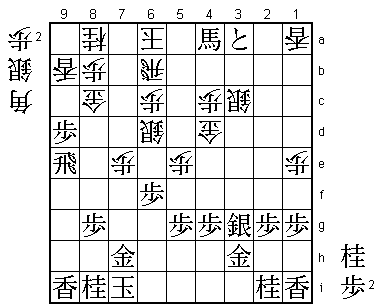
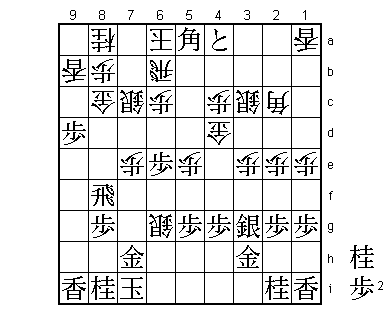
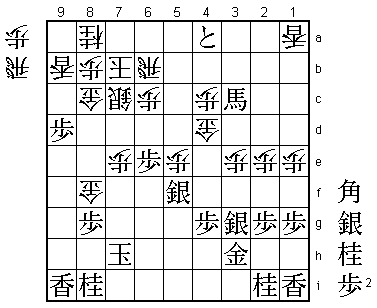
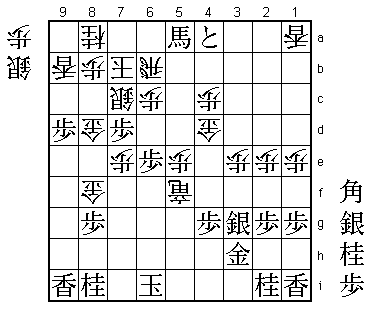
B-4a+ Px7e; P-9e N*7d; R-9f P-9d; Px9d P*9e; Rx9e Nx6f; Px6f G-8c (Diagram 1); P-6e S-7c; R-9f
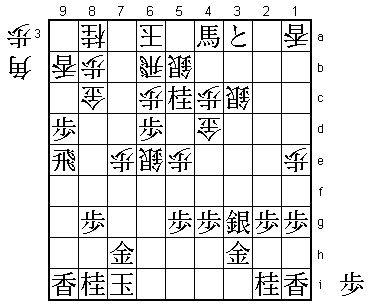
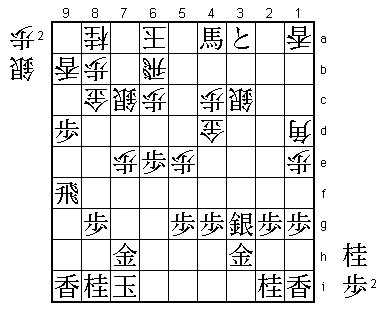
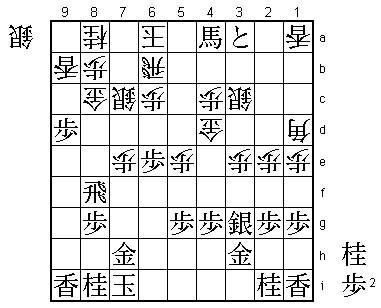
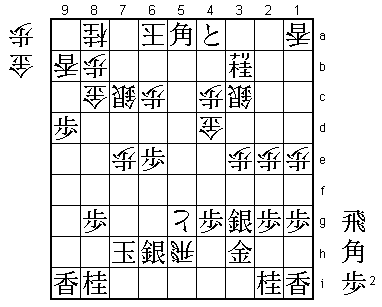
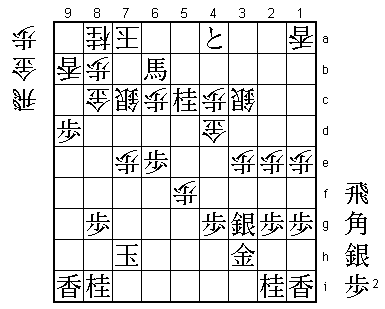
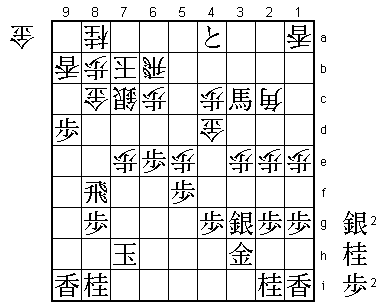
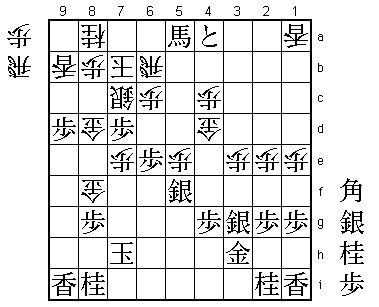
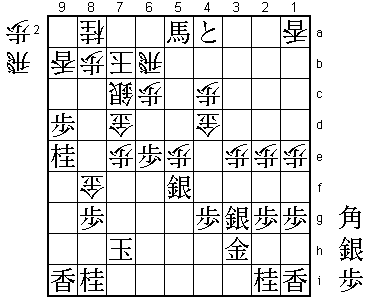
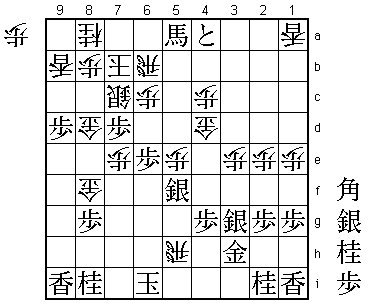
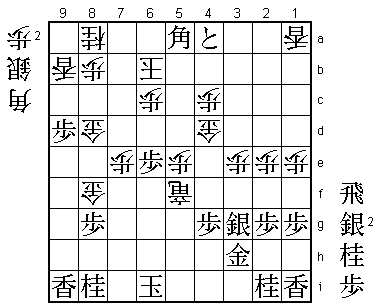
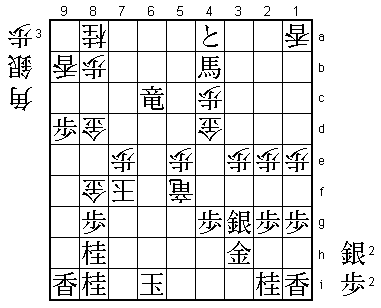
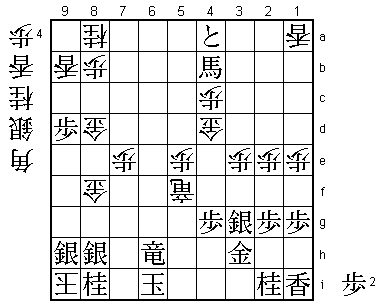
B*1d (Diagram 2); R-2f P*2e; R-3f P*3e; R-8f (Diagram 3) Bx4a; +Px4a B*2c; B*5a S*6g (Diagram 4);
P-5f Sx7h+; Kx7h K-7b (Diagram 5); Bx3c+ Bx5f; S*6g G*7f; Sx5f Gx8f (Diagram 6); +B-5a G-8d:
P*7d (Diagram 7) R*5h; K-6i (Diagram 8) Rx5f+ (Diagram 9); Px7c+ Kx7c; +Bx6b Kx6b;
B*5a (Diagram 10) K-5c; B-4b+ K-5d; R*5c Kx6e; Rx6c+ K-7f; N*8h Resigns
(Times: Tanigawa 8 hrs 7 mins; Nakahara 8hrs 18 mins)
 |
| Diagram 1 |
The position in Diagram 1 is from the 4th game of the 46th Meijin title match. Meijin Nakahara has just
moved his gold from 7b to 8c, giving his king more space and threatening ...Lx9d. If he can get a rook
in hand, his attack against my king will gain in speed. This gold move is therefore both attacking and defensive.
 |
| Diagram A |
Here I wanted to start an immediate fight, but I couldn't find a good way of doing so. After 26 minutes' thought,
I proceeded cautiously with P-6e S-7c; R-9f. By playing P-6e followed by R-9f, my rook, which had been hemmed in
and targeted, suddenly becomes active. I was able to play these two moves because I managed to keep my cool
in this tense position. If White answers P-6e with ...Sx6e, I can attack with P*6d. If now ...Px6d; P*6c, or
if ...S*5b; N*5c (Diagram A) is a crushing blow. From Diagram A, ...K-7b; +Bx5b Rx5b; S*6a and Black has a mating attack.
 |
| Diagram 2 |
In response to R-9f, Nakahara played ...B*1d (Diagram 2). This was a dubious move and during the post mortem the
Meijin said it was the move he most regretted. Instead, he should have simply made an early king escape with ...K-7b or,
if he was going to drop the bishop, ...B*1b, aiming for ...S*6g, would have been better. The crucial deciding factor
in this game was whether or not the tokin on 3a can play an effective role. B*1d was a dubious move because it helped
to activate the tokin.
Simplifying the Position
 |
| Diagram 3 |
From Diagram 2, the game continued R-2f P*2e; R-3f P*3e; R-8f (Diagram 3). With these rook moves, I aimed to fully exploit
the rook's range of movement by making White use up his pawns in hand and then placing it in its optimal position. It is
a sequence with good aji. In fact, I was aware at this point that I had a slight advantage. When you have the advantage,
the quickest way to victory is make the position as clear as possible. The side with the advantage aims for simplification,
while the side at a disadvantage tries to complicate matters. This is one of the fundamental approaches in the endgame.
 |
| Diagram 4 |
From Diagram 3, play continued ...Bx4a; +Px4a B*2c; B*5a S*6g (Diagram 4). Instead of ...S*6g, simply turning to defense
with ...R-3b would have made things more difficult for me. In response to ...R-3b, N*2d springs to mind, but then White
can counterattack with ...S*6g and after P-5f Bx5f; Rx5f Sx7h+; Kx7h Px5f; Nx3b+ R*5h; S*6h P-5g+ (Diagram B), since
Black has no mate, White has succeeded in turning the tables. Black's best response to ...R-3b is not to attack immediately
but to play P-5f Px5f; G-4h to activate the passive gold on 3h before dropping the knight on 2d. This would have
maintained Black's advantage.
 |
| Diagram B |
The silver drop ...S*6g (Diagram 4) was the move White had been aiming for, but the timing was bad. Against the defensive
tesuji P-5f, he wants to continue the attack with ...Bx5f, but after Rx5f Sx7h+; Kx7h Px5f; N*5c K-7a; Bx6b+ (Diagram C),
White is mated after either ...Kx6b; B*7a Kx7a; R*5a, etc. or ...Sx6b; P*7b Kx7b; B*6a K-7c; R*7b K-8d; S*9e K-8e;
S-8f K-8d (or K-7f); Rx7e+.
 |
| Diagram C |
From Diagram 4, play continued P-5f Sx7h+; Kx7h K-7b (Diagram 5), giving back the initiative to Black. This is
unavoidable because after ...Bx5f; Rx5f, as we have seen, Black can mate with a bishop, silver, and knight in hand.
 |
| Diagram 5 |
From Diagram 5, the game went Bx3c+ Bx5f; S*6g G*7f; Sx5f Gx8f (Diagram 6). When he dropped the silver on 6g, White had
wanted to answer P-5f by taking it immediately with the bishop but, in view of the above-mentioned forced mate, he had
to play ...Bx5f one move later. As a result, Black can now repel the attack with S*6g, significantly reducing its impact.
After I took the bishop and Nakahara took my rook, we reached the position in Diagram 6. Black must now find a way of
putting together the final mating attack.
 |
| Diagram 6 |
Restricting the Opponent's Options
In Diagram 6, Black seems to have various ways of winning. I thought that the quickest way, if possible, was to close
in with successive mate threats. I therefore attacked with +B-5a G-8d: P*7d (Diagram 7). +B-5a threatens mate by
S*6a Rx6a; +Bx6a Kx6a; R*5a, etc. ...G-8d defends against this threat, but my reply P*7d was decisive. If instead
Black tries to cut off the king's escape via 8c with N*9e, White can turn the tables with ...Gx9e.
 |
| Diagram 7 |
 |
| Diagram D |
If White answers P*7d with ...Sx7d, Black has forced mate, and if ...Gx7d, N*9e (Diagram D) is a nice finishing touch.
Seeing that he had no good defense to P*7d, White played the rook drop R*5h and I replied K-6i (Diagram 8). This may
look dangerous, but it's the simplest way to win. If I interpose a piece, by N*6h for example, I will have one less
attacking piece, giving White a wider range of attacking and defensive possibilities. K-6i attacks the rook, leaving
White no choice but to escape by taking the gold on 3h or the silver on 5f. My aim was restrict White's options and then mate him.
 |
| Diagram 8 |
When you have the advantage, you should try to restrict your opponent's options as much as possible. This
will reduce the amount of variations you have to analyze and make it easier to find winning lines and back
them up with precise calculation. Conversely, when you stand worse, try to find moves that force your opponent
to analyze as many variations as possible. Complicating the situation is a good way of turning the tables.
With K-6i (Diagram 8), the position was simplified. Now I could focus completely on mating my opponent's king
without having to worry about my own.
Calculating to the End
 |
| Diagram 9 |
Nakahara chose to take the silver with ...Rx5f+ (Diagram 9) rather than the gold on 3h. He apparently thought
that this offered better chances for his king to escape up the board. I had anticipated and thoroughly analyzed
the position in Diagram 9. Play continued Px7c+ Kx7c; +Bx6b Kx6b; B*5a (Diagram 10). If now ...K-7b, Black mates
with R*6b K-7c; R-6a+ K-7d; Bx8d+ Kx8d; S*9e K-7d; G*6d K-8e; Px8f K-7f; G*7g.
 |
| Diagram 10 |
From Diagram 10, the game continued ...K-5c; B-4b+ K-5d; R*5c Kx6e (or ...K-4e; S*5d Gx5d; Rx4c and mates);
Rx6c+ K-7f; N*8h (Resignation Diagram) and Meijin Nakahara resigned. From the Resignation Diagram, it is forced
mate after ...Kx8g; S*9h Kx8h; +R-6h Kx9i; S*8h (Diagram E) Kx9h; S-9g K-8g; +R-7h. It may seem risky to let the
enemy king come deep into my camp all the way to 9i, but I had calculated this line to the end from Diagram 9.
 |
| Resignation Diagram |
 |
| Diagram E |
Forced Mate is Absolute
In fact, White is not threatening mate in the position in Diagram 9 (after ...Rx5f+). Therefore, Black could win
by one move by putting the enemy king in brinkmate, or by successive mate threats. You are probably familiar with
the proverb "brinkmate is better than a long mate." It means that, rather than chasing the enemy king around with
successive checks and running the risk of letting it escape, a simple but certain brinkmate is less likely to let
your opponent to turn the tables. But I take a different view. For one thing, from the viewpoint of the record of
the game rather than the result, it is surely best to mate when forced mate is possible. Furthermore, brinkmate
is not absolute; it sometimes contains an element of uncertainty. In the previous chapters, we have seen examples
of escaping a mate threat with a mate threat or escaping brinkmate with brinkmate. Even when it is brinkmate from
a partial perspective, from the total perspective of the relationship with one's own king, there is sometimes a
better move.
But forced mate is absolute. It's either mate or not mate: there is no element of uncertainty. As long as you
calculate accurately, your opponent will have no chance to turn the tables. For these reasons, in a position like
Diagram 9 where it looks like mate, I make a point of looking for forced mate rather than brinkmate. Unlike Tsume
Shogi problems, which are designed to lead to mate, determining whether you have forced mate is very difficult
and complicated, and often you have no choice but to give up and go back to the start. However, these repeated
efforts will improve your endgame ability. In a position that looks like mate, I urge you to calculate carefully
and, if you reach a positive conclusion, go for it. Forced mate is better than brinkmate. The attitude of trying
to reach the goal as fast as possible should give you a strong tailwind in the endgame.
One final word. Even when you have calculated accurately, you may feel anxious as the game unfolds. After all,
if it is not mate, it can lead directly to loss of the game. So always believe in your calculating ability and play
the endgame with courage.
