 |
| Diagram 1 |
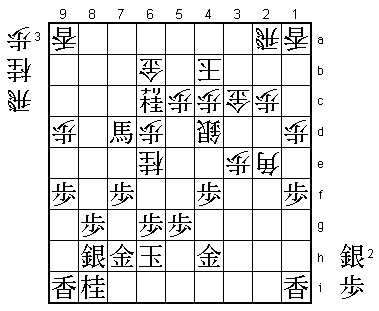
The position in Diagram 1 is the endgame against Yonenaga 9-dan in the A Class of the 1987 Junisen League. For this game, I studied at the last minute as if I was cramming for an examination. I reviewed the score of Yonenaga's game with Kiriyama played two days earlier in the belief that our game would follow the same path. And so it turned out. Last-minute study sometimes pays off.
 |
| Diagram 2 |
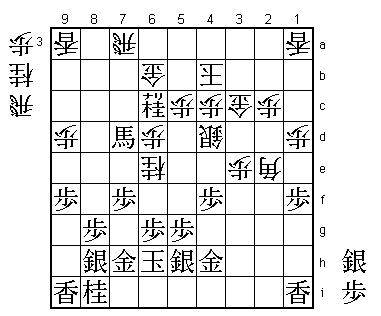
Both of us had foreseen this position from ten moves earlier. I have just played ...N-6e, threatening mate in one by ...R*6i, and Yonenaga defended with S*5h. I answered this with ...R-7a (Diagram 2), a move with good aji. I think my opponent either did not foresee this move or underestimated it. With ...R-7a, White gains the advantage. The next stage is to work out how to drive this advantage home.
 |
| Diagram A |
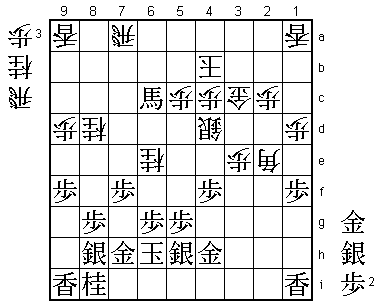
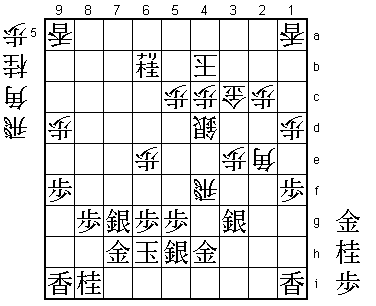
The natural response to ...R-7a is +Bx6d, but after ...Gx6c; +Bx6c, White has the powerful punch ...N*8d (Diagram A), to which Black has no good defense. After thinking for 14 minutes, Yonenaga opted for the emergency measure +Bx6e. The game continued ...Px6e; +Nx6b Rx7f; S-7g Rx4f; S*3g (Diagram 3).
 |
| Diagram 3 |
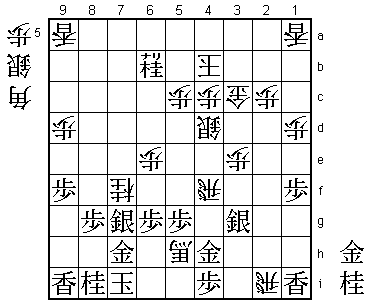
In Diagram 3, White must first and foremost be aware that, if he gives Black a rook, his king will be threatened with forced mate. Therefore the theme of this endgame is: how can White storm the enemy king without handing over a rook? For his part, Black will do his utmost to get the rook he needs. Whatever pieces he drops in his own camp to defend his king, he can turn the tables with just a gold and rook in hand. In this context, S*3g was a bold defensive gamble played in full awareness that his own attacking forces would be diminished.
In response, I pursued the attack with ...Nx7f. If Black takes the knight with Sx7f, White will recapture with ...Rx7f, bringing the rook back into the action. Yonenaga withdrew his king with K-7i and answered my ...R*2i with P*4i, sticking to his aim of getting hold of a rook.
 |
| Diagram 4 |
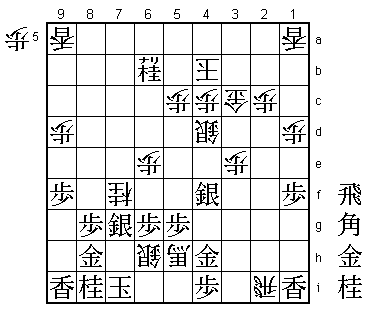
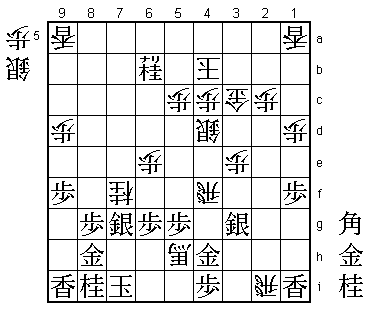
Now I took the plunge with ...Bx5h+ (Diagram 4). If Black now takes the rook on 4f, White mates by ...B*8h; Gx8h S*6h (Diagram B), and if Gx5h, he has a long but simple forced mate with ...R4fx4i+; N*5i +Rx5i; Gx5i Rx5i+; G*6i B*8h, etc. Since Black cannot take the rook or the promoted bishop, I thought that my Bx5h+ had put him in brinkmate. But Yonenaga's next move was a surprise. He took my knight with Sx7f and I suddenly realized that it wasn't brinkmate after all.
 |
| Diagram B |
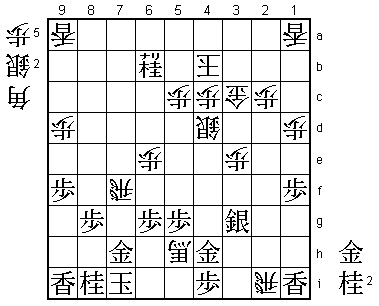
Instead of ...Bx5h+, I should have first cut off the king's escape route with the bishop drop ...B*8h. After Gx8h Bx5h+ (Diagram C), it really would have been brinkmate. It was essential to find a way of finishing that did not allow Black's king to escape to 8h. Because I simply played Bx5h+, the mating attack disappeared with the removal of my knight on 7f. This kind of mistake in the endgame usually results in a mortal injury, so I was fortunate that my advantage was so large that it wasn't fatal.
 |
| Diagram C |
 |
| Diagram 5 |
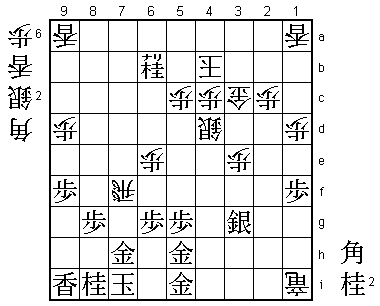
Although I missed the quickest finish, after Sx7f Rx7f (Diagram 5), White has such a big material advantage that this was not so serious. Particularly painful for Black is the fact that he has no pawns in hand and no suitable piece to defend with on 7g.
 |
| Diagram 6 |
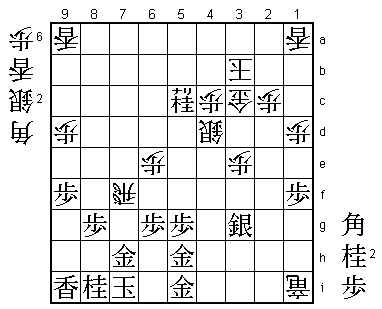
From Diagram 5, the game continued Gx5h Rx4i+; G*5i Rx1i+ (Diagram 6). The position has suddenly calmed down. As I had overlooked ...B*8h and played ...Bx5h+ in Diagram 4, there was no longer any quick finish, leaving me no choice but to change my plan. With Rx4i+ I forced White to drop a gold on 5i and then took the lance on 1i. It may look as if I am attacking here, but I had actually switched to defense by forcing my opponent to use pieces to reduce his attacking strength. In fact, by forcing G*5i, I had made my own king quite safe.
 |
| Diagram 7 |
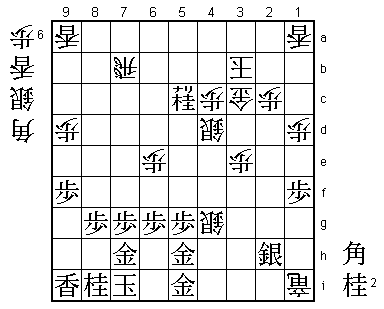
In Diagram 6, Yonenaga 9-dan played +N-5b. This is a startling move, the point being that ...Kx5b is answered by B*8e, forking king and rook. I couldn't very well hand over a rook, so I escaped with ...K-3b, whereupon Black immediately landed a second punch with +Nx5c (Diagram 7), aiming to answer ...Sx5c with P*7g followed by N*4e. I left the promoted knight on 5c alone and dropped a silver with ...S*4g. This is the clearest way of finishing. Yonenaga now chased my rook away with P*7g R-7b and played S-2h (Diagram 8). This powerful sequence of +N-5b and +Nx5c, followed by S-2h, is typical of Yonenaga's "quagmire-style" endgame technique. If White carelessly takes this silver with ...+Rx2h, the situation becomes quite confused after Gx4g. What is more, the silver on 2h gives Black the possibility of defending later with G*3i. S-2h was a great "confusing move" in a lost position.
 |
| Diagram 8 |
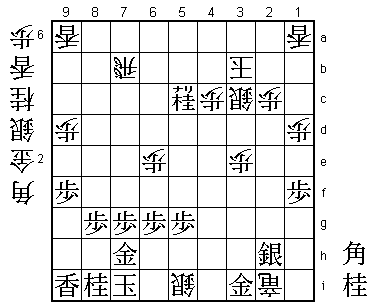
I answered S-2h with ...+R-2i. As I had already anticipated the strong defense G*3i, this was a frightening move to play. It was also a move that could not be played without calculating thoroughly that Black's king would be mated in every variation. As I have said many times, you cannot play the endgame through intuition. Rather than vague feelings about what kind of move might be good, you must calculate ahead as deeply as you can and play accordingly. The depth of this calculation is the key to success in the endgame. However difficult the position, the conclusion is already there to be found. The question is whether the players are able to discover it during the game. Calculation is the process of searching for that conclusion.
 |
| Diagram 9 |
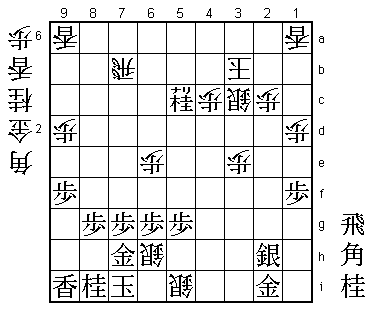
After ...+R-2i, the game continued N*2e Sx5h=; Nx3c+ Sx3c; G*3i Sx5i=, reaching the position in Diagram 9. I think you can appreciate now that S-2h prepared the defensive gold drop G*3i and that +R-2i couldn't be played without calculating right to the end. Without the certainty that Sx5i threatens mate, it would be a hard move to make and if, instead of this, White were to withdraw the promoted rook with ...+R-1h, Black could capture the silver with Gx5h or play the attacking and defensive bishop drop B*5d, with good chances of turning the tables in either case.
In the position after S-2h +R-2i, I had to anticipate the defense G*3i and calculate that ...Sx5i= threatens forced mate even after the promoted rook on 2i has been captured. The key to the solution was not to promote the silver when playing ...Sx5h= and ...Sx5i=. If the silver had promoted, White would not have been threatening mate. While Yonenaga spent seven minutes on ...S-2h, I calculated that I could force mate in every variation.
 |
| Resignation Diagram |
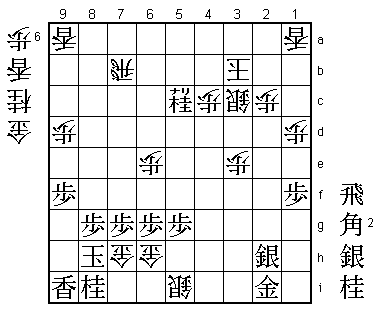
From Diagram 9, play continued Gx2i S*6h (Resignation Diagram) and Yonenaga resigned. Instead of Gx2i, Black could try +Nx4c. If White carelessly takes this with ...Kx4c, B*6a forks king and rook, and without the rook on 7b, he is no longer threatening mate as Black's king can now escape up the board. I therefore planned to answer +Nx4c with K-2a, and since the position of the promoted knight does not affect the mating lines from the Resignation Diagram, it's still a win for White.
 |
| Diagram D |
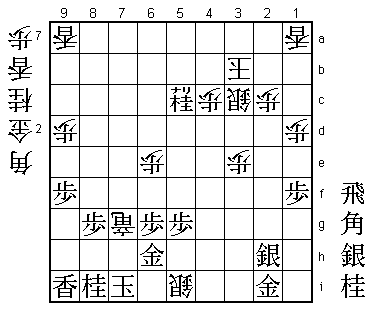
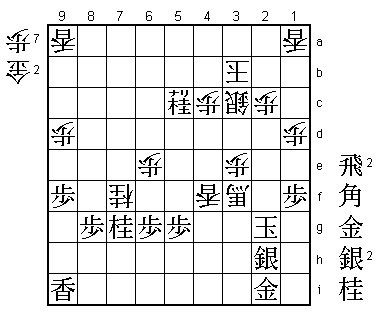
In the Resignation Diagram, Black can play either K-8h or Gx6h. If K-8h, White forces mate with ...B*7i; Gx7i Sx7i=; Kx7i G*6h; K-8h G*7h (Diagram D); K-9h L*9g; Kx9g N*8e; K-8f G*7e mate. After K-8h, White can also mate with G*9g. Try working it out for yourself. But how about Gx6h? Here White should not immediately play ...Sx6h+ but the fine move ...Rx7g+ (Diagram E). If now Gx7g, White has a simple forced mate with G*6h; K-8h B*7i; K-9h L*9g, etc., and if Nx7g, it is also mate after ...Sx6h+; Kx6h N*7f; K-5i G*5h; Kx5h B*6i; K-4i L*4f; K-3h B-4g+; K-2g +B-3f (Diagram F), etc.
 |
| Diagram E |
 |
| Diagram F |
You cannot play the endgame through intuition: calculation is everything. And when I say that, I am of course also reproaching myself. In this game, I played the bad move ...Bx5h+ after only one minute's thought. I had plenty of time left, so why didn't I calculate all the possibilities? That was a very careless minute. If I hadn't made that mistake and played ...B*8h instead, the game would probably have ended 20 moves sooner.