Lightning Speed Endgame Technique
Koji Tanigawa, Meijin
Part Three: Winning Endgame Technique
Chapter 3: Never Give Up
Black: Koji Tanigawa, Meijin
White: Kiyosumi Kiriyama, 9-dan
9th Shogi Japan Series, July 17, 1988 (10 minutes each)
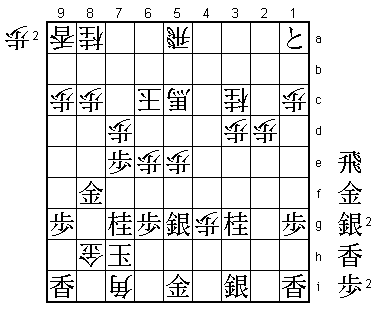
P-7f P-8d; S-6h P-3d; S-7g S-6b; S-4h P-5d; P-5f S-5c; G-7h S-6d; P-2f P-5e; Px5e Sx5e; P-2e R-5b;
K-6i G-3b; S-6h B-3c; K-7i S-4b; P-3f K-4a; N-3g P-4d; P-2d Bx2d; P*5d Rx5d; Rx2d Px2d;
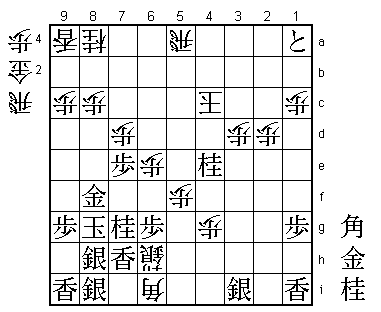
B*8c (Intermediate Diagram 1) R-5a; Bx6a+ Rx6a; Bx5e (Intermediate Diagram 2) G-4c; P-4f R-5a;
B-6f B*2g; G-5i Bx3f+; P-4e P*5e; Px4d Gx4d; B-7e P-6d; P*2b P*4g; S-3i N-3c; P-2a+ +B-5d; +Px1a
K-5b; L*4f S-5c; Lx4d Sx4d; N-7g L*5f; G-4i K-6c; K-8h S-5c; Bx8d P*8f; P*5g Px8g+; Gx8g P*8f;
Gx8f P*8c; B-6f P-6e; B-7e P-7d; Bx5c+ +Bx5c; P-7e (Diagram 1) Lx5g+; Sx5g R*6i (Diagram 2); G*5i
B*7i; K-7h Rx5i+; Gx5i G*8h (Diagram 3); K-6i Bx5g+; G*6h (Diagram 4) +B5c-3e; P*4f +B5gx4f;
S*7i S*5g; R*4c K-5d; Rx4f+ +Bx4f; B*7b K-4c; Sx8h (Diagram 5) P-5f; K-7h Sx6h=; P*4e (Diagram 6) Nx4e;
Bx4e+ +Bx4e; Nx4e Sx5i=; K-8g B*6i; L*7h S-6h+; S*8i (Diagram 7) K-5d; B*3c R-4a; G*5e K-6c; Nx6e R*5h;
N*6d (Diagram 8) G*6b; P*5d Resigns
(Times: Tanigawa 10 mins; Kiriyama 10 mins)
 |
| Diagram 1 |
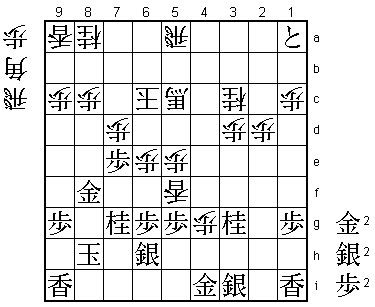
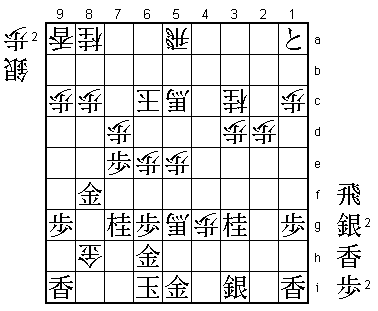
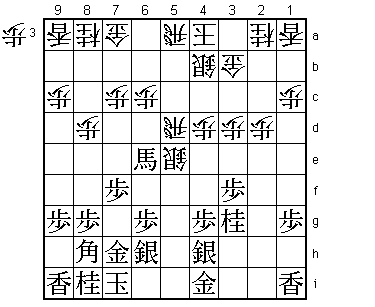
This is my game with Kiriyama 9-dan in the 9th Japan Series. The position in Diagram 1 is a rare case
where White has all four major pieces and Black has all eight generals. This exchange of bishop and
rook for four generals gives Black a clear material advantage. In view of this, White has no choice
but to attack immediately.
 |
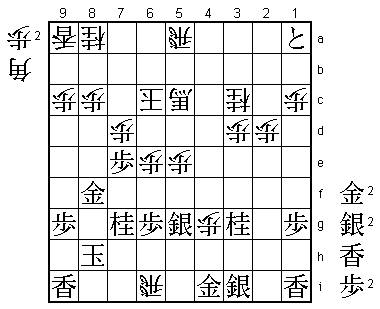
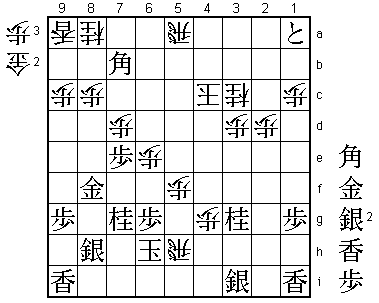
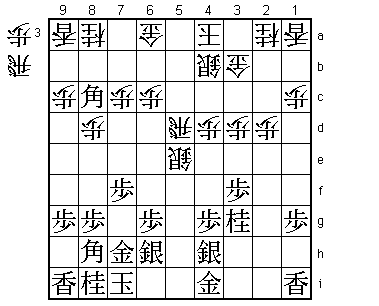
| Intermediate Diagram 2 |
As you can see from the game score above, with the exchange of a bishop for a gold and silver after
Bx5e (Intermediate Diagram 2), I gained a winning advantage. Even so, the game continued for about
50 moves without me being able to drive home this advantage. Of course, I should now have been
focusing completely on the present position, but I couldn't help thinking about how I might have
played better. What is more, we were playing in front of an audience and I had already used my
allotted ten minutes' thinking time and was in byoyomi, having to play each move within 30 seconds.
Then I made an incredible blunder...
 |
| Diagram 2 |
From Diagram 1, the game continued ...Lx5g+; Sx5g R*6i (Diagram 2); G*5i B*7i; K-7h Rx5i+; Gx5i G*8h (Diagram 3).
Suddenly everything went black. I had completely overlooked ...Rx5i followed by ...G*8h. If I had noticed it,
I would have answered R*6i with G-5h Rx3i+; P*5i. Of course, this is what I had to play.
 |
| Diagram 3 |
When White played ...G*8h, for a moment I considered resigning, but since my opponent had also used his allotted time,
I pulled myself together and decided to play on a little longer. Perhaps the main reason I won this game was that
I did not give up at this point.
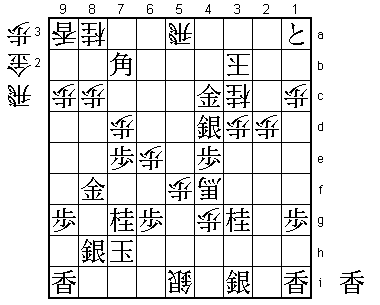
The Crucial Moment
From Diagram 3, play continued K-6i Bx5g+; G*6h (Diagram 4). I'm sure my face turned pale when Kiriyama dropped his
gold on 8h, but I also sensed that he did not have quite enough attacking pieces to finish me off straight away.
If White now takes the silver with ...+Bx3i, the pawn drop P*8i is quite annoying for him.
 |
| Diagram 4 |
From Diagram 4, the game proceeded ...+B5c-3e; P*4f +B5gx4f; S*7i S*5g; R*4c K-5d; Rx4f+ +Bx4f; B*7b K-4c;
Sx8h (Diagram 5). This was as expected, but it must have been a little worrying for White to move the promoted
bishop on 5c away from his king. With the promoted bishop on 5c closely guarding his king, he could have
focused completely on closing in on my king, but now he cannot afford to do this. From now on, he always has
to consider the repercussions on his own king. In that sense, during the sequence from Diagram 4 to Diagram 5,
some interesting prospects emerged for me too.
 |
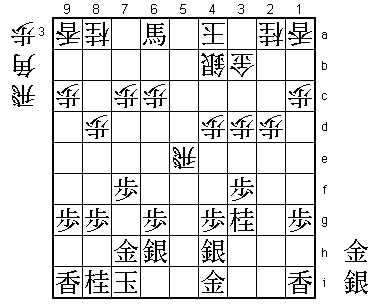
| Diagram 5 |
In Diagram 5, Kiriyama 9-dan played ...P-5f. The most natural move here is ...R*4i, but if Black defends
doggedly with Gx5g +Bx5g; G*6h, it seems impossible to force the attack home. P-5f threatens mate by ...Sx6h+;
Gx6h +Bx6h; Kx6h R*5h (Diagram A), etc. The game went K-7h Sx6h=; P*4e, reaching the position in Diagram 6.
If White now plays ...Sx5i=, Black wins with S*4d K-3b; G*4c (Diagram B). It looks as if White can escape
with ...K-2c, but is mated after Gx3c K-1d; L*1f.
 |
| Diagram A |
 |
| Diagram B |
 |
| Diagram 6 |
From Diagram 6, play continued ...Nx4e; Bx4e+ +Bx4e; Nx4e Sx5i=; K-8g B*6i; L*7h S-6h+; S*8i (Diagram 7).
This is the crucial position in this game. In the Japan Series, in addition to the allotted ten minutes,
the players are given five 1-minute thinking times. Kiriyama 9-dan used his second thinking time at this
point. Though this is mere speculation on my part, I believe Kiriyama realized this was a won position
for him and was looking for the winning line. I think he must have considered the variation given below,
but for some reason he hesitated to play it.
 |
| Diagram 7 |
From Diagram 7, White can play ...+Sx7h; Sx7h Bx7h+; Kx7h G*6h; K-8g (if Kx6h R*5h mates) S*7h; K-9h (or K-9f L*9d, etc.)
R*6i (Diagram C). In this position, Black's king is virtually in brinkmate. The question is whether Black has forced mate
here. As it turns out, after B*3b K-4d; B*3c Kx4e, White's king just manages to escape to 5g via 4f. As I stated above,
Kiriyama no doubt realized that he had a won position and looked at the line leading to Diagram C. Perhaps this
awareness that he was winning caused him to steer clear of the stormy variations after ...+Sx7h.
 |
| Diagram C |
A Game of Swinging Fortunes
In Diagram 7, Kiriyama played ...K-5d. Before closing in for the kill, he aimed to first ensure the safety of his
king by escaping up the board, but this turns out much worse. With B*3c R-4a; G*5e I pinned back his king and
put an end to such hopes. After ...K-6c, Black finished neatly with Nx6e R*5h (if ...K-7b; Px7d and, as a final
ironic touch, the lance interposed on 7h takes part in the decisive attack); N*6d (Diagram 8). If now ...K-6b,
Black can safely force home his attack with B-4d+ Rx4d; Gx4d since his own king is in no immediate danger.
 |
| Diagram 8 |
From Diagram 8, play continued ...G*6b; P*5d (Resignation Diagram) and Kiriyama 9-dan resigned.
 |
| Resignation Diagram |
 |
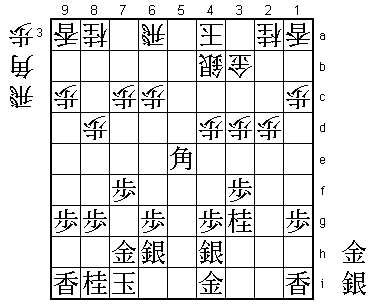
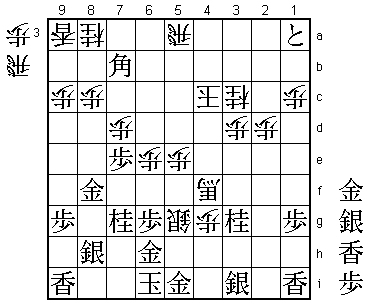
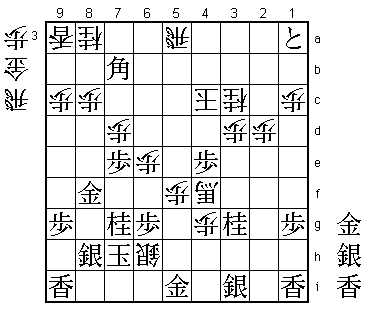
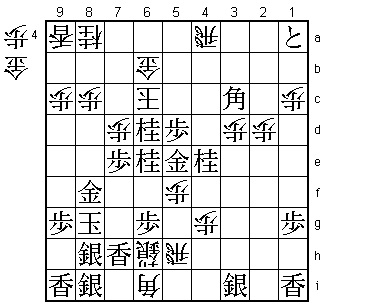
| Intermediate Diagram 1 |
Let us return to the position in Intermediate Diagram 1, which we reached after I exchanged
rook for bishop with Rx2d Px2d and dropped the bishop on 8c. This threatens to take White's gold
on 6a while aiming to promote the bishop with B-6e+, and naturally I thought I was doing well here.
But the moment I dropped the bishop on 8c, I noticed that it wasn't so good after all. The gold
can escape with ...G-7a when, in response to B-6e+, White has the strong defense R*5a (Diagram D).
Since Black has no effective rook drop after +Bx5d Rx5d and no pawns in hand, it is hard to find
a good continuation. My attack seems to have been unsound.
 |
| Diagram D |
But instead of G-7a and R*5a, Kiriyama 9-dan simply retreated his rook to 5a and I immediately secured
a clear advantage by winning two generals for a bishop with Bx6a+ followed by Bx5e. In fact, I felt the
game was over when I took the gold on 6a. In retrospect, instead of Bx6a+ Rx6a; Bx5e (Intermediate Diagram 2),
Bx5e Rx5e; Bx6a+ (Diagram E) would have given me a strong attack. I should have thought more carefully about
which line was better. Perhaps because I was so pleased to gain such an advantage, I lacked the requisite
caution at this stage of the game. And this carelessness led to my overlooking ...G*8h (Diagram 3). When I
won two generals for a bishop with Bx5e I felt I had won, and when my opponent played ...G*8h I felt I had lost.
It was certainly a game of swinging fortunes.
 |
| Diagram E |
Ultimately I was able to win the game, but from the position after ...R-5a (the 36th move), I should have
been able to win in about 80 moves. It really goes without saying, but you must not relax when you get a won
position, nor give up easily when you think you have a lost position. However big an advantage you have, the moment
you relax and drop your guard is the most dangerous moment of all. And when things don't go well, giving up
is the worst possible solution. As I wrote earlier, the reason I won this game was that I did not resign;
I succeeded in turning the tables because I didn't give up.
Never relax your attention and never give up. Shogi is a struggle between two human beings.