Lightning Speed Endgame Technique
Koji Tanigawa, Meijin
Part Three: Winning Endgame Technique
Chapter 2: Basic Endgame Strength
Black: Koji Tanigawa, Oi-titleholder
White: Teruichi Aono, 8-dan
Junisen League, A-Class, Shogi Kaikan, September 14, 1987 (6 hours each)
P-7f P-8d; P-2f P-8e; B-7g P-3d; S-8h G-3b; G-7h Bx7g+; Sx7g S-4b; S-3h S-7b; P-3f S-3c; P-4f K-4b;
S-4g P-7d; G-5h P-6d; S-5f G-5b; K-6i S-7c; P-2e S-8d; N-3g P-7e; Px7e Sx7e; N-4e P*7f; S-8h S-4d;
P-2d Px2d; Rx2d P*2c; R-2i P-6e; P*7g Px7g+; Nx7g S-6d; P*7f K-3a; K-7i B*3g; G-4g B-1e+; Nx6e +B-4b;
P-3e P*7e; Px3d P-8f; Px8f Px7f; P*7d R-7b; B*8c R-7a; P-7c+ Nx7c; P*7b R-6a; Nx7c+ Sx7c;
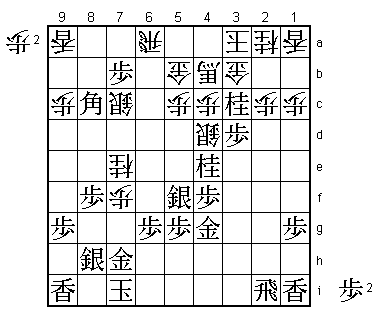
N*3c N*7e (Diagram 1); Nx2a+ Kx2a; P-3c+ Sx3c; Nx3c+ Gx3c; K-6h (Diagram 2) P*6f; Px6f N*5d;
P-7a+ Nx6f (Diagram 3) Bx6a+ Nx7h+; K-5i (Diagram 4) G*3h (Diagram 5); N*3d (Diagram 6) G-3b;
+Bx5b (Diagram 7) +B-1e; P*3g +B-3c; P*2b Gx2b; R*3a Kx3a; G*4b K-2a; Nx2b+ Kx2b; G*3b Resigns
(Times: Tanigawa 4hrs 54 mins; Aono 5hrs 55 mins)
In Shogi, as in any field of endeavor, the most important thing is persistent study of the basics.
Just as repeated training develops the muscles and basic physical strength for sports, regular
practice is essential for Shogi. Particularly in the endgame, the tactics of basic Tsume Shogi
problems appear in every variation. The ability to discover these variations and correctly
analyze them depends greatly on how much time you have invested in study. Studying openings
and solving Tsume Shogi problems will not immediately bring results, but by pursuing this kind
of study over several months and even years, you will acquire real understanding and the basic
strength needed to play Shogi well. Well-known mating sequences and endgame tesuji frequently
appear even in the endgames of professionals. When you need to find these finishing moves at
each crucial moment of the endgame, the knowledge accumulated through regular study makes all
the difference.
 |
| Diagram 1 |
A Dubious Move Born of Impatience
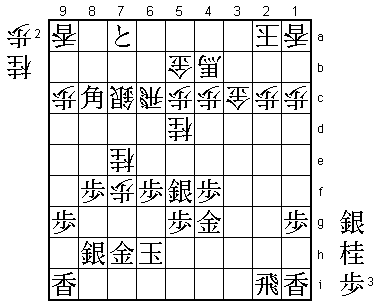
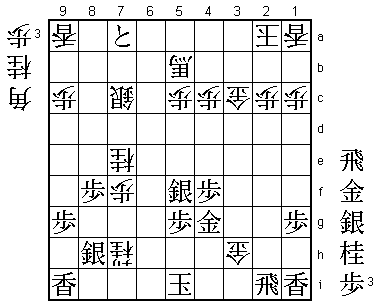
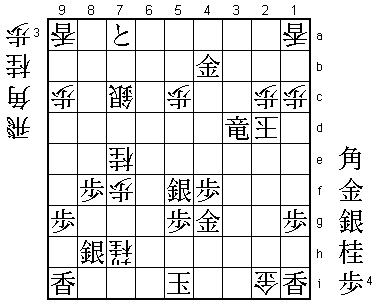
The position in Diagram 1 is from my game with Aono 8-dan in the A-class of the Junisen League.
In response to my attack with N*3c, Aono has played the counter-attacking ...N*7e. These knight
drops aimed at our respective vital points have brought about an unclear position. From Diagram 1,
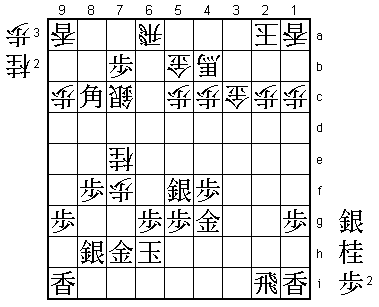
play continued Nx2a+ Kx2a; P-3c+ Sx3c; Nx3c+ Gx3c; K-6h (Diagram 2).
 |
| Diagram 2 |
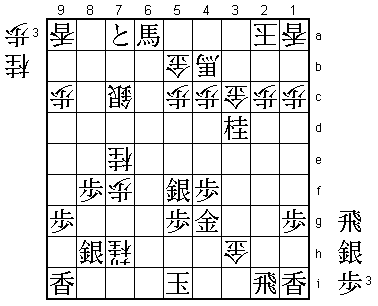
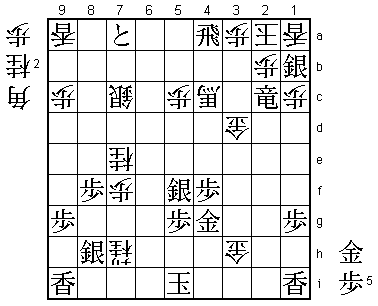
I played K-6h after
25 minutes' thought, but returning the initiative at this point shows that something is wrong.
If K-6h is all Black has here, then he should have played it right away in Diagram 1. Giving White
two knights in hand and then returning the move creates a dangerous situation. In fact I had
miscalculated, believing that I could play P*3d after Nx2a+ Kx2a; P-3c+ Sx3c; Nx3c+ Gx3c.
I initially thought White would have to retreat his gold to 3b here, but when we actually
reached this position I realized that he could omit this and play ...P*8g, and after Px3c+
+Bx3c (Diagram A) the promoted bishop’s attack along the 1a-9i diagonal is too severe.
 |
| Diagram A |
K-6h (Diagram 2) stemmed from the need to change my plan, but a sudden change of plan rarely
brings good results. What is more, if I was going to do this, instead of K-6h, a move like N*8g
would have been better, aiming to answer ...Nx6g+ with Sx6g N*5e; Sx7f. My Nx2a+ in Diagram 1
was a dubious move springing from my impatience to quickly close in on the opponent's king and
bring about a clear mating pattern. This was an instance of my bad habit of going all out for
the attack and then noticing midway that I had miscalculated. Seeing my change of plan
with K-6h, Aono must have felt the game had turned in his favor.
A Subtle Difference
 |
| Diagram 3 |
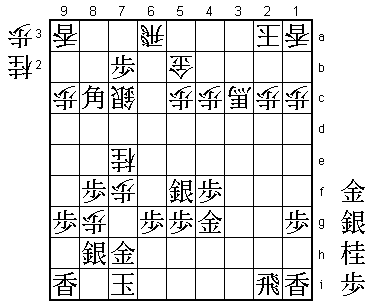
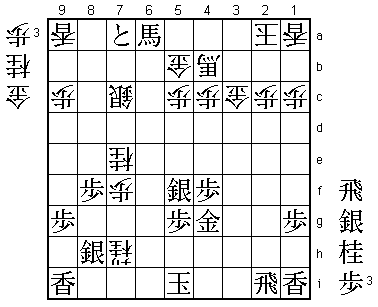
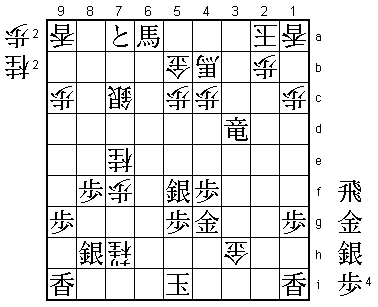
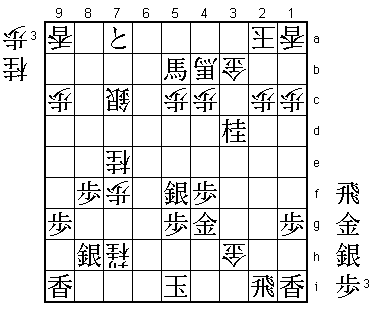
From Diagram 2, play continued ...P*6f; Px6f N*5d; P-7a+ Nx6f (Diagram 3). P*6f followed by N*5d
is an attack with good aji that strikes at the heart of my position. But after my P-7a+, White's
...Nx6f was a mistake. Instead of this, he should have patiently played ...R-6c (Diagram B).
Since ...Nx6f would now be horrible for Black, he has no choice but to hang in with N*5h, when
after ...N*7d; Bx7d+ Sx7d; N*4e the position is unclear with chances for both sides.
 |
| Diagram B |
 |
| Diagram 4 |
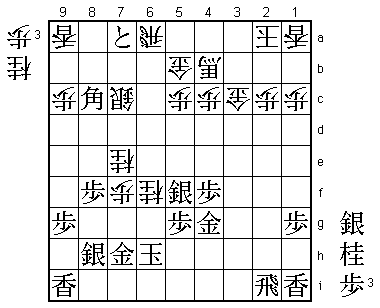
From Diagram 3, the game continued Bx6a+ Nx7h+; K-5i (Diagram 4). Aono 8-dan had apparently
overlooked K-5i. If instead Black takes the promoted knight on 7h, ...N*6f; K-6h G*5h; K-7i P*8g
is brinkmate. I think Aono had only looked at the line ...Nx7h+; K-5h G*3h (Diagram C). White is
not threatening mate in this position, but with one more knight in hand he can force mate
with ...N*6f; K-5i N*6g; Sx6g Nx6g=. He will also have a forced mate if he gets any other extra
piece in hand, apart from a pawn. But after my K-5i, White cannot mate even with another knight
because after ...N*6g; Sx6g Nx6g=, he can escape to 5h and then 6g.
 |
| Diagram C |
So the difference between K-5h and K-5i is whether Black is able to give White one more knight in hand.
According to the Shogi proverb, you should "drive the king to the back rank," so we tend to assume
that it is safer to keep away from the edge, but in this case escaping to the back rank in effect
gives Black an extra knight. Even a professional player may suffer a blind spot when the correct
solution is contrary to Shogi common sense.
The Requirements
 |
| Diagram 5 |
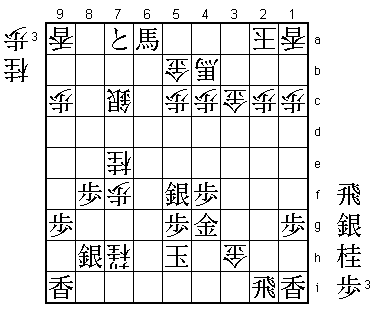
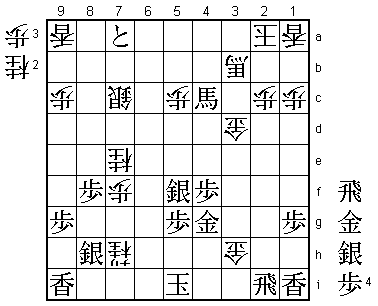
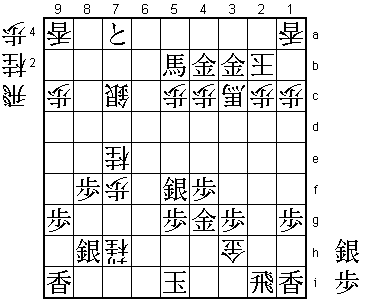
Nevertheless, Aono 8-dan answered my K-5i with ...G*3h (Diagram 5). In this position, it is
essential for Black to threaten mate. K-5i has made it possible to give White another knight.
Black must also ensure that, when he threatens mate, ...Gx2i does not allow White to escape the
mate threat and threaten mate himself. In the present position, ...Gx2i would threaten mate by ...R*6i, etc.
I therefore have to find a move that meets these requirements.
 |
| Diagram D |
The first line to consider is +Bx5b. If White takes the rook with ...Gx2i, then R*6a delivers check
and defends against the threat of ...R*6i. However, after ...+Bx5b (Diagram D), there is no way of
mating the White king. At first sight, it looks as if Black mates with S*2b Kx2b; N*3d Gx3d; R*2a,
but White can answer S*2b with ...K-1b, and although Black can pursue the king with Sx1c+ Kx1c;
N*2e K-1d; G*1e Kx1e; P-1f K-2d; Nx3c+ Kx3c (Diagram E), he has no mate.
 |
| Diagram E |
Returning to Diagram 5, Black might also try P*2b, but this is also no good because after ...Kx2b; +Bx5b Gx2i,
the rook drop on 6a is no longer check.
Meeting the Requirements
 |
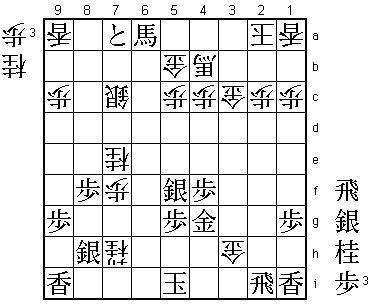
| Diagram 6 |
Then I considered N*3d (Diagram 6). If now ...Gx3d; Rx2c+ P*2b; +Rx3d (Diagram F), when White has no mate
and his gold on 3h is under attack from the promoted rook. If Black had played K-5h instead of K-5i, White
would have had a forced mate in this variation. The difference in just one move has had a decisive effect.
 |
| Diagram F |
If White answers N*3d with ...Gx2i, Black can force mate by R*2b K-3a; Rx4b+ Gx4b; S*2b K-3b; B*2a K-4a; Nx4b+ Kx4b; G*5b.
So how about ...+B-3b in reply to N*3d? Here White takes the gold with +Bx5b and if ...Gx2i, R*6a is again very effective.
After ...P*3a; P*2b K-1b; S*2a, the rook on 6a ensures that Black's king is safe. Instead of ...Gx2i after ...+B3b
+Bx5b, ...Gx3d poses more difficult problems. Can Black threaten mate without giving White any pieces?
 |
| Diagram G |
In fact Black has a very good move here: +Bx4c (Diagram G). If now ...Gx2i; R*4a N*3a; +Bx3b Kx3b; G*4b K-3c; Rx3a+ K-2d;
+Rx3d (Diagram H) Kx3d; B*5b and, with a gold, silver, and knight in hand, Black has forced mate wherever White’s king
goes. Alternatively, if White answers +Bx4c with ...+Bx4c, Black forces mate with Rx2c+ P*2b (or ...B*2b; G*3a Kx3a; R*4a, etc.);
R*4a P*3a; S*1b (Diagram I) Lx1b; G*1a Kx1a; Rx3a+ followed by +R2cx2b mate.
 |
| Diagram H |
 |
| Diagram I |
Therefore, after N*3d (Diagram 6) +B-3b; +Bx5b Gx3d, the powerful +Bx4c wins in all variations. In this line,
Black must avoid the pitfall of playing P*2b (instead of +Bx5b), when White's king escapes to 1b, a position where
it cannot be mated. Even though Black can threaten mate after S*2a +Bx2a; Px2a+, his own king can now be mated
because he has given White a silver.
I think it should now be clear that, in Diagram 6, N*3d is the only move that meets all the requirements.
Using a knight which he can afford to give to White, Black threatens mate and ensures that he is still
threatening mate even after White takes the rook on 2i.
A Check to Escape Mate
Let us return to the game. In reply to N*3d, Aono 8-dan retreated his gold with ...G-3b and I played +Bx5b (Diagram 7).
If now ...+Bx5b, Black wins with the typical mating pattern G*2b Gx2b; Nx2b+ Kx2b; R*2a. In Diagram 7, ...Gx2i both eliminates
Black's mate threat and threatens mate by ...R*6i, but Black trumps this with R*6a, giving check and defending against
the mate. By vacating the 6a square for the rook, +Bx5b always ensures that ...Gx2i is ineffective.
 |
| Diagram 7 |
From Diagram 7, the game continued +B-1e; P*3g +B-3c; P*2b Gx2b; R*3a Kx3a; G*4b K-2a; Nx2b+ Kx2b; G*3b (Resignation Diagram)
and Aono 8-dan resigned. From the Resignation Diagram, Black has forced mate after ...+Bx3b; Gx3b Kx3b; B*4a etc.
 |
| Resignation Diagram |
Accumulating Skills
In this game, characteristic Tsume Shogi-type moves appear in several of the variations. For instance, the tactic R*2a Kx2a; Rx2c+
is one of the basic tactics in the endgame. Another such tactic is S*1b (Diagram I), throwing in the silver to vacate the 1a square
for a gold drop. Even the most difficult variation, +Bx4c (Diagram G), though it is a means of threatening mate without handing
over pieces, can be seen as a Tsume Shogi-style sacrifice. Moves such as these may be startling at first sight, but they
will occur quite naturally to someone who regularly solves 3-move and 5-move Tsume Shogi problems. In this sense, the ability
to see ahead in the endgame could be said to come from the steady accumulation of these skills. Through simple training,
regularly repeated, you will build up the basic strength you need, and the best training technique for mastering the
endgame is to solve simple Tsume Shogi problems regularly. The skills you acquire will certainly be applicable in your
games, and tactics you never noticed before will naturally spring to mind. Even the most difficult endgames in
professional Shogi, when broken down into their basic elements, are a collection of surprisingly simple tesuji.
Try it and see for yourself.