This was the 6th game of the 13th Kio Title Match. The pawn toss gave me the first move and as Black I always aim for the Bishop Exchange Reclining Silver. As this was a title match, I considered it most important to make full use of my favorite opening strategy. When your opponent is aiming for his specialist field, it can be an excellent tactic to avoid it. Kio titleholder Takahashi did this by transposing into the Right-Side King opening. He apparently didn't want to fight on my turf.
|
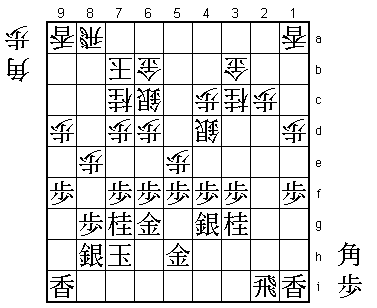
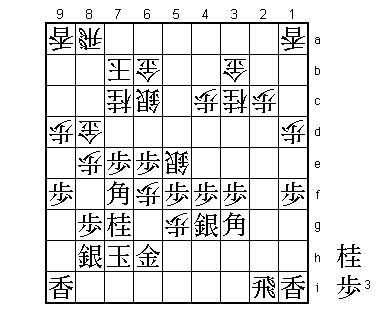
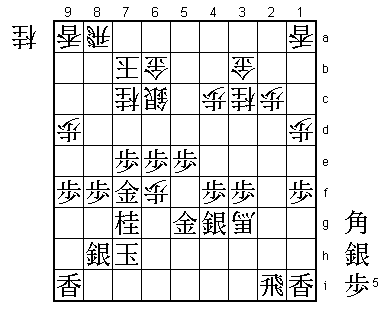
| Diagram 1 |
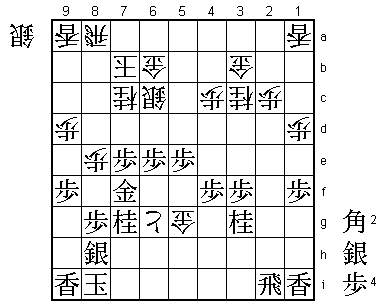
In the position in Diagram 1, Takahashi has just started the fight in the center with P-5e in response to my N-7g. Technically speaking, the opening has been a slight strategic victory for me. As a result of White's inaccurate play, I have been able to exchange the pawn on the rook's file, giving me a distinct advantage. However, turning a strategic victory in the opening into a win is the hardest part of the game.
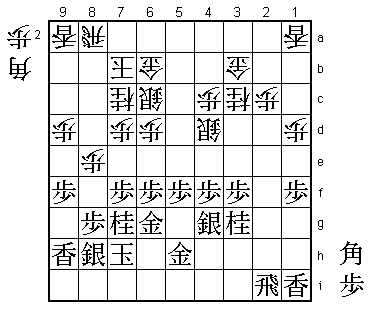 |
| Diagram A |
In Diagram 1, I thought for 54 minutes over my next move, Px5e. After ... Sx5e; P*5f S-4d, Black intends to play L-9h (Diagram A). If Black is able to follow this up with R-9i and P-9e, he will get a winning position. White must hurry to find counterplay before this happens. I spent most of this time considering the line (from Diagram A) ... B*5d; P-4e Nx4e; Nx4e P-7e. I wondered, for example, whether it might be better to move the lance to 9g rather than 9h since it would be in the bishop's line of fire after B*5d. After almost an hour's thought, I played Px5e, but Takahashi replied with ... P-6e instead of ... Sx5e. The game continued Px6e P-7e; Px7e Sx5e (Diagram 2).
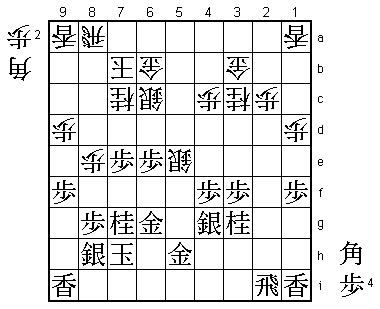 |
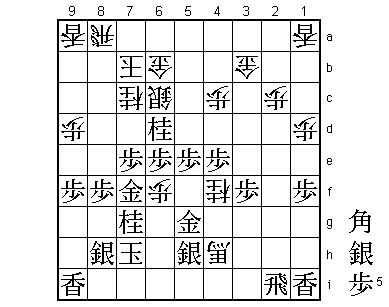
| Diagram 2 |
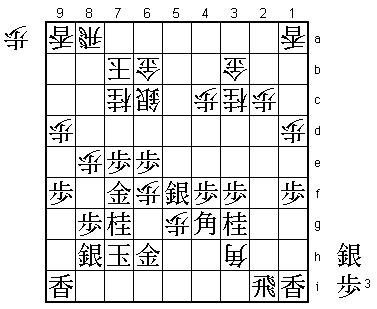
From Diagram 1 to Diagram 2 play seemed to be going according to White's plan, though this line was quite untypical of Takahashi's cautious and deliberate style. I thought again for 58 minutes over Px7e. As White's attack is rather simple and direct, I reckoned that I could figure it all out in an hour if I thought hard, but I still couldn't reach a conclusion. With ... P-6e Takahashi went onto the offensive, so it was natural that he would follow it up with ... P-7e. If White does not play this move, Black can answer ... Sx5e with P*5f P*6f; G6g-5g and the attack peters out, but with the interpolation of ... P-7e he can drop a pawn on 7f after G6g-5g. After ... P*7f; Px5e Px7g+; Sx7g Nx6e, White's attack continues. This may seem trivial, but it's an important tactical sequence for keeping an attack going.
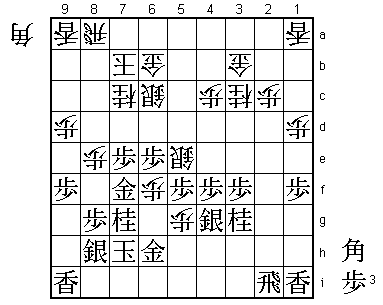 |
| Diagram 3 |
From Diagram 2, play continued P*5f P*6f; G-7f P*5g; G-6h, reaching Diagram 3. This position was the fruit of my 58-minute think before playing Px7e. If Black answers ... P*5g with Gx5g, play might continue ... B*4h; S-5h Bx5g+; Sx5g G*6g; K-8i Gx5g; Px5e P-6g+ (Diagram B). In this position both sides have chances, but the risks involved in handing pieces to White made it unappealing to me.
 |
| Diagram B |
In Diagram 3, White has pawns at the key points on 6f and 5g and in some respects Black's position is in very bad shape. On the other hand, the vanguard pawns on 6e and 7e exert considerable pressure. Furthermore, if Black can weather the storm for one more move and force back the silver on 5e – the foundation of White's attack – he will have a won game. If White plays ... S-4d in this position, Black drops his bishop on 4h and takes on the pawns on 5g and 6f, completely snuffing out the attack. After B*4h, White has no good way of defending these two dangling pawns that are his lifeline. Instead of this, hastily taking the pawn on 6f with Gx6f would allow White himself to play ... B*4h with devastating effect.
 |
| Diagram C |
In Diagram 3 I was most concerned about ... Sx5f and ... Sx4f, and devoted most of my 58 minutes' thought to the variations following these two moves. After ... Sx5f; Sx5f B*3h, Black can defend with B*4g (Diagram C), and if ... Bx2i+; Bx2i R*2h; B-4g and, with only one pawn in hand, White does not have enough to sustain his attack. I was more afraid of ... Sx4f, but after Sx4f B*3h Black can abandon his rook and remove the key pawn with Sx5g Bx2i+; P-6d Sx6d; P*6e S-5c; P-7d (Diagram D). I liked this position for Black.
 |
| Diagram D |
 |
| Diagram 4 |
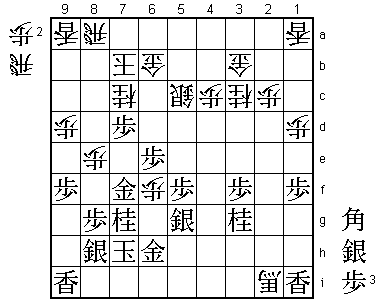
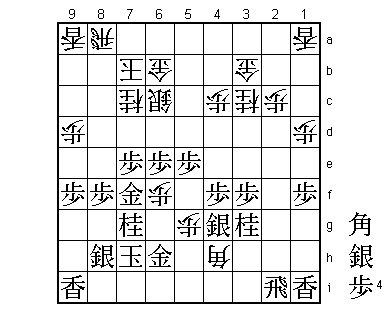
In Diagram 3, Takahashi threw in a pawn with ... P-8f; Px8f and then played the bishop drop ... B*4h (Diagram 4). He could have played ... B*4h without the pawn sacrifice, but then Black can defend solidly with B*2h. Play might continue ... Bx3g+; Bx3g N*8d; B*4i Nx7f; Bx7f G*8d (Diagram E). If Black now simply takes the silver with Px5e, White has good prospects after Gx7e; B-4i P*7f. But instead of Px5e in Diagram E, Black has a good defense in B-4i, when White has no pawn to drop on 7f and if ... Gx7e, Black can drive the gold away with P*7f.
 |
| Diagram E |
But what about the bishop drop on 4h after the pawn sacrifice on 8f (Diagram 4)? In fact, I had initially calculated that White could not sustain his attack after B*2h, but deeper analysis showed that, even with the same tactic ... B*4h, the situation is quite different depending on whether White throws in a pawn on 8f. I still had a plenty of time left and it was a good decision to spend 32 minutes through the dinner break carefully considering all the variations.
In Diagram 4, if Black defends with B*2h, White has …P-6g+, and if now Gx6g P-5h+; Sx5h Sx4f and the attacked silver escapes. This position is not bad for Black, but it is not so agreeable from a psychological viewpoint. Also, if Black answers ... P-6g+ with Kx6g, he meets a fierce attack with ... S-6f. Now Kx6f is answered with the discovered check ... P-5h+, or if Gx6f, White's rook enters the fray with ... Rx8f (Diagram F), when there is no answer to the dual threats of ... Rx8h+ and ... Rx6f; Kx6f P-5h+. These are the effects of the pawn sacrifice.
 |
| Diagram F |
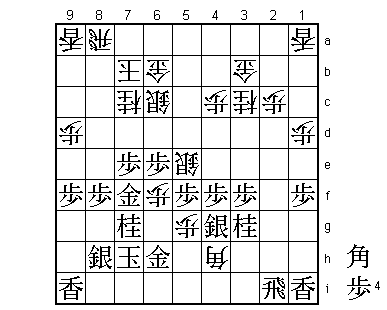
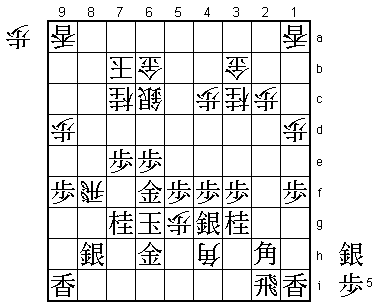
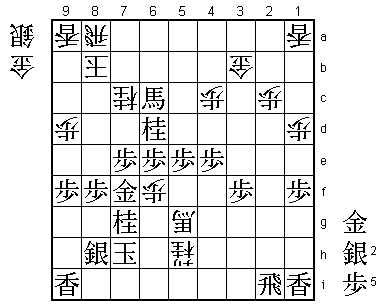
Let us return to Diagram 4. As a result of the pawn sacrifice, my king has more room to move. Takahashi had presumably calculated that, by playing ... P-8f; Px8f first, he could keep the attack going after B*2h because of variations like the one leading to Diagram F, but his ... B*4h enabled me to take advantage of the increased space around my king by simply taking the silver with Px5e (Diagram 5). If White had been able to play ... P-8f at a good moment in this game, I think I would have lost. Takahashi struggled to find the right timing, but he just could not make it work. As soon White drops his bishop, Black can take the silver on 5e, even when he times it as in the game.
 |
| Diagram 5 |
After ... P-8f; Px8f, White could try the fierce attack ... B*6g instead of ... B*4h, but after K-8g Bx7f+ (if ... Sx5f; Gx6f and White has no good reply); Kx7f P-6g+; Gx6g G*6f; Gx6f Sx6f (Diagram G), Black is not in check so he can ignore the silver and play B*2f, for example, with a winning position.
 |
| Diagram G |
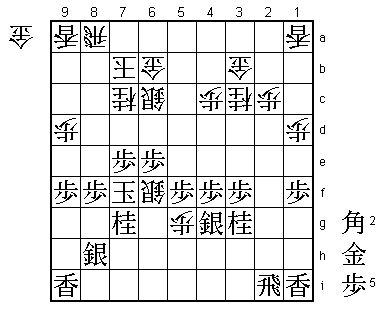
Px5e (Diagram 5) was the winning move. The game continued ... Bx3g+; Gx5g (Diagram 6). Here White can try ... +Bx4g; Gx4g followed by ... S*3h or S*6g, but after ... S*3h; R-6i Sx4g+; Rx6f, Black gets rid of the pawn on 6f and brings his rook to bear on the key point at 6d, while after ... S*6g; K-8g Sx7f+; Kx7f, White has no good way of continuing his attack with only a gold and knight in hand.
 |
| Diagram 6 |
From Diagram 6, the game continued ... +B-4h; S-5h N-4e; Px4e N*4f; N*6d (Diagram 7).
 |
| Diagram 7 |
Takahashi seemed resigned to his fate and chose the simplest way of giving up the struggle. If now ... Sx6d; Px6d and the threat of B*5d is too strong, and if ... K-6a; B*4a followed by Bx6c+ Gx6c; S*5b and wins. Takahashi actually played ... K-8b, but this allowed B*3e, forking the gold on 6b and knight on 4f. After ... Nx5h+; Bx6b+ +Bx5g; +Bx6c, White resigned (Resignation Diagram).
 |
| Resignation Diagram |
In this game, Takashashi displayed little of his usual solid and cautious style of play. From a professional player's viewpoint, the three-move pawn sacrifice attack with P-5e, P-6e, and P-7e looks quite unsound, and the final despairing knight moves N-4e and N*4f were uncharacteristic of the usually tenacious Kio titleholder. At the time I thought it was strange, but I later discovered Takahashi had just got engaged to be married around this time. That seemed to solve the mystery, but it also meant that this victory was perhaps not entirely due to my playing strength. I hope our next encounter will be an all-out struggle.