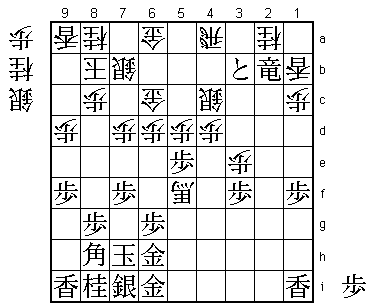
In my game against Sakatani 8-dan in the Kisei Tournament I played ranging rook, the fifth time I had played this opening in 1987. Since it is quite a different world from static rook, I sometimes get confused when I play ranging rook. On the other hand, it has the merit that the resulting positions seem quite fresh and new.
I'm basically a static rook player. Whenever I look at a position, I always see it from this viewpoint and want to play the static rook side. Even if the chances are even, I will assess it as better for static rook.
The advantage of playing ranging rook is supposed to lie in the king's solid castle. The ranging rook player is always on the lookout for ways of taking advantage of his safe king by boldly initiating a fight. But as someone who usually plays static rook, I don't feel ranging rook's Mino castle is particularly solid. If the Boat castle consists of three generals, it seems to me just as solid as the Mino. Because I feel this way, my ranging rook style is a little unusual. Rather than trying to open up the position without worrying about a material disadvantage, I tend to play the ranging rook side rather cautiously and deliberately.
 |
| Diagram 1 |
In Diagram 1, Black has just played +R-2b in response to my … +Bx5f, taking Black's silver and attacking the promoted rook on 2c. I am a silver and knight up, but Black has created a tokin on 3b. Black's promoted rook has entered my camp, while my own rook is in a miserable position.
This was the position I had been most concerned about. If I take the tokin with ... Sx3b, after +Rx3b R-5a, Black can dangle another pawn with P*4c, when White's prospects are bleak.
 |
| Diagram A |
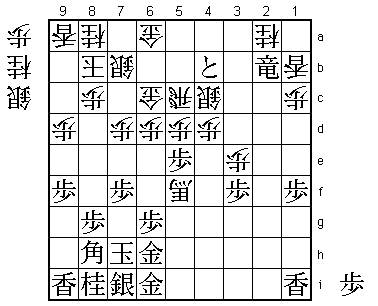
The normal move in Diagram 1 is probably ... R-5a. After +P-4b R-5c (Diagram A). If now +Px4c Rx4c; +Rx2a R-2c, White has successfully developed his forces. But in Diagram A, Black can simply play +Rx2a, leaving me in serious difficulties.
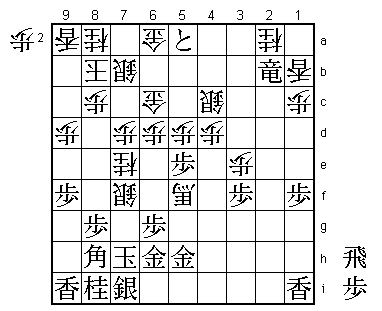
The move I most wanted to play in Diagram 1 was ... S*6e, but after +Px4a Sx7f; +P-5a N*7e; G6i-5h (Diagram B), when White has no effective way of continuing the attack. I can capture Black's bishop with ... Sx8g+, but that's as far as it goes. When his turn comes, Black's attack with two rooks will just be too fast.
 |
| Diagram B |
 |
| Diagram 2 |
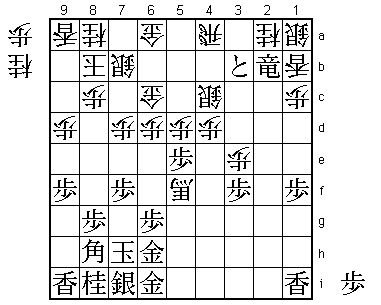
Even so, ... S*1a was a difficult move to play. I’d like to pretend I had deliberately prepared it with L-1b, but no-one would believe me! Actually, I felt quite embarrassed about dropping a silver on such a square.
If Black cannot use his tokin on 3b to compensate for the material deficit of silver and knight, he will not be able to hold the balance in Diagram 1. I reasoned that, if I could get rid of the tokin at the cost of a silver, I would still be a whole knight up. After +Rx1a Sx3b; +R-2b +B-2c, the promoted rook's movement is very restricted. The restrictedness of Black's promoted rook on 1a is a key factor in this line.
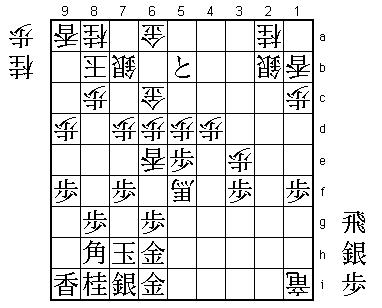
The reply to ... S*1a that worried me most was the exchange of rooks with +Px4a. But after ... Sx2b; +P-4b R*2i; +Px4c Rx1i+; +P-5b L*6e (Diagram C) is surprisingly strong for White.
 |
| Diagram C |
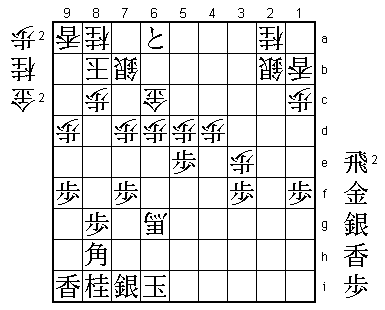
If now +Px6a Lx6g+; Gx6g +Rx6i; Kx6i +Bx6g (Diagram D) and Black is suddenly in brinkmate.
 |
| Diagram D |
If Black defends with G*5h, he is mated after ... N*5g; Gx5g G*7h; Sx7h G*6h. And since Black only has one silver in hand, he has no mate himself. It seems that the exchange of rooks in Diagram 2 is a win for ranging rook.
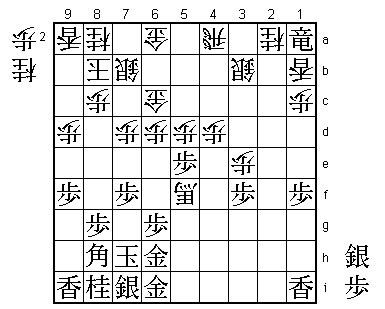
Sakatani 8-dan therefore decided to take the silver with +Rx1a. After taking the tokin with ... Sx3b (Diagram 3), I was still a knight up and I liked my position.
 |
| Diagram 3 |
 |
| Diagram 4 |
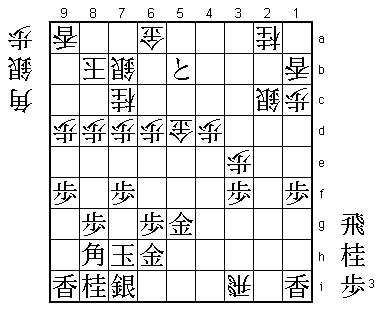
Diagram 4 is the position 23 moves from Diagram 3. Here I played ... N-6e. After +Px6a Nx5g+; Gx5g B*6i; K-7g S*6h. If now Sx6h G*7h; K-8f Gx8h; or if Kx6h Bx8g+. White cannot be mated even if he gives Black a silver, and his attack is unstoppable.
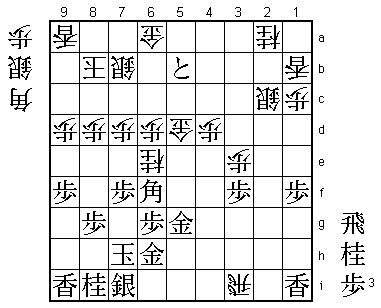
White's attack after ... N-6e in Diagram 4 is faster, so Black must defend. Sakatani 8-dan found the strongest defense: B-6f (Diagram 5).
 |
| Diagram 5 |
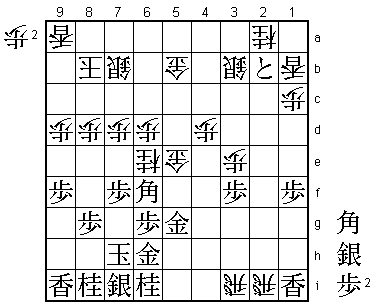
After B-6f, White cannot effectively continue his attack with ... Nx5g+ because Bx5g would attack his rook on 3i. In this position, having discovered a good move 11 moves ahead, I took the tokin and switched to defense for a while. From Diagram 5, the game continued ... Gx5b; R*2b S*3b; P*2d B*3c; Px2c+ Bx2b; +Px2b R*2i; N*6i G-5e! (Diagram 6). In reply to R*2b, I trapped and won this rook with ... S*3b to get two rooks on the back rank. ... G-5e! was the key move I had found when I analyzed the position in Diagram 5.
 |
| Diagram 6 |
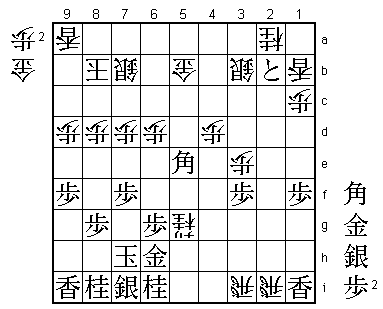
Because ... Nx5g; Bx5g hits the rook on 3i, Black is still just about hanging on in Diagram 5. The gold sacrifice ... G-5e! strikes Black's configuration at its weakest point, aiming to drive away his most effective piece, the bishop on 6f. One way of forcing home an advantage in the endgame is to put pressure on the defending side's most effective piece. By warding off or eliminating a piece at a key point, the position is simplified. ... G-5e! is a striking example of this tactic. If Black replies Bx5e, White can at last get in ... Nx5g+ (Diagram E), when Black cannot capture the promoted knight either with his gold on 6h or his knight on 6i. And if Black counterattacks with +Px3b, he is left with no defense after ... Gx6f; Gx6f Nx5g+.
 |
| Diagram E |
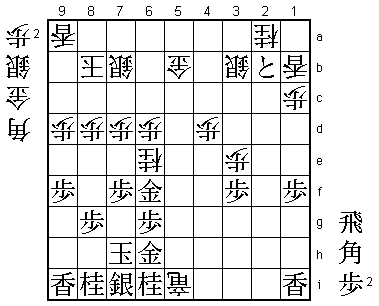
In Diagram 6, Sakatani 8-dan played S*4h and play continued ... Gx6f; Gx6f R-4i+; G*5i +Rx5i; Sx5i +Rx5i (Diagram 7). Giving up two generals for a rook or bishop is never pleasant, but it is Black’s only defense.
 |
| Diagram 7 |
Here Gx6e looks promising for Black (if ... Px6e; B*3g forking king and rook), but in reply White can drop his own bishop on the crucial diagonal with ... B*4f. Instead, the game continued B*3g B*4h; Bx6d S*7c; B-4f P-4e; Bx3e P*3d; B-2d S-3c (Diagram 8), and White was able to crown this precise sequence by bringing his threatened silver into the attack. Now Black has no effective defense and resigned after a few more moves.
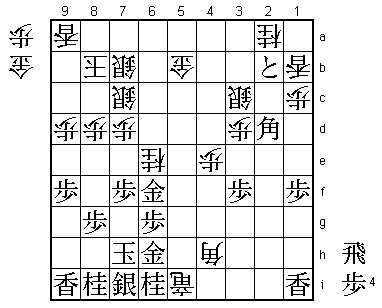 |
| Diagram 8 |
In Diagram 1, White certainly has the advantage, but it was hard to find an effective way of making that advantage tell. The silver drop ... S*1a (Diagram 2) is a strange-looking move but easy to understand in that it stresses White's one clear advantage: the fact that he is a knight up. Once I had found this move, I was able to stay ahead for the rest of the game either in terms of material or in terms of speed. Unable to ignore the silver on 1a, Black had to face this painful reality.
The winning move ... G-5e (Diagram 6) is very instructive. It was a nice move to be able to play, directly hitting the most effective piece on the board, the bishop on 6f. This will repay close study.
Still, I could not help noticing that, as a player who would immediately choose to play the static rook side in an equal position, that I played ranging rook in a rather unusual way. Rather than aiming for a bold offensive or trying to develop my forces in typical ranging rook style, I chose a static rook-style strategy with my silver drop on 1a. Because I would always take static rook when the chances are even, I had the impression that my position was a little worse from the opening to the middlegame. On reflection, that may have been no bad thing.