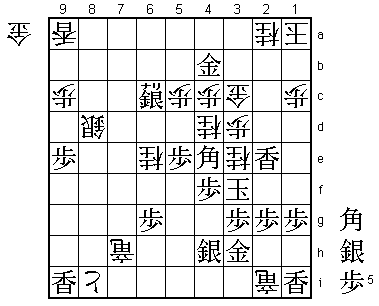
84th Kisei Match Game 2
[Black "Watanabe Akira, Challenger"]
[White "Habu Yoshiharu, Kisei"]
[Event "84th Kisei-sen, Game 2"]
[Date "June 22nd 2013"]
1.P2g-2f     00:00:00  00:00:00
2.P3c-3d     00:00:00  00:00:00
3.P7g-7f     00:00:00  00:00:00
4.P8c-8d     00:00:00  00:01:00
5.P2f-2e     00:01:00  00:01:00
6.P8d-8e     00:01:00  00:01:00
7.G6i-7h     00:01:00  00:01:00
8.G4a-3b     00:01:00  00:02:00
9.P2e-2d     00:02:00  00:02:00
10.P2cx2d    00:02:00  00:03:00
11.R2hx2d    00:02:00  00:03:00
12.P8e-8f    00:02:00  00:03:00
13.P8gx8f    00:02:00  00:03:00
14.R8bx8f    00:02:00  00:03:00
15.R2dx3d    00:03:00  00:03:00
16.B2bx8h+   00:03:00  00:03:00
17.S7ix8h    00:03:00  00:03:00
18.R8fx7f    00:03:00  00:03:00

This was a huge surprise. It has been 24 years since Habu last played the Ai-Yokofudori
with white. He was still a 5-dan player then and only played it twice. Watanabe has
played only 3 games with the black pieces against this opening, the last time being
7 years ago. After the game he could only admit that he never expected this opening
to be played. The reason why this opening is rarely played these days is clear: it
is considered good for black. However, if Habu decided to play it after such a long
time, it seems clear that he found something in this opening. Watanabe decides to
play a slow variation to move away from the trap that Habu may have set for him.

19.N8i-7g    00:24:00  00:03:00
20.G3b-3c    00:24:00  00:07:00
21.R3d-8d    00:25:00  00:07:00
22.P*8b      00:25:00  00:07:00
23.K5i-5h    00:26:00  00:07:00
24.R7f-2f    00:26:00  00:09:00
25.P*2h      00:26:00  00:09:00
26.K5a-5b    00:26:00  00:09:00
27.G4i-3h    00:27:00  00:09:00
28.G6a-7b    00:27:00  00:10:00
29.P2h-2g    00:28:00  00:10:00
30.R2f-2b    00:28:00  00:10:00
31.R8d-8f    00:32:00  00:10:00
32.P8b-8c    00:32:00  00:10:00
33.P9g-9f    00:41:00  00:10:00
34.S3a-4b    00:41:00  00:13:00
35.S8h-8g    00:47:00  00:13:00
36.S7a-8b    00:47:00  00:15:00
37.P9f-9e    00:54:00  00:15:00
38.P7c-7d    00:54:00  00:25:00
39.S8g-7f    00:58:00  00:25:00
40.S8b-7c    00:58:00  00:33:00
41.S7f-6e    00:59:00  00:33:00
42.S7c-8d    00:59:00  00:54:00

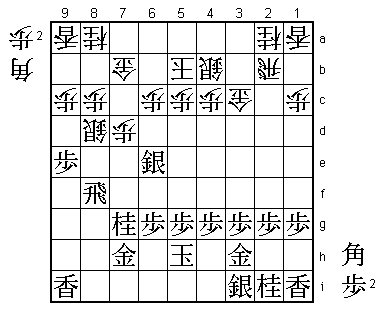
Watanabe has chosen a slow variation, but still slowly but surely moves up the silver
towards the enemy camp. In response, Habu moves the silver out to 8d, inviting black
to take the pawn on 7d for free.

43.S3i-4h    01:09:00  00:54:00

An important preparation move. With the silver still on 3i, the black king has no space
to run to and is much more vulnerable to an attack.

44.N8a-7c    01:09:00  01:13:00
45.S6ex7d    01:14:00  01:13:00
46.R2b-2d    01:14:00  01:27:00
47.B*5f      01:15:00  01:27:00

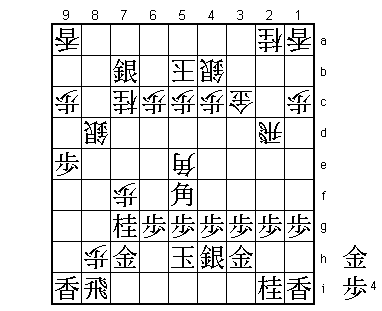
Aims for a breakthrough on 8c. White cannot defend, so has to attack himself. The
position suddenly becomes very sharp.

48.B*6d      01:15:00  01:48:00
49.R8f-8i    01:24:00  01:48:00
50.P*7f      01:24:00  01:49:00

White's counter attack aims at the head of the knight.

51.S7dx8c=   01:36:00  01:49:00
52.B6d-5e    01:36:00  02:19:00
53.S8cx7b=   01:53:00  02:19:00
54.P*8h      01:53:00  02:26:00

If black takes this pawn with the rook, Px7g+ becomes much stronger, so black has to
give up the rook.

55.B5f-4e    02:32:00  02:26:00

Threatens mate after Bx6c+ next.

56.K5b-4a    02:32:00  02:29:00
57.P5g-5f    02:33:00  02:29:00
58.P8hx8i+   02:33:00  02:38:00

White has give up the bishop because 58.B4d R8h attacks the silver on 8d (the rook
on 2d has been blocked by the bishop on 4d) and because white has no pawns in hand,
this is hard to defend against.

59.P5fx5e    02:33:00  02:38:00

Here the general opinion was that black has the better position. Watanabe also felt
that way, but he still felt that the position was difficult because he had been
forced to chase the white king to 4a, where it has much more space to run.

60.P7fx7g+   02:33:00  02:56:00
61.G7hx7g    02:33:00  02:56:00
62.N7c-6e    02:33:00  03:00:00
63.G7g-7h    02:42:00  03:00:00

Because white has no pawns in hand he cannot play P*7g. This ends the white attack
and black has the better position, or...

64.N*8f!     02:42:00  03:02:00

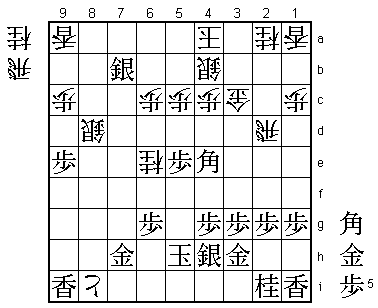
This knight drop was completely overlooked by everybody in the press room and by
Watanabe. He expected something like +Px9i. On 8f the knight seems to be completely
out of place, but after careful analysis it becomes clear that there is no good way
to defend against this simple attack on the gold. For example, 65.G6h +P7i and N7h+
next is a very fast attack.

65.P*7i      03:12:00  03:02:00

Not the solution, as giving up a gold is not good for black.

66.N8fx7h+   03:12:00  03:13:00
67.P7ix7h    03:12:00  03:13:00
68.R*7i      03:12:00  03:14:00
69.S7bx6c+   03:18:00  03:14:00
70.R2d-7d    03:18:00  03:39:00
71.P4g-4f    03:19:00  03:39:00

72.R7dx7h+?  03:19:00  03:42:00

A bad move that almost throws away the game. The simple 72.+Rx2i would have been
winning. This threatens mate with G*5g Sx5g +Rx3h and the white rook on 7d is still
working well in defense. It seems that Habu also realized his mistake a little later,
and it shows his psychological toughness that he was able to assess the position
objectively and not let this mistake invite others.

73.K5h-4g    03:19:00  03:42:00
74.R7ix2i+   03:19:00  03:42:00

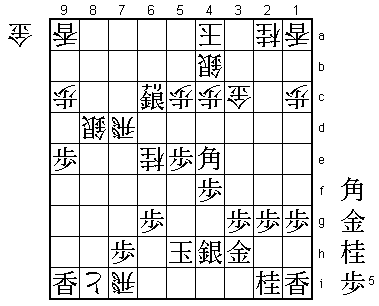
Here Watanabe thought he had won the game because there is no mate against the black
king so he only needs to find a good attack against the white king.

75.G*5b?!    03:56:00  03:42:00

Watanabe took 37 minutes for this move, but was unable to find the decisive attack he
thought he had in this position. He initially thought that 75.G*5b K3a N*3d (threatening
mate with Gx4b next) was winning. However, after +R5h Kx5h G*5g Sx5g +Rx3h is mate.
Also, +R5h K3f N*4d K3e (K2f P*2e leads to mate) G*2d and white can take the knight
on 3d next. Watanabe's best option was 75.+S5b because 76.Kx5b B*9f is a fork on rook
and promoted rook, while 76.K3a G*4a K2b Gx4b N*3d has more potential than the game.
Still, the final conclusion of the post-mortem analysis was that white can still win.

76.K4a-3a    03:56:00  03:43:00
77.N*2c      03:58:00  03:43:00

This is not strong enough.

78.K3a-2b    03:58:00  03:46:00
79.G5bx4b    03:58:00  03:46:00
80.P*3d      03:58:00  03:48:00
81.N2cx1a+   03:59:00  03:48:00
82.K2bx1a    03:59:00  03:49:00
83.L*2e      03:59:00  03:49:00
84.N*3e      03:59:00  03:50:00
85.K4g-3f    03:59:00  03:50:00
86.N*4d      03:59:00  03:50:00
Resigns      03:59:00  03:50:00

Mate after 87.K2f Nx2g+ Gx2g (or Bx2g G3e K1f Gx2e Kx2e L*2c etc.) G3e K1f Gx2e K2e
+Rx2g etc., so Watanabe resigned here. A game where Watanabe ended up with a losing
position without making a clear mistake. After the game, Watanabe questioned his own
opening strategy, suggesting that he should have attacked earlier instead of extending
the pawn on the 9th file. In any case, he is clearly not in great form, losing his
fourth official game in a row and going 2-0 down in this Kisei match. Habu can already
close out the match with the black pieces in the next game.
