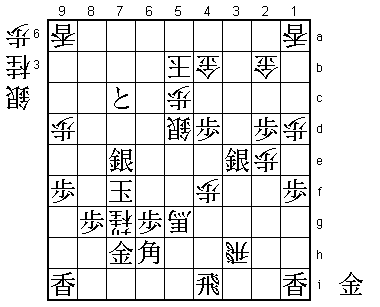
82nd Kisei Match Game 3
[Black "Fukaura Koichi, Challenger"]
[White "Habu Yoshiharu, Kisei"]
[Event "82nd Kisei-sen, Game 3"]
[Date "July 2nd 2011"]
1.P2g-2f     00:00:00  00:00:00
2.P8c-8d     00:00:00  00:00:00
3.P7g-7f     00:02:00  00:00:00
4.G4a-3b     00:02:00  00:01:00
5.G6i-7h     00:02:00  00:01:00
6.P8d-8e     00:02:00  00:03:00
7.B8h-7g     00:02:00  00:03:00
8.P3c-3d     00:02:00  00:03:00
9.S7i-8h     00:02:00  00:03:00
10.B2bx7g+   00:02:00  00:03:00
11.S8hx7g    00:02:00  00:03:00
12.S3a-4b    00:02:00  00:03:00
13.S3i-3h    00:02:00  00:03:00
14.S7a-7b    00:02:00  00:04:00
15.P4g-4f    00:02:00  00:04:00
16.P6c-6d    00:02:00  00:06:00
17.S3h-4g    00:02:00  00:06:00
18.S7b-6c    00:02:00  00:07:00
19.K5i-6h    00:02:00  00:07:00
20.P1c-1d    00:02:00  00:08:00
21.P1g-1f    00:02:00  00:08:00
22.S6c-5d    00:02:00  00:08:00
23.S4g-5f    00:02:00  00:08:00
24.S4b-3c    00:02:00  00:08:00

The classic Kakugawari Koshikakegin opening. Playing this silver to 3c before the black
pawn is pushed to 2e is unusual, because it invites the attack R4h-N3g-N2e-P4e, which was
considered difficult for white. However, some new ideas have opened the discussion again
as we will see in this game.

25.G4i-5h    00:04:00  00:08:00
26.K5a-4b    00:04:00  00:09:00
27.P9g-9f    00:04:00  00:09:00
28.P9c-9d    00:04:00  00:10:00
29.K6h-7i    00:04:00  00:10:00
30.G6a-5b    00:04:00  00:11:00
31.P3g-3f    00:05:00  00:11:00
32.K4b-3a    00:05:00  00:17:00
33.N2i-3g    00:06:00  00:17:00
34.P4c-4d    00:06:00  00:17:00
35.P6g-6f    00:08:00  00:17:00
36.P7c-7d    00:08:00  00:17:00
37.R2h-4h    00:09:00  00:17:00
38.G5b-4b    00:09:00  00:18:00
39.K7i-8h    00:09:00  00:18:00
40.K3a-2b    00:09:00  00:18:00
41.N3g-2e    00:15:00  00:18:00
42.S3c-2d    00:15:00  00:19:00
43.B*2h      00:15:00  00:19:00
44.P7d-7e    00:15:00  00:32:00
45.P4f-4e    00:20:00  00:32:00
46.P7ex7f    00:20:00  00:37:00
47.S7gx7f    00:20:00  00:37:00
48.P4dx4e    00:20:00  00:37:00
49.B2hx6d    00:22:00  00:37:00
50.P*7c      00:22:00  00:37:00
51.P*7d      00:23:00  00:37:00
52.R8b-6b    00:23:00  00:41:00
53.B6d-3g    00:25:00  00:41:00
54.R6bx6f    00:25:00  00:42:00
55.G5h-6g    00:25:00  00:42:00
56.B*4d      00:25:00  00:43:00
57.N8i-7g    00:43:00  00:43:00
58.R6fx6g+   00:43:00  00:58:00

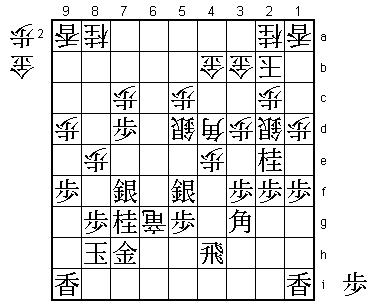
White has invited the aforementioned attack and black has taken up the challenge. However,
we are still in known territory. There have been two games with this position, Murayama-Goda
(Oza, March 11th, black won) and Kitajima-Iizuka (Ryu-O, June 7th, white won). Both of
these games continued 59.S7fx6g P*6f S5h G*4f Bx4f Px4f Rx4f resulting in a very sharp
semeai.

59.S5fx6g    00:43:00  00:58:00

Fukaura takes with the other silver, which is a new idea. A small surprise, because
Iizuka (who was an arbiter for this game) admitted that even though he won his game
against Kitajima, he had been lucky because black had the better position. This would
indicate that 59.S5fx6g is better for black, but Habu undoubtedly will have prepared
something and Fukaura changes the moves before he finds out what Habu has cooked up.

60.P*6f      00:43:00  00:59:00
61.S6g-5h    00:48:00  00:59:00
62.G*4f      00:48:00  01:11:00
63.B3g-2h    00:57:00  01:11:00

This is the difference with 59.S7fx6g. The gold on 4f is in front of his own pawn,
which is bad shape. If black retreats the bishop with the silver still on 5f, white
can simply take the silver with the gold. However, in the current position there is
no silver on 5f, so Fukaura plays to exploit the bad gold on 4f.

64.P7cx7d!   00:57:00  01:24:00

The drawback of taking with the silver on 5f instead of with the silver on 7f.
Without a silver on 7f, taking the pawn on 7d would not be attractive, because
it would take three moves for this pawn to enter the attack. However, here the
silver on 7f becomes a target, so this is now much quicker. In the press room
64.Px7d was praised and white was considered to have the better position, but
in the post-mortem analysis Habu admitted that he was far from confident about
his position here.

65.R*7a      01:13:00  01:24:00

Taking the sting out of the attack on the 7th file, but at the cost of committing
the rook.

66.P7d-7e    01:13:00  01:25:00
67.R7ax7e+   01:13:00  01:25:00
68.B4dx2f    01:13:00  01:25:00
69.R4h-4i    01:15:00  01:25:00
70.S2dx2e    01:15:00  01:25:00

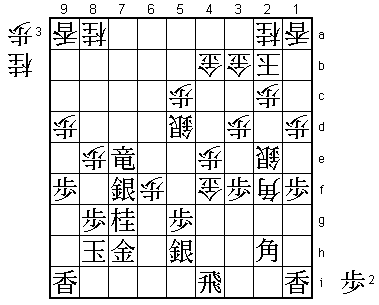
Habu picks up a knight and now has a gold and a knight for the rook. Fukaura now
further sharpens up the position.

71.B2hx4f    01:29:00  01:25:00
72.P4ex4f    01:29:00  01:34:00
73.+R7ex2e   01:34:00  01:34:00

A bishop for two generals, so black is now a silver against a knight up.

74.B2f-3g+   01:34:00  01:41:00
75.P*2d      01:39:00  01:41:00
76.P2cx2d    01:39:00  01:43:00

The head of the king is now an important weakness and black seems to get the advantage
here, but Habu is not letting up.

77.+R2ex8e   01:39:00  01:43:00
78.N8a-7c    01:39:00  02:28:00
79.+R8e-8a   01:47:00  02:28:00
80.P*7e      01:47:00  02:29:00

A natural but strong attack on the 7th file. We are entering a very sharp endgame
that seems to close too call.

81.P*2c      02:07:00  02:29:00
82.K2bx2c    02:07:00  02:29:00
83.+R8ax2a   02:09:00  02:29:00
84.B*2b      02:09:00  02:29:00
85.S7fx7e    02:09:00  02:29:00
86.P*7f      02:09:00  02:32:00
87.P*2e      02:32:00  02:32:00
88.P7fx7g+   02:32:00  02:52:00
89.K8hx7g    02:32:00  02:52:00
90.P2dx2e    02:32:00  02:57:00

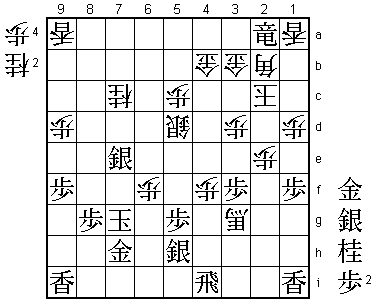
With the promoted rook in the back and the head of the king very vulnerable, it
looks like black must have a good move here. Fukuara was convinced that there was
something, but he couldn't find it.

91.S*4d?     02:48:00  02:57:00

This is not the right move. Hard to hold this against Fukuara, because the position
is very difficult. For example, moves like 91.R2i and 91.N*4d were analyzed deeply,
but no decisive variation was found. In the post-mortem analysis Fukaura was ready
to admit that there was nothing here when the following variation was found: 91.R3i
+B4h N*3e Px3e S*3d Kx3d Px3e and now K4c is answered by P*4d Bx4d G*3d, so white
has to play K2c and then the position seems very difficult.

92.G3b-3a    02:48:00  03:07:00

The problem. This slows down the black attack a lot.

93.N*3e      03:23:00  03:07:00

Desperate try, but not enough.

94.P3dx3e    03:23:00  03:07:00
95.P*2d      03:23:00  03:07:00
96.K2c-3d    03:23:00  03:07:00
97.S4dx3e    03:24:00  03:07:00
98.K3d-4c    03:24:00  03:07:00
99.P*4d      03:29:00  03:07:00
100.K4c-5b   03:29:00  03:07:00
101.+R2ax2b  03:29:00  03:07:00
102.G3ax2b   03:29:00  03:07:00
103.P*7d     03:29:00  03:07:00
104.N7c-6e   03:29:00  03:18:00
105.K7gx6f   03:31:00  03:18:00
106.+B3gx3f  03:31:00  03:26:00

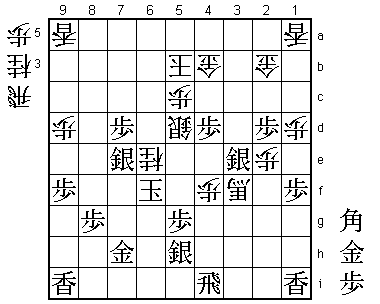
This attack of two silvers decides the game. Black threatens to either go for the
black king with +Bx5h, or make his own king completely safe with +Bx3e.

107.P7d-7c+  03:37:00  03:26:00
108.+B3fx5h  03:37:00  03:30:00
109.P*6g     03:47:00  03:30:00
110.+B5hx5g  03:47:00  03:42:00
111.K6f-7f   03:47:00  03:42:00
112.R*3h     03:47:00  03:43:00
113.B*6h     03:59:00  03:43:00
114.N6e-7g+  03:59:00  03:44:00
Resigns      03:59:00  03:44:00

Nice decisive knight sacrifice. 115.Gx7g is answered by +Rx6h, 115.Bx7g by +Rx7h
and 115.Kx7g by +Bx7e and in all black loses material while his defense collapses.
Fukaura resigned here, ending his challenge for the Kisei title with a 3-0 defeat
for the second year in a row. Habu takes his 10th Kisei title (fourth in a row)
and more importantly, he now has won 79 major titles, which is only one title short
of the record held by Oyama. With challenging for the Oi and a defense of his Oza
title coming up, he could break this record in the next couple of months.
