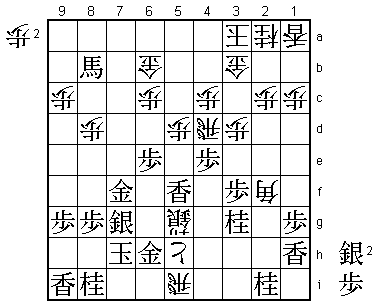
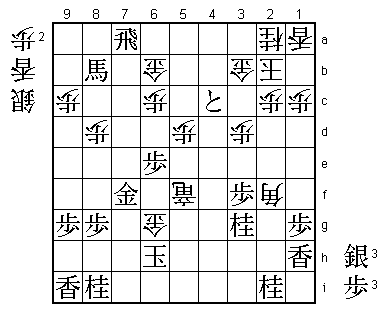
82nd Kisei Match Game 1
[Black "Fukaura Koichi, Challenger"]
[White "Habu Yoshiharu, Kisei"]
[Event "82nd Kisei-sen, Game 1"]
[Date "June 11th 2011"]
1.P2g-2f     00:00:00  00:00:00

The furigoma for this game resulted in four tokins, so challenger Fukaura gets to
start with the black pieces. He is looking for a good start to this match, because
he was whitewashed in the Kisei last year. Fukaura's first move is 1.P2f, an
invitation to play the Aigakari opening.

2.P3c-3d     00:00:00  00:00:00

Although Habu and Fukaura have played the Aigakari opening in title matches before,
Habu indicates that he is not interested and prefers to play a Yokofudori instead.

3.P7g-7f     00:00:00  00:00:00
4.P8c-8d     00:00:00  00:01:00
5.P6g-6f     00:01:00  00:01:00

Now it is Fukaura's turn to decline the invitation. Instead of the Yokofudori, the
 game now becomes a Yagura opening.

6.S3a-4b     00:01:00  00:03:00

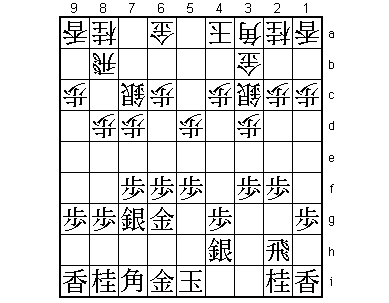
Interesting choice by Habu. Most professionals would have played 6.P8e here, because
 he reply 7.B7g is forced and after that it is much harder for black to move into the
Yagura castle formation. Instead, Habu opts to play a more classic type of Yagura opening.

7.S7i-6h     00:01:00  00:03:00
8.S7a-6b     00:01:00  00:03:00
9.P5g-5f     00:02:00  00:03:00
10.P5c-5d    00:02:00  00:04:00
11.S3i-4h    00:03:00  00:04:00
12.G4a-3b    00:03:00  00:05:00
13.G4i-5h    00:03:00  00:05:00
14.K5a-4a    00:03:00  00:09:00
15.G5h-6g    00:03:00  00:09:00
16.P7c-7d    00:03:00  00:10:00
17.S6h-7g    00:18:00  00:10:00
18.S4b-3c    00:18:00  00:19:00
19.B8h-7i    00:20:00  00:19:00
20.B2b-3a    00:20:00  00:20:00
21.P3g-3f    00:20:00  00:20:00
22.S6b-7c    00:20:00  00:21:00

23.S4h-3g    00:45:00  00:21:00

Fukaura has been threatening to move into the Yagura without playing the bishop to
6h (K6h-K7h-K8h-G7h) which would give him an extra move. Habu is careful not to allow
that. If black plays 24.K6h here, then 25.P7e is a strong attack. Normally, this can
be answered with B4f and the pinned silver on 7c becomes a major liability. However,
here the king on 6h is blocking the bishop, so there is no counter to P7e for black.

24.S7c-6d    00:45:00  00:34:00
25.G6i-7h    00:51:00  00:34:00
26.R8b-5b    00:51:00  01:04:00
27.K5i-6i    00:52:00  01:04:00
28.N8a-7c    00:52:00  01:06:00
29.S3g-4f    01:01:00  01:06:00
30.S3c-4d    01:01:00  01:09:00

31.P2f-2e    01:36:00  01:09:00

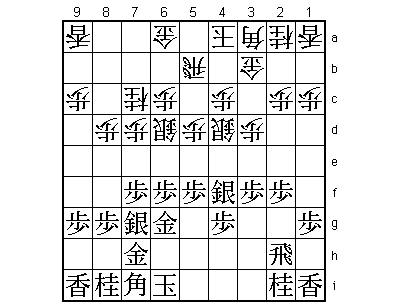
The alternative is 31.N3g and after 32.P5e R5h Px5f Gx5f black has the strong future
N4e. On the other hand, white can play P*5e and it is not so easy to see how black
should respond to that.

32.P5d-5e    01:36:00  01:42:00
33.P5fx5e    01:37:00  01:42:00
34.S6dx5e    01:37:00  01:42:00
35.S4fx5e    01:37:00  01:42:00
36.S4dx5e    01:37:00  01:42:00
37.P2e-2d    01:37:00  01:42:00
38.P2cx2d    01:37:00  01:42:00
39.B7ix2d    01:37:00  01:42:00
40.P*2c      01:37:00  01:42:00
41.B2d-1e    01:37:00  01:42:00
42.S5e-5f    01:37:00  01:43:00
43.G6gx5f    02:04:00  01:43:00
44.R5bx5f    02:04:00  01:43:00
45.B1e-3g    02:04:00  01:43:00
46.S*3i?!    02:04:00  02:12:00

A move with a strong impact, but probably not the best here. The post-mortem analysis
showed that white should have played 46.B6d here. Then 47.Bx6d P*6d B*6c K3a S*4a B*3i
is unclear. Habu felt that strong action was necessary because he felt that the natural
46.N8e S6h Rx3f was too weak.

47.R2h-1h    02:51:00  02:12:00

Better than 47.R3h G*2g R3i Gx3g Rx3g B*2h which is good for white because he is
attacking while removing the threat to the knight on 7c. With 47.R1h, black moves
the rook to a position where it is defended by the lance, which gives him time to
take the knight on 7c and go for a material advantage.

48.G*2g      02:51:00  02:25:00
49.G7h-6g    02:51:00  02:25:00
50.R5f-5b    02:51:00  02:25:00
51.B3gx7c+   02:59:00  02:25:00
52.G2gx1h    02:59:00  02:25:00
53.P*5c      03:06:00  02:25:00

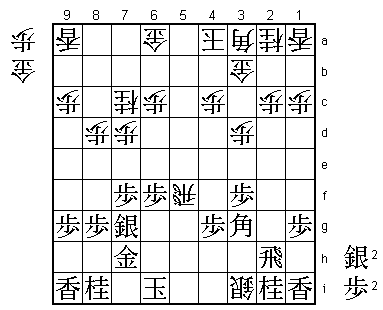
It is not so easy to see why 53.P*5d isn't better here. After all, with P*5c, black
allows the white bishop to come into play and attack via square 2f. Actually, 53.P*5d
was suggested by one of the shogi fans who followed the game on big board and the
professionals explaining the game had a hard time answering the question. Finally,
they came up with the following variation: 53.Gx1i N*5c Bx5c Px5c+ Rx5c P*5d Rx5d
+Bx6c L*5b which seems good for white.

54.B3ax5c    03:06:00  02:29:00
55.P*5d      03:06:00  02:29:00
56.B5c-2f    03:06:00  02:38:00
57.L1ix1h    03:06:00  02:38:00
58.G6a-6b    03:06:00  02:46:00
59.+B7cx9a   03:10:00  02:46:00
60.R5bx5d    03:10:00  02:48:00
61.L*5f      03:13:00  02:48:00
62.R5d-4d    03:13:00  03:04:00
63.P4g-4f    03:19:00  03:04:00
64.P*5g      03:19:00  03:09:00

65.G*6h?     03:27:00  03:09:00

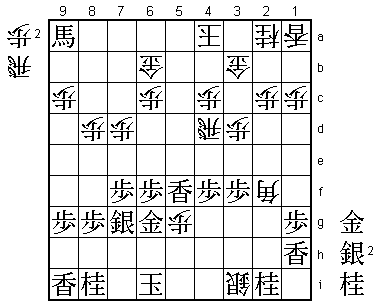
This is a serious mistake. There were several alternative that were better here.
The most obvious one is 65.S*5e which in the post-mortem analysis lead to an unclear
position. Even better seems 65.+B5e, because after 66.P5h+ K7h R*4h (or K3a K8h B5i+
P9f and Habu admitted that white has no effective moves) +Bx4d Px4d R*5a K4b N*2e
there is no mate for black, much to Habu's surprise: +P5g K7i B*8h Sx8h R4i+ B*6i!
and black wins.

66.R*5i      03:27:00  03:21:00
67.K6i-7h    03:27:00  03:21:00
68.P5g-5h+   03:27:00  03:21:00
69.N*3g      03:38:00  03:21:00
70.K4a-3a    03:38:00  03:23:00
71.P6f-6e    03:42:00  03:23:00
72.P7d-7e    03:42:00  03:26:00
73.+B9a-5e   03:45:00  03:26:00
74.P*5d      03:45:00  03:30:00
75.+B5e-8b   03:50:00  03:30:00
76.P7ex7f    03:50:00  03:30:00
77.G6gx7f    03:50:00  03:30:00
78.S3i-4h=   03:50:00  03:33:00
79.P4f-4e    03:51:00  03:33:00
80.S4h-5g+   03:51:00  03:33:00

Leaving the gold on 6h and taking the time to bring the dormant silver on 3i into
play is a great way to play the endgame. With this silver maneuver Habu decides
this first game in his favor.

81.P4ex4d    03:55:00  03:33:00
82.+P5hx6h   03:55:00  03:36:00
83.S7gx6h    03:55:00  03:36:00
84.+S5gx6h   03:55:00  03:36:00
85.K7hx6h    03:57:00  03:36:00
86.R5ix5f+   03:57:00  03:36:00
87.R*7a      03:57:00  03:36:00
88.K3a-2b    03:57:00  03:36:00
89.P4dx4c+   03:57:00  03:36:00
90.G*6g      03:57:00  03:36:00
Resigns      03:57:00  03:36:00

Mate after 91.K7i +R5i K8h (S*6i +Rx6i Kx6i S*6h) +R6h so Fukaura resigned here.
Not the start he would have liked. He had his chances in this game, but dropping
a game with black means that all the pressure is now on him to win game 2 with
the white pieces to avoid a 0-2 hole.
