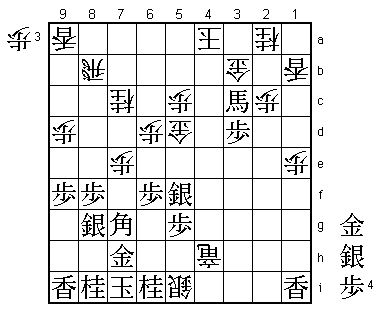
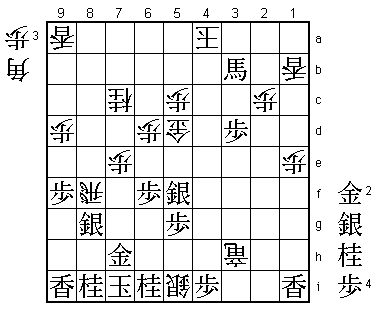
81st Kisei Match Game 1
[Black "Habu Yoshiharu, Kisei"]
[White "Fukaura Koichi, Challenger"]
[Event "81st Kisei-sen, Game 1"]
[Date "June 8th 2010"]
1.P7g-7f     00:00:00  00:00:00
2.P8c-8d     00:00:00  00:00:00
3.P2g-2f     00:02:00  00:00:00
4.G4a-3b     00:02:00  00:02:00
5.G6i-7h     00:02:00  00:02:00
6.P8d-8e     00:02:00  00:02:00
7.B8h-7g     00:03:00  00:02:00
8.P3c-3d     00:03:00  00:02:00
9.S7i-8h     00:03:00  00:02:00
10.B2bx7g+   00:03:00  00:02:00
11.S8hx7g    00:03:00  00:02:00
12.S3a-4b    00:03:00  00:02:00
13.S3i-3h    00:04:00  00:02:00
14.S7a-7b    00:04:00  00:02:00
15.P9g-9f    00:05:00  00:02:00
16.P9c-9d    00:05:00  00:02:00
17.P4g-4f    00:09:00  00:02:00
18.P6c-6d    00:09:00  00:02:00
19.S3h-4g    00:10:00  00:02:00
20.S7b-6c    00:10:00  00:02:00
21.K5i-6h    00:11:00  00:02:00
22.S6c-5d    00:11:00  00:03:00
23.S4g-5f    00:11:00  00:03:00
24.P4c-4d    00:11:00  00:03:00
25.P6g-6f    00:13:00  00:03:00
26.G6a-5b    00:13:00  00:05:00
27.G4i-5h    00:14:00  00:05:00
28.K5a-4a    00:14:00  00:05:00
29.P3g-3f    00:14:00  00:05:00
30.K4a-3a    00:14:00  00:06:00
31.P1g-1f    00:15:00  00:06:00
32.P1c-1d    00:15:00  00:06:00
33.K6h-7i    00:16:00  00:06:00
34.P7c-7d    00:16:00  00:06:00
35.N2i-3g    00:18:00  00:06:00
36.N8a-7c    00:18:00  00:07:00
37.P2f-2e    00:23:00  00:07:00
38.S4b-3c    00:23:00  00:13:00

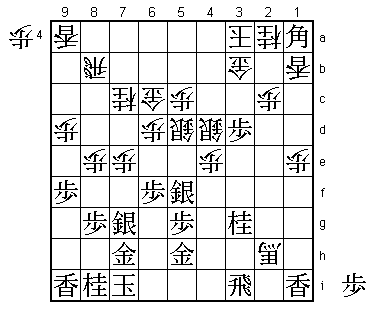
Still going strong after all those years: the Kakugawari Koshikakegin. This is without
a doubt the most deeply analyzed position in shogi and it is remarkable that after all
those years there is still no conclusion reached about who has the better chances here.
However, recently something has changed.

39.P4f-4e    00:41:00  00:13:00
40.P4dx4e    00:41:00  00:14:00
41.P2e-2d    00:42:00  00:14:00
42.P2cx2d    00:42:00  00:14:00
43.P1f-1e    00:42:00  00:14:00
44.P1dx1e    00:42:00  00:14:00
45.P7f-7e    00:42:00  00:14:00
46.P7dx7e    00:42:00  00:14:00
47.P3f-3e    00:42:00  00:14:00
48.S3c-4d    00:42:00  00:16:00
49.R2hx2d    00:50:00  00:16:00
50.P*2c      00:50:00  00:17:00
51.R2d-2i    00:50:00  00:17:00
52.G5b-6c    00:50:00  00:18:00
53.P*1b      00:52:00  00:18:00
54.L1ax1b    00:52:00  00:18:00
55.P3ex3d    00:52:00  00:18:00
56.B*3h      00:52:00  00:20:00
57.R2i-3i    00:54:00  00:20:00
58.B3h-2g+   00:54:00  00:20:00
59.B*1a      00:55:00  00:20:00
60.+B2g-2h   00:55:00  00:24:00

61.B1ax4d+   01:07:00  00:24:00

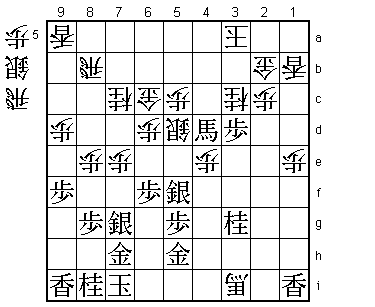
The Kakugawari Koshikakegin has been hugely popular, but recently it almost completely
disappeared from the professional scene. To be exact, it wasn't played in a single
game between March 17th and May 31st. The reason for this is Tomioka's bold rook
sacrifice 61.B1ax4d+. For a while this was considered an overplay and moves like 61.R4i
or 61.R6i were played here, but the lack of attacking power without the rook gave white
good chances as well. When the power of 61.Bx4d+ was discovered, this opening suddenly
seemed unplayable, because this was the main line for white. If 61.Bx4d+ works, then
retreating the rook to 2i (51.R2i) will have been shown to be superior to pulling back
to 2f or 2h and white will have to come up with something entirely different. When the
opening finally resurfaced in a game between Iizuka and Nakata Hiroshi, just a week
before this first Kisei match game, it continued 62.+Bx3i P*2b Gx2b S*3c K4a, but Fukaura
didn't like this for white and came up with something else.

62.+B2hx3i   01:07:00  00:24:00
63.P*2b      01:07:00  00:24:00
64.G3bx2b    01:07:00  01:17:00
65.S*3c      01:09:00  01:17:00
66.N2ax3c?!  01:09:00  01:17:00

This was Fukaura's new idea, but this game seems to indicate that it is not a solution
to the problems of the white position.

67.P3dx3c+   01:09:00  01:17:00
68.K3a-4a    01:09:00  01:18:00
69.N3gx4e!   01:47:00  01:18:00

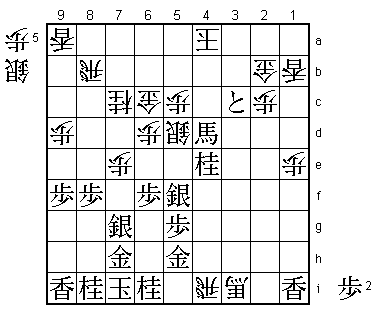
The point. This knight now joins the attack and black can take the gold on 2b whenever
he wants.

70.R*4i      01:47:00  01:57:00

This indirectly defends against Nx5c+ because of Rx4d+ and also forces black to drop a
piece in defense. However, this rook takes away square 4i from the white promoted bishop,
which would have been the ideal square for this piece.

71.N*6i      01:54:00  01:57:00
72.P8e-8f    01:54:00  02:15:00
73.P8gx8f    02:02:00  02:15:00

74.P*8h      02:02:00  02:25:00

White has no choice but to go for an all-out attack. Even though Nx5c+ is not possible,
the promoted pawn on 3c is huge and black threatens moves like P*7d or P*4c to close in
on the king. The alternative is 74.P7f 75.Sx7f 76.P*8h and if now 77.Gx8h then +B4h
S5f-6g +Bx5h Sx5h R5i+ G7h P*7g N8ix7g Rx8f P*8h Rx7f B*8g (Nx5c+ Gx5c +Bx5c N*8g! Px8g
S*6h Gx6h G*8h Kx8h +Rx6h leads to mate) Rx7g+ Gx7g S*6h K8i Sx7g= R*8a is unclear. Also,
if 77.Kx8h then not immediately Rx6i+, but P*8g Sx8g P*8e Px8e P*8f Sx8f Rx6i+ (G5h-6h
is then answered with N*7f) and again the position seems unclear.

75.S7gx8h    02:28:00  02:25:00
76.P*8g      02:28:00  02:25:00
77.S8hx8g    02:29:00  02:25:00
78.P*8h      02:29:00  02:25:00
79.G7hx8h    02:31:00  02:25:00

Looks good because the gold is badly placed on 8h. It seems like white must have something
in this position and Fukaura may have thought he had, but there is no effective way to
continue the attack.

80.+B3i-4h   02:31:00  03:01:00
81.G5hx4h    02:54:00  03:01:00
82.R4ix4h+   02:54:00  03:03:00
83.G8h-7h!   02:54:00  03:03:00

Perfect defense. Removes the wall gold and white now has no good way to continue the
attack.

84.S*5i      02:54:00  03:05:00

85.B*7g!     03:04:00  03:05:00

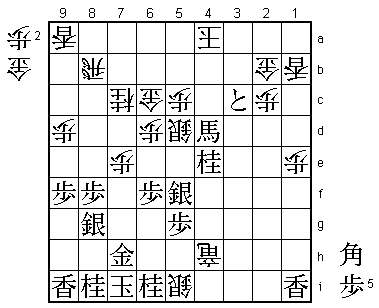
The decisive move. It seems like 84.S*5i is a desperation move, but it actually
carries a nasty threat if black decides to close in on the white king. For example,
85.B*7a is answered by G*6h K8h Gx7h Sx7h (K9g is not mate, but then G*8h wins for
white) Rx8f and the black king is mated. 85.B*7g defends against G*6h, but it seems
risky to drop a defense-only bishop at this point. However, Habu has seen that this
bishop also threatens Bx5i +Rx5i S*4b and wins.

86.S5dx4e    03:04:00  03:30:00
87.+B4dx4e   03:08:00  03:30:00
88.G6c-5d    03:08:00  03:30:00
89.+B4e-3d   03:17:00  03:30:00

Again threatens Bx5i followed by S*4b, so there is no relief for white.

90.G2bx3c    03:17:00  03:36:00
91.+B3dx3c   03:17:00  03:36:00
92.G*3b      03:17:00  03:36:00
93.P*3d      03:26:00  03:36:00
94.N*2a      03:26:00  03:39:00

95.P*4i!     03:29:00  03:39:00

The cream on the cake. White cannot take this pawn, because the blocked rook would
end all hopes for an attack, but the rook also needs to stay on the 4th file to keep
the defense around the white king together.

96.+R4h-3h   03:29:00  03:43:00
97.+B3c-1a   03:32:00  03:43:00

Habu doesn't rush his attack. He knows that the white attack is not strong enough.

98.P*8e      03:32:00  03:44:00
99.+B1ax2a   03:35:00  03:44:00
100.P8ex8f   03:35:00  03:50:00
101.B7gx8f   03:35:00  03:50:00
102.R8bx8f   03:35:00  03:51:00
103.+B2ax3b  03:35:00  03:51:00
Resigns      03:35:00  03:53:00

With the rook away from defensive duty, this easily decides the game. 104.Kx3b simply
fails to G*3c and mate, but 104.K5b or 104.K5a also lose quickly after 105.Sx8f,
picking up the rook and threatening mate at the same time. Therefore, Fukaura resigned
here. Great start for Habu against an opponent he always has a difficult time against.
Still, it is only the first game of the match and challenger Fukaura had the white
pieces, so there is still everything to play for. Can he keep serve in the second game?
