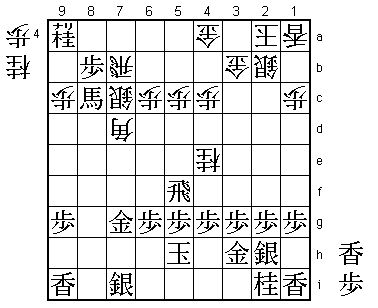
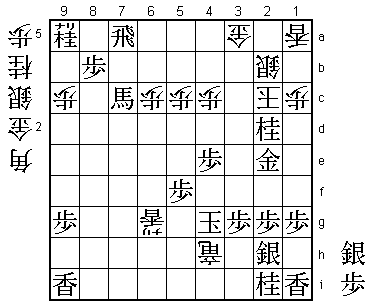
80th Kisei Match Game 5
[Black "Kimura Kazuki, Challenger"]
[White "Habu Yoshiharu, Kisei"]
[Event "80th Kisei-sen, Game 5"]
[Date "July 17th 2009"]
1.P7g-7f 00:00:00 00:00:00
The furigoma for this final Kisei game resulted in four tokins, so Kimura gets
the black pieces. It shouldn't make that much of a difference, because the furigoma
also gave Habu the white pieces when he successfully defended his Osho crown and
he was given black in the final game of the Meijin match.
2.P3c-3d 00:00:00 00:01:00
3.P2g-2f 00:00:00 00:01:00
4.P8c-8d 00:00:00 00:02:00
5.P2f-2e 00:00:00 00:02:00
6.P8d-8e 00:00:00 00:02:00
7.G6i-7h 00:00:00 00:02:00
8.G4a-3b 00:00:00 00:02:00
9.P2e-2d 00:00:00 00:02:00
10.P2cx2d 00:00:00 00:03:00
11.R2hx2d 00:00:00 00:03:00
12.P8e-8f 00:00:00 00:03:00
13.P8gx8f 00:00:00 00:03:00
14.R8bx8f 00:00:00 00:03:00
15.R2dx3d 00:00:00 00:03:00
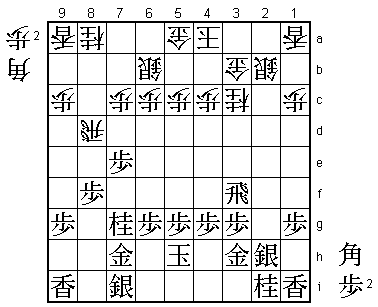
Kimura selects the Yokofudori for this all-important game.
16.B2b-3c 00:00:00 00:03:00
Habu responds with the B3c variation, which gives white the best chances of active
play for the lost pawn.
17.R3d-3f 00:00:00 00:03:00
18.S3a-2b 00:00:00 00:03:00
19.K5i-5h 00:02:00 00:03:00
20.K5a-4a 00:02:00 00:03:00
21.G4i-3h 00:03:00 00:03:00
22.R8f-8d 00:03:00 00:07:00
Kimura delays the drop of the pawn on 8g and Habu responds by pulling back the rook
to 8d instead of 8e.
23.P*8g 00:06:00 00:07:00
24.R8d-2d 00:06:00 00:10:00
25.S3i-2h 00:06:00 00:10:00
26.G6a-5a 00:06:00 00:10:00
27.P7f-7e 00:08:00 00:10:00
28.R2d-8d 00:08:00 00:11:00
29.B8hx3c+ 00:14:00 00:11:00
30.N2ax3c 00:14:00 00:11:00
31.N8i-7g 00:14:00 00:11:00
32.S7a-6b 00:14:00 00:18:00
33.P8g-8f 00:16:00 00:18:00
34.R8d-2d 00:16:00 00:19:00
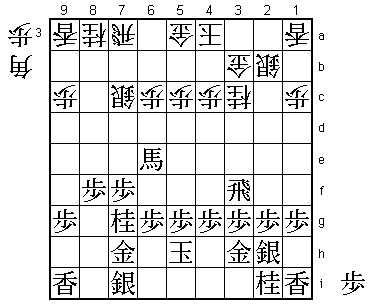
This is the second time the rook is going to 2d. This seems like a waste of moves,
but the idea behind this rook maneuver is very clear: force black into a wall
formation on the right side of the board. The first time the rook moved to R2d,
black was forced to play the silver to 2h and now black is forced to cement this
formation by dropping a pawn on 2g. If black doesn't drop a pawn on 2g, white can
play P*2g Sx2g B*4e which is a very strong attack.
35.P*2g 00:17:00 00:19:00
Of course, this is not only good for white, because black now gets the chance to
make a promoted bishop. If this promoted bishop stays on the board and black is
given the time to resolve the wall formation, he will get the advantage.
36.P7c-7d 00:17:00 00:20:00
37.P7ex7d 00:18:00 00:20:00
38.R2dx7d 00:18:00 00:21:00
39.B*8c 00:18:00 00:21:00
40.R7d-7e 00:18:00 00:22:00
41.P*7f 00:18:00 00:22:00
42.R7e-7a 00:18:00 00:24:00
43.B8c-6e+ 00:19:00 00:24:00
44.S6b-7c 00:19:00 00:28:00
45.P8f-8e?   00:34:00  00:28:00

It is unclear if both players knew this, but this position has actually been played
before once. There black played 45.N8e, which is better than 45.P8e, because it is
attacking a piece, forcing white to defend. Because 45.P8e is not threatening anything,
white now gets the opportunity to strengthen his king formation.

46.K4a-3a    00:34:00  00:49:00
47.P8e-8d    00:50:00  00:49:00
48.P*8b      00:50:00  00:49:00
49.+B6e-6f   01:02:00  00:49:00
50.K3a-2a    01:02:00  01:02:00

Suddenly the king is well tucked away in the corner. It is also very important that
black cannot drop any pawns on the second and third file to attack the king formation.
The difference in king position is already huge, but Kimura has no time to improve his
position, because then white plays G4a followed by G3a and it will be almost impossible
for black to attack the white king. Black therefore has to force his attack before white
can make his king invincible. However, with the wall formation still unresolved, opening
the position is very risky.

51.R3f-5f    01:07:00  01:02:00
52.S7c-6d    01:07:00  01:22:00
53.P8d-8c+   01:13:00  01:22:00
54.P8bx8c    01:13:00  01:22:00
55.P*8b      01:14:00  01:22:00
56.N8a-7c    01:14:00  01:23:00
57.P7f-7e    01:15:00  01:23:00
58.P8c-8d    01:15:00  01:36:00
59.P7e-7d?   01:23:00  01:36:00

This looks good, but it turns out that it doesn't stop white from further strengthening
his king position. The best chance for black would have been 59.P8a+ Rx8a and only
then P7d. For example, N8e P7c+ Nx7g+ +Bx7g Sx7c Rx5c+ G6b +R5f and black has both a
promoted rook and a promoted bishop. After the game Kimura said he also had no
confidence in his position after this, but he admitted that it would have been
better than what he played in the game.

60.N7c-8e    01:23:00  01:37:00
61.+B6fx8d   01:26:00  01:37:00
62.N8ex7g+   01:26:00  01:42:00
63.G7hx7g    01:26:00  01:42:00
64.G5a-4a    01:26:00  01:49:00

This is the problem. Black is still not threatening anything significant, so white
can continue to strengthen his castle.

65.N*8c      01:38:00  01:49:00
66.R7a-7b    01:38:00  01:50:00
67.N8cx9a+   01:38:00  01:50:00
68.N3c-4e!   01:38:00  02:07:00
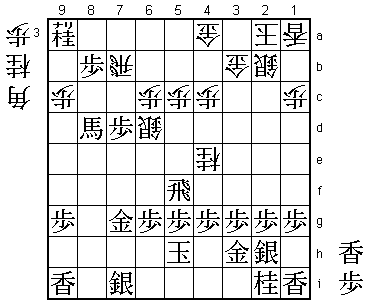
Strong move, but not an easy move to play. White doesn't want to weaken the king
position and would prefer to use the pieces on the other side of the board and
the pieces in hand to win from here. Therefore, in the press room moves like S6e
and B*4d were analyzed, but 68.N4e was never given any thought. However, when
the move was actually played, everyone started to realize how strong it was.
White threatens N*6e next, and the combination of these two knight is too strong
for black to handle. The reason why Habu is so strong is that he not only saw N4e,
but also calculated that black cannot do anything about a knight drop on 6e.
Interestingly, during this game each position was analyzed using computer world
champion GPS Shogi. GPS Shogi had a hard time predicting the moves in the opening
and middle game, but instead of 64.G4a it predicted 64.N4e, showing that the computer
was also prepared to play this defensive knight to attack the black king.

69.P7d-7c+   02:10:00  02:07:00
70.S6dx7c    02:10:00  02:22:00
71.+B8d-8c   02:29:00  02:22:00
72.B*7d!     02:29:00  02:23:00
The perfect reply. Of course, 73.+Bx7d Sx7d is out of the question, so black is
forced to take the rook on 7b.

73.+B8cx7b   02:46:00  02:23:00
74.B7dx5f    02:46:00  02:23:00
75.G3h-4h    02:57:00  02:23:00

No alternative. Taking the bishop on 5f is answered with N*6e and even though black
is a major piece ahead, the white attack is too strong.

76.N*6e      02:57:00  03:04:00

There is the second knight. Again, black can take the bishop on 5f and be a full
bishop ahead, but the wall formation makes it impossible for the black king to
escape the attack by the two knights.

77.P5gx5f    03:07:00  03:04:00
78.R*8i      03:07:00  03:06:00
79.R*7a      03:19:00  03:06:00
80.G4a-3a    03:19:00  03:12:00
81.P4g-4f    03:32:00  03:12:00

If only 81.+Bx6c would have worked here, black would have been alright. However,
white can answer this with 82.N4e5g+ Gx5g Rx7i+ which threatens mate after S*4i
K4h +R6h K4i Nx5g= and there is no proper defense against this mating threat.

82.R8ix7i+   03:32:00  03:18:00
83.P4fx4e    03:32:00  03:18:00
84.+R7ix7g   03:32:00  03:20:00

This is a mating threat (+R7h L*6h S*5g Gx5g G*4h etc.), so white is forced to
play a defense-only move.

85.B*4f      03:33:00  03:20:00
86.+R7g-7h   03:33:00  03:26:00
87.L*6h      03:33:00  03:26:00
88.N6e-7g+   03:33:00  03:27:00
89.+B7bx7c   03:35:00  03:27:00
90.+N7gx6h   03:35:00  03:27:00
91.B4fx6h    03:35:00  03:27:00
92.S*7g      03:35:00  03:28:00
93.S*7i      03:42:00  03:28:00
94.S7gx6h+   03:42:00  03:28:00
95.S7ix6h    03:42:00  03:28:00
96.L*6d      03:42:00  03:36:00

Blocks the bishop and threatens Lx6g+ next. Kimura now throws the towel by setting
up an attack while allowing mate.

97.N*2d      03:47:00  03:36:00
98.L6dx6g+   03:47:00  03:42:00
99.K5h-4g    03:48:00  03:42:00
100.+R7hx6h  03:48:00  03:44:00
101.N2dx3b+  03:53:00  03:44:00
102.K2ax3b   03:53:00  03:44:00
103.N*2d     03:55:00  03:44:00
104.K3b-2c   03:55:00  03:45:00
105.G*2e     03:56:00  03:45:00
106.+R6hx4h  03:56:00  03:45:00
Resigns      03:56:00  03:45:00
Simple mate after 107.Kx4h G*5g or 107.K3f B*4g K3e Bx2e+, so Kimura resigned here.
He came very close to winning his first major title, but in this match he learned
the hard way that Habu seems to get even stronger when the pressure is on. For the
third time in a row, he comes from behind to defend his title, picking up his 8th
Kisei title. For Kimura it is a good thing that he has no time to dwell on this
match (especially on the fourth game which he should have won), because he is also
challenging for the Oi title.