80th Kisei Match Game 4
[Black "Habu Yoshiharu, Kisei"]
[White "Kimura Kazuki, Challenger"]
[Event "80th Kisei-sen, Game 4"]
[Date "July 9th 2009"]
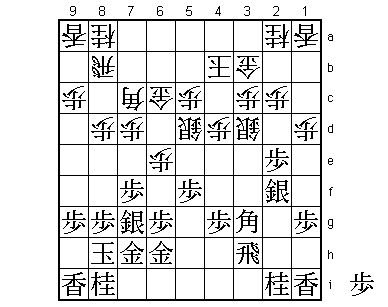
1.P7g-7f 00:00:00 00:00:00
2.P3c-3d 00:00:00 00:02:00
3.P2g-2f 00:00:00 00:02:00
4.G4a-3b 00:00:00 00:02:00
5.G6i-7h 00:02:00 00:02:00
6.P8c-8d 00:02:00 00:03:00
7.P2f-2e 00:05:00 00:03:00
8.B2bx8h+ 00:05:00 00:04:00
It was widely expected that Kimura would play the Kakugawari with tempo loss in
his bid to take the Kisei title from Habu with the white pieces. This system gives
white a chance to play actively for the win instead of having to wait for black
to open the game.
9.S7ix8h 00:05:00 00:04:00
10.S3a-2b 00:05:00 00:04:00
11.S3i-3h 00:07:00 00:04:00
12.S2b-3c 00:07:00 00:04:00
13.S3h-2g 00:09:00 00:04:00
14.S7a-6b 00:09:00 00:05:00
15.S2g-2f 00:11:00 00:05:00
The classic climbing silver attack is also not a surprise. The opening where black
exchanges the pawn in front of the rook and then moves the silver up quickly has
been very popular, but the results for black have been bad recently, so the bogin
attack is having another revival.
16.P1c-1d 00:11:00 00:05:00
17.K5i-6h 00:12:00 00:05:00
18.P6c-6d 00:12:00 00:05:00
19.P3g-3f 00:13:00 00:05:00
20.G6a-5b 00:13:00 00:05:00
21.P3f-3e 00:22:00 00:05:00
22.P4c-4d 00:22:00 00:05:00
23.S8h-7g 00:27:00 00:05:00
24.S6b-6c 00:27:00 00:05:00
25.K6h-7i 00:28:00 00:05:00
26.S6c-5d 00:28:00 00:07:00
27.P3ex3d 00:30:00 00:07:00
28.S3cx3d 00:30:00 00:07:00
29.G4i-5h 00:30:00 00:07:00
It is still easy to get into unknown territory in this opening. Moving this gold
up at this particular time is unusual and the game slowly drifts away from earlier
examples.
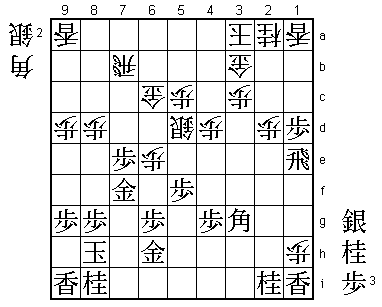
30.P6d-6e 00:30:00 00:22:00
31.P5g-5f 00:40:00 00:22:00
32.K5a-4b 00:40:00 00:28:00
33.K7i-8h 00:47:00 00:28:00
34.P7c-7d 00:47:00 00:56:00
35.G5h-6h 01:07:00 00:56:00
36.B*7c 01:07:00 01:03:00
37.B*3g 01:15:00 01:03:00
38.G5b-6c 01:15:00 01:28:00
39.R2h-3h 01:43:00 01:28:00
40.P*3c 01:43:00 01:40:00
41.P1g-1f?! 02:01:00 01:40:00
Habu is aiming for a big exchange of pieces followed by an edge attack, but this
attack has no power. He should have been patient here and move into an Anaguma
formation with 41.L9h. White can then win a pawn with 42.Bx3g+ Sx3g Sx2e R2h S3d,
but both players agreed that not having the pawn on 2e is probably better for black.
42.P9c-9d 02:01:00 01:47:00
43.S2f-3e 02:17:00 01:47:00
44.S3dx3e 02:17:00 01:53:00
45.B3gx7c+ 02:17:00 01:53:00
46.N8ax7c 02:17:00 01:53:00
47.R3hx3e 02:17:00 01:53:00
48.K4b-3a 02:17:00 02:12:00
49.P2e-2d 02:42:00 02:12:00
50.P2cx2d 02:42:00 02:12:00
51.P1f-1e 02:42:00 02:12:00
52.P1dx1e 02:42:00 02:17:00
53.P*1d 02:44:00 02:17:00
54.P7d-7e 02:44:00 02:23:00
55.B*3g 02:55:00 02:23:00
56.R8b-7b 02:55:00 02:31:00
57.P7fx7e 02:58:00 02:31:00
58.N7c-8e 02:58:00 02:37:00
59.R3ex1e 03:03:00 02:37:00
60.N8ex7g+ 03:03:00 03:07:00
61.G7hx7g 03:03:00 03:07:00
62.P*7f 03:03:00 03:18:00
63.G7gx7f 03:06:00 03:18:00
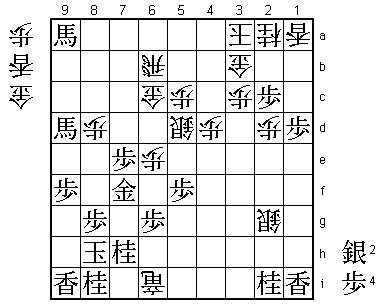
64.P*1h! 03:06:00 03:21:00
This seems like a very difficult move to spot and in the press room it was met with
surprise. Miura (8-dan), who was following the game at the venue, said afterwards
that he was even more surprised when he heard after the game that both players had
seen this move. Kimura played it and Habu expected that Kimura would play it. An
example of how the players in the game see much more than a bunch of professionals
in the press room. 64.P*1h is quite a tricky move. The point is that after 65.Lx1h,
white plays 66.S*2c!. Then 67.Bx9a+ is answered by Lx1d R3e Lx1h+. If white doesn't
play 64.P*1h first, the black lance will still be on 1i and S*2c Bx9a+ Lx1d R3e Lx1i+
is simply answered by +Bx1i. Therefore, black has to take the pawn on 1h with the
rook. However, this rook will be chased down and exchanged and the black position
is not really well protected against a rook drop.
65.R1ex1h 03:12:00 03:21:00
66.B*3f 03:12:00 03:25:00
67.R1h-2h 03:13:00 03:25:00
68.S*2g 03:13:00 03:26:00
69.R2h-5h 03:15:00 03:26:00
70.B3fx4g+ 03:15:00 03:26:00
71.B3gx9a+ 03:15:00 03:26:00
72.+B4gx5h 03:15:00 03:26:00
73.G6hx5h 03:15:00 03:26:00
74.R*4i 03:15:00 03:26:00
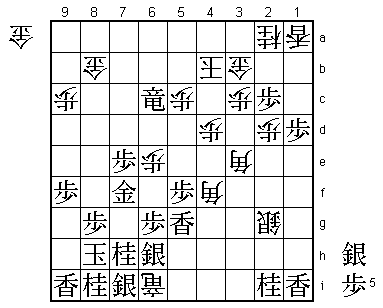
Habu admitted after the game that his middle game strategy had failed and that he
was in major trouble here. His only chance is to dig in and make it hard for his
opponent to find the winning moves.
75.L*5i 03:34:00 03:26:00
76.S*6i 03:34:00 03:27:00
77.B*8c 03:36:00 03:27:00
78.R7b-6b 03:36:00 03:30:00
79.B8cx9d+ 03:40:00 03:30:00
80.S6ix5h+ 03:40:00 03:34:00
81.L5ix5h 03:40:00 03:34:00
82.R4i-5i+ 03:40:00 03:35:00
83.P9g-9f 03:44:00 03:35:00
84.+R5ix5h 03:44:00 03:36:00
85.N*7h 03:44:00 03:36:00
86.+R5h-6i 03:44:00 03:41:00
87.P*2c 03:46:00 03:41:00
88.P*9c?     03:46:00  03:42:00

Quite tough on Kimura to call this a bad move, but it is. The reason behind this
move is crystal clear: if white gets a bishop in hand, the drop on 7i is very strong
and there is no way for black to make an entering king. However, black can hold his
position against the bishop, even without escaping up the board. Correct was 88.G*6h,
but this is not easy to see. At first glance, this gold looks too heavy and it seems
to give the black king too many opportunities to escape up the board. After close
examination, it turns out that the black king cannot escape. For example, 89.K9g +Rx7h
N7g N*6d is very strong, because after K8f Nx7f S*5a R5b +B6a Nx8h+ is a mating threat
after G*8e etc. The black king cannot escape up the board here because K9e is answered
by L*9b.

89.+B9dx8d   03:48:00  03:42:00
90.L*8b      03:48:00  03:43:00
91.+B8dx6b   03:50:00  03:43:00
92.G6cx6b    03:50:00  03:43:00
93.R*8a      03:50:00  03:43:00
94.K3a-4b    03:50:00  03:43:00
95.S*7i      03:50:00  03:43:00
96.B*4f      03:50:00  03:44:00
97.S*6h      03:50:00  03:44:00
98.G6b-7b    03:50:00  03:44:00
99.R8a-6a+   03:51:00  03:44:00
100.S5d-6c   03:51:00  03:45:00
101.+B9ax8b  03:54:00  03:45:00
102.G7bx8b   03:54:00  03:45:00
103.+R6ax6c  03:54:00  03:45:00
104.B*3e     03:54:00  03:45:00
105.L*5g?    03:56:00  03:45:00
If Habu would have lost his Kisei title in this game, this would have been the culprit.
Correct was 105.S*5g and after 106.Bx1i+ L*3g B2f +R6b K4c +Rx8b +Rx2i S4f black has
the advantage.

106.+R6ix2i? 03:56:00  03:50:00

The decisive mistake. Again, the reason why Kimura played this move is clear: he didn't
like a future gold drop on 5i that would capture the rook. However, if he had realized
the importance of escaping up the board himself, he would have played 106.Bx1i+ here.
Then after 107.S*5b P3d +R6a K3c +Rx2a P2e! the white king escapes and because there
is no lance on 1i, there is no way that black can stop the king from entering.

107.S*5b     03:56:00  03:50:00
108.P3c-3d   03:56:00  03:53:00
109.P1d-1c+  03:56:00  03:53:00
110.N2ax1c   03:56:00  03:55:00
111.P*3c     03:56:00  03:55:00
112.K4bx3c   03:56:00  03:56:00
113.+R6cx5c  03:56:00  03:56:00
114.G*4c?    03:56:00  03:56:00

A rare blunder in defense by top defender Kimura. If he would have played 114.N*4c here,
black would still have the advantage but the game would last much longer.

115.S5bx4c=  03:56:00  03:56:00
116.G3bx4c   03:56:00  03:56:00
117.G*3b!    03:56:00  03:56:00

Kimura had overlooked this gold drop.

118.K3cx3b   03:56:00  03:59:00

Spending his final three minutes on a forced move says it all. Kimura must have been kicking
himself here.

119.P2c-2b+  03:56:00  03:59:00
Resigns      03:56:00  03:59:00
There is no defense after 120.Kx2b +Rx4c because G*3c is mate after P*2c Gx2c G*3b K1b +Rx2c
Kx2c G*2b. Kimura had a chance to win this match in this game, but Habu showed why he has
won so many title match games by refusing to give Kimura something easy, inviting his
opponent to make a mistake. As a reward, he will live to fight another day and after the
Osho match and the Meijin match, Habu has a chance to come back from behind for the third
consecutive time to defend his title. On the other hand, Kimura seemed to recover from
this tough loss very quickly. At the end of the post-mortem analysis, after Habu had
already left the room, he muttered "Matsuyama, Matsuyama" under his breath. That is the
name of the city where the final game will be played.