80th Kisei Match Game 3
[Black "Kimura Kazuki, Challenger"]
[White "Habu Yoshiharu, Kisei"]
[Event "80th Kisei-sen, Game 3"]
[Date "June 27th 2009"]
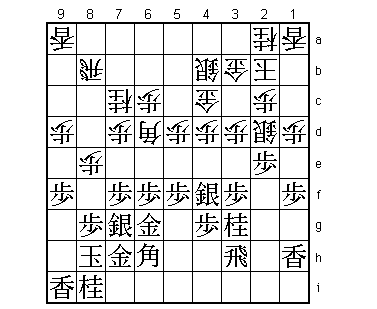
1.P7g-7f 00:00:00 00:00:00
This third game of the Kisei match was played at the Forest Hotel in Toyota-city.
This was the same location where Habu defended his Meijin title just two days earlier.
It is not without precedent that title match games are played at the same location
so close together. Because of the special preparations needed to host a professional
title match game, the number of locations being used is actually quite limited. In
the case of the Forest Hotel, the manager of the hotel, Mr. Ono, is himself a strong
shogi player who has represented the Aichi Prefecture multiple times in national
tournaments like the Amateur Meijin tournament when he was younger. He was
particularly happy about his hotel being the venue for two big games in a row.
As for Habu, people worried a bit about fatigue because of his tough schedule,
but defending his Meijin title obviously helped a lot as he was in a very good
mood before the game. The same could be said about challenger Kimura, who won his
first title match game by taking the second game of this Kisei match. As a results,
there was an unusually low amount of tension before the game. Of course, once the
game starts, the gloves come off...
2.P8c-8d 00:00:00 00:01:00
3.S7i-6h 00:01:00 00:01:00
4.P3c-3d 00:01:00 00:01:00
5.P6g-6f 00:01:00 00:01:00
6.S7a-6b 00:01:00 00:03:00
7.P5g-5f 00:01:00 00:03:00
8.P5c-5d 00:01:00 00:04:00
9.S3i-4h 00:01:00 00:04:00
10.S3a-4b 00:01:00 00:05:00
11.G4i-5h 00:01:00 00:05:00
12.G4a-3b 00:01:00 00:06:00
13.G6i-7h 00:02:00 00:06:00
14.K5a-4a 00:02:00 00:08:00
15.K5i-6i 00:02:00 00:08:00
16.P7c-7d 00:02:00 00:09:00
17.G5h-6g 00:02:00 00:09:00
18.G6a-5b 00:02:00 00:10:00
19.S6h-7g 00:03:00 00:10:00
20.S4b-3c 00:03:00 00:11:00
21.B8h-7i 00:04:00 00:11:00
22.B2b-3a 00:04:00 00:12:00
23.P3g-3f 00:05:00 00:12:00
24.P4c-4d 00:05:00 00:12:00
25.S4h-3g 00:16:00 00:12:00
26.B3a-6d 00:16:00 00:20:00
27.B7i-6h 00:17:00 00:20:00
28.G5b-4c 00:17:00 00:25:00
29.K6i-7i 00:18:00 00:25:00
30.K4a-3a 00:18:00 00:28:00
31.K7i-8h 00:19:00 00:28:00
32.K3a-2b 00:19:00 00:29:00
33.S3g-4f 00:22:00 00:29:00
34.S6b-5c 00:22:00 00:30:00
35.N2i-3g 00:23:00 00:30:00
36.P9c-9d 00:23:00 00:33:00
37.P1g-1f 00:24:00 00:33:00
38.P1c-1d 00:24:00 00:34:00
39.P2g-2f 00:25:00 00:34:00
40.S3c-2d 00:25:00 00:38:00
41.R2h-3h 00:30:00 00:38:00
42.P8d-8e 00:30:00 00:56:00
43.L1i-1h 00:33:00 00:56:00
44.S5c-4b 00:33:00 01:01:00
45.P9g-9f 00:46:00 01:01:00
46.N8a-7c 00:46:00 01:04:00
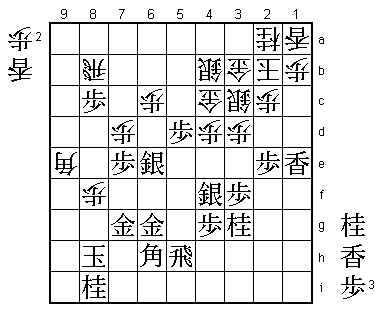
47.P2f-2e 01:29:00 01:04:00
A classic Yagura game. Pushing the pawn to 2e is the latest fashion. In the old
days, this was never played because it blocks the knight. However, the old style
N2e has the disadvantage that white can take this knight at any time. Not putting
the knight where white can take it is the new way of playing this position. Also,
the pawn on 2e is considered to be well-balanced against the white formation of B6d-N7c.
48.S2d-3c?! 01:29:00 01:12:00
Unusual and probably not good. By pulling back the silver to 3c, white allows the
edge attack. After the game, Habu said that it was probably better to play 48.S1c
here.
49.L1h-1g 01:30:00 01:12:00
50.R8b-8a 01:30:00 01:20:00
51.R3h-1h 01:31:00 01:20:00
52.R8a-8b 01:31:00 01:21:00
53.P1f-1e 01:36:00 01:21:00
54.P1dx1e 01:36:00 01:24:00
55.L1gx1e 01:36:00 01:24:00
56.P*1b 01:36:00 01:25:00
White wants to drop the pawn on 1c, but in the future the rook and bishop will
attack this pawn and black will get an unstoppable attack. Of course, dropping
the pawn on 1b is also no fun because the king now has nowhere to run on that
side.
57.R1h-5h 01:40:00 01:25:00
58.R8b-5b 01:40:00 01:27:00
59.P6f-6e 01:46:00 01:27:00
60.B6d-5c 01:46:00 01:27:00
61.S7g-6f 01:46:00 01:27:00
62.R5b-8b 01:46:00 01:43:00
63.P5f-5e 01:50:00 01:43:00
64.P8e-8f 01:50:00 01:53:00
65.P5ex5d 01:53:00 01:53:00
66.P8fx8g+ 01:53:00 02:06:00
67.G7hx8g 01:53:00 02:06:00
68.P*8f 01:53:00 02:06:00
69.G8g-7g 01:53:00 02:06:00
70.B5c-6b 01:53:00 02:07:00
71.P7f-7e 02:23:00 02:07:00
72.P9d-9e 02:23:00 02:21:00
73.P9fx9e 02:25:00 02:21:00
74.L9ax9e 02:25:00 02:21:00
75.L9ix9e 02:36:00 02:21:00
76.N7cx6e 02:36:00 02:21:00
77.S6fx6e 02:45:00 02:21:00
78.B6bx9e 02:45:00 02:21:00
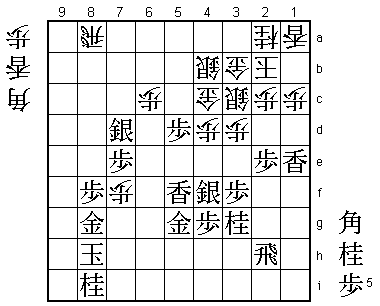
79.P*8c 02:46:00 02:21:00
It seems like Habu is attacking strongly, but actually Kimura has invited the
attack, knowing that it cannot work if it is properly defended against. Kimura
is trusting his famous defensive skills to stop it even against the magical powers
of his opponent.

80.R8bx8c?   02:46:00  02:31:00

An important mistake. The best way to play for Habu would have been 80.R9b. For
example, after 81.P*9f P8g+ Kx8g L*8d Kimura planned to play N*8f, but then P*8e
Px9e Rx9e P*9f Px8f Gx8f Rx7e S7f Lx8f Bx8f P*8e is good for white. In the
post-mortem analysis it was found that black still has the upper hand if he plays
L*8f instead of N*8f in reply to L*8d, but Kimura admitted that he had pretty much
made up his mind about N*8f and probably would have played it.

81.S6ex7d    02:47:00  02:31:00
82.P8f-8g+   02:47:00  02:39:00
83.G7gx8g    02:48:00  02:39:00
84.B9ex6h+   02:48:00  02:39:00
85.G6gx6h    02:48:00  02:39:00
86.R8c-8a    02:48:00  02:39:00

If 86.B*7i would have worked here, white would have been alright, but black doesn't
have to take the bishop. After 87.K7h there is no way for white to continue.

87.P*8f      02:52:00  02:39:00
88.P*5g      02:52:00  02:39:00
89.R5h-2h    02:56:00  02:39:00
90.P1b-1c    02:56:00  02:54:00
91.L*5f      03:07:00  02:54:00
92.P*7f      03:07:00  03:00:00
93.G6hx5g    03:15:00  03:00:00
94.L*8d?     03:15:00  03:14:00

Habu misses his last chance to make a fight of it. Necessary was 94.L*8b. For example,
95.N*9c R9a B*7c Rx9c B8b+ B*9i K7i P7g+ Nx7g P*7f and the white attack has suddenly
become a real threat. Better is 95.B*7b R9a P*9f P3e, but white still has better chances
than in the game because Sx3e is answered by B*1i R3h Bx3g+ Rx3g N*4e R2g Nx5g+ and the
difference between the defense around the king is a big plus for white.

95.N*9c!     03:17:00  03:14:00
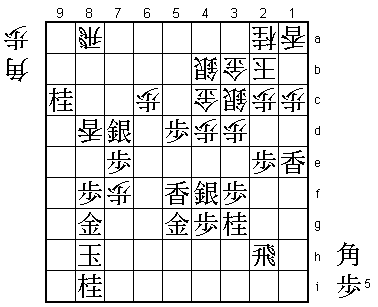
Kimura shows why he is considered the best defender in the game. The reflex move is to
defend against the threat Lx8f by 95.N*7h, but then 96.P3e is a strong attack. Px3e is
answered by P*3f and Sx3e here also is answered by B*1i R3h Bx3g+ etc. By attacking the
rook with 95.N*9c, black indirectly defends against Lx8f. Not defending the spot that
is attacked, but defending by attacking the attackers is an important defensive technique.
Kimura is a master of these types of moves.

96.R8a-9a    03:17:00  03:17:00
97.S7d-8c+!  03:18:00  03:17:00

Another great move by Kimura. The normal way of playing would be to play P*9b here, so
that after Rx9b the silver promotion on 8c can be played with tempo. Instead, Kimura plays
the silver immediately, which of course threatens to take the lance on 8d. White has no
good defense against this, so being forced to think of a move here is actually very
unpleasant. Habu desperately tries to keep his attack going, but it is all in vain.

98.P3d-3e    03:18:00  03:20:00
99.B*7c      03:19:00  03:20:00
100.P3ex3f   03:19:00  03:24:00
101.B7cx9a+  03:20:00  03:24:00
102.P3fx3g+  03:20:00  03:24:00
103.S4fx3g   03:20:00  03:24:00
104.P7f-7g+  03:20:00  03:37:00
105.N8ix7g   03:21:00  03:37:00
106.P*7f     03:21:00  03:37:00
107.G5g-6g   03:32:00  03:37:00
108.P7fx7g+  03:32:00  03:37:00
109.G8gx7g   03:32:00  03:37:00
110.N*6e     03:32:00  03:39:00
111.G7g-6f   03:34:00  03:39:00
112.B*6d     03:34:00  03:40:00
113.+B9ax6d  03:34:00  03:40:00
114.P6cx6d   03:34:00  03:40:00
115.+S8cx8d  03:34:00  03:40:00
116.B*5i     03:34:00  03:40:00
117.S3g-2f   03:39:00  03:40:00
118.B5ix8f+  03:39:00  03:40:00
119.R*8g!    03:39:00  03:40:00
The final defensive blow. 119.P*8g seems more economical, but after 120.N*9f K9h P*9g
K8i +Bx8g the white attack is suddenly unstoppable. The point of 119.R*8g is that
after N*9f K9h P*9g black can take the pawn with Rx9g and the two rooks work very
well in defense.

120.+B8f-5i  03:39:00  03:42:00
121.K8h-9g   03:39:00  03:42:00
122.P*8c     03:39:00  03:42:00
123.+S8d-8e  03:39:00  03:42:00
124.N*8d     03:39:00  03:44:00
125.R8g-8i   03:41:00  03:44:00

The promoted bishop is no match for the two rooks. The white attack is over and so
is this game.

126.P*5h     03:41:00  03:44:00
127.K9g-8g   03:42:00  03:44:00
128.P1c-1d   03:42:00  03:47:00
129.B*7c     03:43:00  03:47:00
130.P1dx1e   03:43:00  03:48:00
131.B7cx6d+  03:43:00  03:48:00
132.L*9b     03:43:00  03:52:00
133.G6fx6e   03:44:00  03:52:00
134.L9bx9c   03:44:00  03:52:00
135.P*6h     03:44:00  03:52:00
136.P1e-1f   03:44:00  03:52:00
137.P*1h     03:45:00  03:52:00
138.+B5ix2f  03:45:00  03:57:00
139.R2hx2f   03:45:00  03:57:00
140.S*9h     03:45:00  03:57:00
141.K8g-7g   03:46:00  03:57:00
142.S9hx8i=  03:46:00  03:57:00
143.P5d-5c+  03:47:00  03:57:00
144.N*7b     03:47:00  03:57:00
145.+B6d-6c  03:47:00  03:57:00
146.G4cx5c   03:47:00  03:57:00
147.L5fx5c+  03:47:00  03:57:00
148.P*6d     03:47:00  03:57:00
149.+L5cx4b  03:48:00  03:57:00
150.G3bx4b   03:48:00  03:57:00
151.N*3e     03:48:00  03:57:00
152.P6dx6e   03:48:00  03:57:00
153.N3ex2c+  03:48:00  03:57:00
154.K2bx2c   03:48:00  03:57:00
155.S*2d     03:48:00  03:57:00
Resigns      03:48:00  03:57:00
Mate after 156.Sx2d Px2d K3d L*3e or 156.K3b G*2c K3a P*3b or 156.K3d B*2c, so Habu
resigned here. Kimura takes a 2-1 lead and goes from being the player who never won
a title match game to the player who only needs one more win to take his first major
title. Can he take his perfect play in this game and do the same in game four?