80th Kisei Match Game 2
[Black "Habu Yoshiharu, Kisei"]
[White "Kimura Kazuki, Challenger"]
[Event "80th Kisei-sen, Game 2"]
[Date "June 19th 2009"]
1.P7g-7f     00:00:00  00:00:00
2.P3c-3d     00:00:00  00:01:00
3.P2g-2f     00:02:00  00:01:00
4.G4a-3b     00:02:00  00:02:00
5.G6i-7h     00:04:00  00:02:00
6.P8c-8d     00:04:00  00:03:00
7.P2f-2e     00:07:00  00:03:00
8.B2bx8h+    00:07:00  00:03:00

Kimura plays the Kakugawari with tempo loss a lot, so this was not an unexpected
choice of opening.

9.S7ix8h     00:07:00  00:03:00
10.S3a-2b    00:07:00  00:03:00
11.S3i-3h    00:11:00  00:03:00
12.S2b-3c    00:11:00  00:03:00
13.K5i-6h    00:12:00  00:03:00
14.S7a-6b    00:12:00  00:04:00
15.P3g-3f    00:13:00  00:04:00
16.P6c-6d    00:13:00  00:04:00
17.S3h-3g    00:15:00  00:04:00
18.S6b-6c    00:15:00  00:04:00
19.S3g-4f    00:16:00  00:04:00
20.S6c-5d    00:16:00  00:04:00
21.P3f-3e    00:16:00  00:04:00
22.P3dx3e    00:16:00  00:05:00
23.S4fx3e    00:16:00  00:05:00
24.P8d-8e    00:16:00  00:05:00
25.K6h-7i    00:19:00  00:05:00
26.P8e-8f    00:19:00  00:10:00
27.P8gx8f    00:19:00  00:10:00
28.R8bx8f    00:19:00  00:10:00
29.P2e-2d    00:19:00  00:10:00
30.P2cx2d    00:19:00  00:10:00
31.B*7g      00:19:00  00:10:00
32.R8f-8b    00:19:00  00:11:00

33.S3ex2d    00:19:00  00:11:00

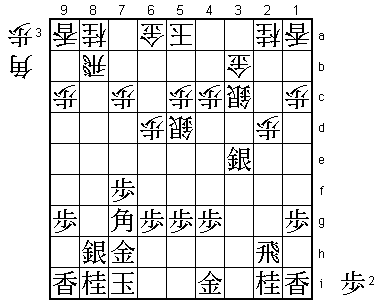
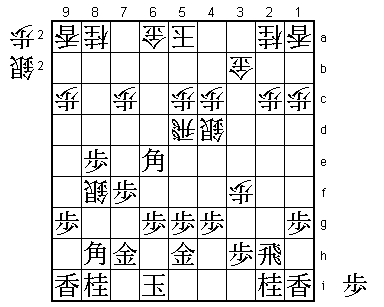
This position has been played before. The most famous game was the game to decide
the challenger of this Kisei tournament between Inaba and Kimura, which was played
in May. Rookie Inaba had beaten a number of top professionals like Fujii and
Tanigawa (twice), but came up short on the final hurdle. In that game, Inaba
attacked strongly with 33.P*3d S2b P*2c Gx2c Sx2d Gx2d P*8c R6b Rx2d, but after
Kimura showed why he is considered one of the best defenders in the game by playing
S*4d next, after black doesn't have a good move to continue the attack. Kimura took
over from there and won the game to become Kisei challenger. Habu plays the more
conventional 33.Sx2d here, but Kimura has prepared something special.

34.S3cx2d    00:19:00  00:22:00
35.R2hx2d    00:19:00  00:22:00
36.P*2c      00:19:00  00:22:00
37.R2d-2h    00:19:00  00:22:00
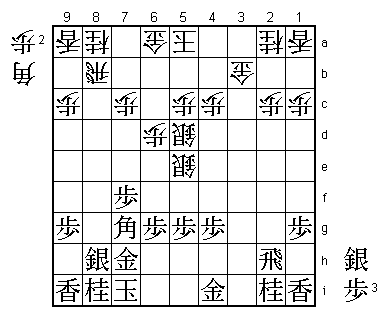
38.S*5e!     00:19:00  00:27:00

This is probably a move that only Kimura can find. It was played after only 5
minutes of thought, so definitely a prepared move. At first glance, it seems like
this move neither works in attack nor in defense, so it looks pretty useless.
The reason Kimura looked for an alternative in this position is that he didn't
like the move 38.P*3c, which had been played previously in this position. Kimura
wants to use this pawn elsewhere, which means that the bishop diagonal has to
be closed in a different way. 38.S*5e is a hard move to find, but it is not so
easy for black to find a good move against it. For example, after 39.P5f, white
just calmly plays 40.S4d and black has a big weakness on the fifth file. If black
doesn't do anything, white can play P6e next to put pressure on the black position.

39.G4i-5h    00:48:00  00:27:00

Habu strengthens the center, which is probably the best move here.

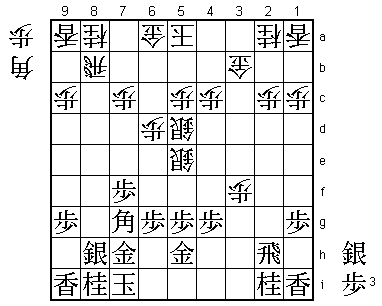
40.P*3f      00:48:00  00:54:00

The reason why Kimura didn't want to play 38.P*3c.

41.P*3h?!    01:46:00  00:54:00

It is uncharacteristic for Habu to play a defense-only move and after the game he
said that he regretted this decision, because it left him without attacking options.
Habu said he should have played 41.S*3d here. Kimura had planned to answer this with
42.B*2d after which black can play 43.R2f and defend against the threat P3g+. After
that, white seems to have no good moves to continue. However, in the post-mortem
analysis 42.P3g+ Nx3g P*3f N4e P3g+ R2f Sx4e Sx4e N3c was discovered. This leads
to a very sharp position, but no variations were found that lead to a good position
for black. Still, this might have been a better fighting chance than the
negative 41.P*3h.

42.P6d-6e    01:46:00  01:31:00
43.P*8c      02:07:00  01:31:00
44.R8bx8c    02:07:00  01:37:00
45.P*2b      02:07:00  01:37:00
46.G3bx2b    02:07:00  02:02:00
47.S*6d      02:08:00  02:02:00

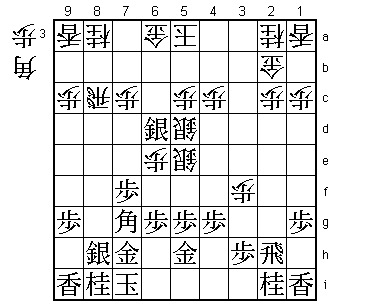
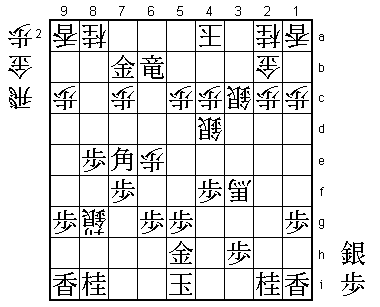
It looks like white is in trouble here, because 48.Sx6d is answered by Bx2b+ and
48.S4d by Sx5c+, but white has a very good counter here.

48.B*4d!     02:08:00  02:05:00

This defends against the black threats, but it needed some careful calculation.

49.S6dx5e    02:09:00  02:05:00
50.S5dx5e    02:09:00  02:05:00
51.S*4e      02:09:00  02:05:00
52.S*8f!     02:09:00  02:08:00

The white bishop on 4d is lost, but Kimura has judged correctly that this is only
temporarily and that the attack on the 8th file is decisive.

53.S4ex4d    02:18:00  02:08:00
54.S5ex4d    02:18:00  02:09:00
55.B*5f      02:19:00  02:09:00
56.P*8g      02:19:00  02:40:00
57.B5fx6e    02:21:00  02:40:00
58.R8c-8d    02:21:00  02:43:00
59.P*8e      03:12:00  02:43:00
60.P8gx8h+   03:12:00  02:48:00
61.B7gx8h    03:12:00  02:48:00
62.R8d-5d    03:12:00  02:55:00
63.K7i-6i    03:23:00  02:55:00
64.G2b-3b    03:23:00  03:07:00

Typical Kimura move. Instead of a risky attack to cash in his advantage as quickly
as possible, he takes the time to improve his position. If black doesn't act, white
can just keep improving its position, so Habu is forced into a desperate attack.

65.P*2d      03:27:00  03:07:00
66.P2cx2d    03:27:00  03:17:00
67.R2hx2d    03:29:00  03:17:00

Here 67.Bx5d Px5d Bx4d Px4d Rx2d looks like a strong attacking option, but it is
answered by P*2c Rx4d S*4c R4e B*3c R*8b B*7b and black cannot break through.

68.P*2c      03:29:00  03:17:00
69.R2d-3d    03:29:00  03:17:00
70.S*3c      03:29:00  03:27:00
71.R3dx3f    03:29:00  03:27:00

Or 71.Bx5d Px5d R3f S*8g Gx8g Sx8g+ B6f and white can play moves like B*8f, S*3e
(Rx3e B*2f) or S*4e and in each case black seems to have a bad position. From here
on, Habu desperately tries to make something out of nothing, but Kimura is like a
fish in the water in positions where the opponent only has a desperate attack which
will lead to nothing if properly defended.

72.R5d-6d    03:29:00  03:29:00
73.B6e-8c+   03:29:00  03:29:00
74.S*8g      03:29:00  03:31:00
75.G7hx8g    03:30:00  03:31:00
76.S8fx8g+   03:30:00  03:31:00
77.B8h-6f    03:30:00  03:31:00
78.R6d-6b    03:30:00  03:31:00
79.P*2b      03:33:00  03:31:00
80.G3bx2b    03:33:00  03:31:00
81.K6i-5i    03:33:00  03:31:00
82.K5a-4b    03:33:00  03:36:00
83.P4g-4f    03:36:00  03:36:00
84.P*6e      03:36:00  03:37:00
85.B6f-7e    03:36:00  03:37:00
86.G6a-7b    03:36:00  03:37:00
87.+B8cx7b   03:36:00  03:37:00
88.R6bx7b    03:36:00  03:37:00
89.G*6c      03:36:00  03:37:00
90.B*2g      03:36:00  03:39:00
91.G6cx7b    03:36:00  03:39:00
92.B2gx3f+   03:36:00  03:39:00
93.R*6b      03:36:00  03:39:00
94.K4b-3a    03:36:00  03:46:00
95.R6b-6a+   03:37:00  03:46:00
96.K3a-4b    03:37:00  03:48:00
97.+R6a-6b   03:44:00  03:48:00
98.K4b-4a    03:44:00  03:49:00
Resigns      03:48:00  03:49:00

Of course 99.+R6a is followed by 100.K4b and black loses because of the illegal
perpetual check. However, there is nothing else because white is threatening mate
with R*7i S*6i G*4i etc. and there is no proper defense against this threat. Kimura
had lost eight title match games in a row (the Ryu-O match against Watanabe in
2005 ended 4-0 and last year's Oza match against Habu finished 3-0 and the first
game of this Kisei match was also a loss), but now he finally wins a game at the
big stage. Hopefully for him, this is a psychological breakthrough that will give
him the momentum to take the Kisei title from Habu.
