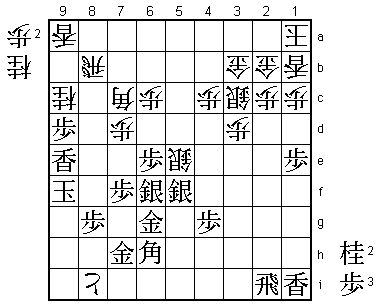
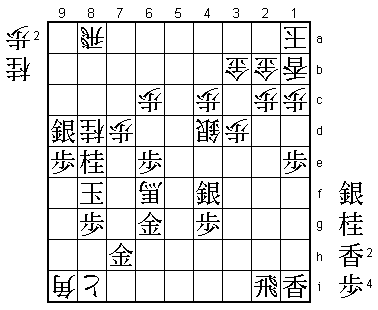
80th Kisei Match Game 1
[Black "Kimura Kazuki, Challenger"]
[White "Habu Yoshiharu, Kisei"]
[Event "80th Kisei-sen, Game 1"]
[Date "June 9th 2009"]
1.P7g-7f     00:00:00  00:00:00
2.P8c-8d     00:00:00  00:01:00
3.S7i-6h     00:01:00  00:01:00
4.P3c-3d     00:01:00  00:02:00
5.P6g-6f     00:03:00  00:02:00
6.S7a-6b     00:03:00  00:02:00
7.P5g-5f     00:03:00  00:02:00
8.P5c-5d     00:03:00  00:03:00
9.S3i-4h     00:03:00  00:03:00
10.S3a-4b    00:03:00  00:04:00
11.G4i-5h    00:03:00  00:04:00
12.G4a-3b    00:03:00  00:06:00
13.G6i-7h    00:03:00  00:06:00
14.K5a-4a    00:03:00  00:08:00
15.K5i-6i    00:03:00  00:08:00
16.P7c-7d    00:03:00  00:09:00
17.G5h-6g    00:05:00  00:09:00
18.S6b-5c    00:05:00  00:12:00
19.P2g-2f    00:11:00  00:12:00
20.P8d-8e    00:11:00  00:13:00
21.S6h-7g    00:11:00  00:13:00
22.P5d-5e    00:11:00  00:14:00

Typical Habu. This opening was played by Watanabe twice in last year's Ryu-O match
which Habu famously lost after taking a 3-0 lead. Most players would do anything to
avoid such painful memories, but Habu just plays it himself. He actually intended
to play this against Watanabe in the final game of the Oi league, but Watanabe avoided
this opening. Habu eventually lost this game, which means that he is currently on a
four game losing streak in big games (two Meijin games, the final of the first Ryu-O
group and the final game of the Oi league). Time to get back to form or we will be
talking about a Habu slump soon... It seemed like Habu couldn't care less, as he
obviously seemed to enjoy himself playing this attacking system against the best
defender in the game. He even smiled a couple of times during the opening stage of
this game, which is highly unusual in a title match game.

23.P5fx5e    00:19:00  00:14:00
24.B2bx5e    00:19:00  00:14:00
25.P2f-2e    00:34:00  00:14:00
26.S4b-3c    00:34:00  00:16:00
27.P6f-6e    00:44:00  00:16:00
28.B5e-7c    00:44:00  00:22:00
29.S7g-6f    00:47:00  00:22:00
30.B7c-8d    00:47:00  00:28:00
31.S4h-5g    00:48:00  00:28:00

Kimura of course knows all the ins and outs of this opening system. He even has a
column in Shukan Shogi in which he used this opening as an example. He recommended
to play the right silver up to 5g as fast as possible and in this game he shows
that he was not holding anything back.

32.K4a-3a    00:48:00  00:42:00
33.P9g-9f    01:06:00  00:42:00
34.G6a-5b    01:06:00  00:48:00
35.S5g-5f    01:07:00  00:48:00
36.G5b-4b    01:07:00  01:05:00
37.B8h-7i    01:14:00  01:05:00
38.K3a-2b    01:14:00  01:12:00
39.B7i-4f    01:18:00  01:12:00
40.B8d-7c    01:18:00  01:25:00
41.P*5e      01:20:00  01:25:00
42.P8e-8f    01:20:00  01:28:00
43.P8gx8f    01:21:00  01:28:00
44.R8bx8f    01:21:00  01:28:00
45.K6i-7i    01:21:00  01:28:00
46.S5c-4d    01:21:00  01:37:00
47.P3g-3f    01:48:00  01:37:00
48.L1a-1b    01:48:00  01:40:00
49.N2i-3g    01:50:00  01:40:00
50.K2b-1a    01:50:00  01:40:00
51.P*8g      02:12:00  01:40:00
52.R8f-8d    02:12:00  01:47:00
53.K7i-8h    02:13:00  01:47:00
54.P9c-9d    02:13:00  01:48:00

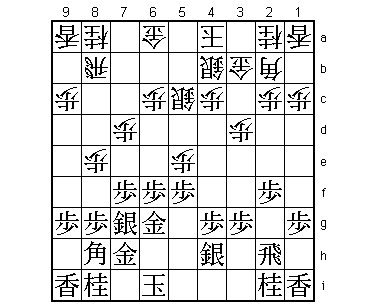
White has moved into an Anaguma formation, but Habu has a serious problem here: no
long term strategy. The black center is very powerful and impossible to attack with
the two silvers and bishop placed perfectly. Habu had already realized that he would
run out of moves after completing the Anaguma and admitted that the opening had ended
in a strategic defeat. He should have tried something earlier to have some attacking
options.

55.N3g-4e    02:17:00  01:48:00
56.S3c-2b    02:17:00  01:51:00
57.P2e-2d    02:17:00  01:51:00
58.P2cx2d    02:17:00  01:52:00
59.R2hx2d    02:17:00  01:52:00
60.P*2c      02:17:00  02:02:00
61.R2d-2i    02:17:00  02:02:00
62.G4b-4a    02:17:00  02:04:00
63.P1g-1f    02:22:00  02:04:00
64.G4a-3a    02:22:00  02:06:00
65.P1f-1e    02:26:00  02:06:00
66.P*8f      02:26:00  02:17:00
67.P8gx8f    02:26:00  02:17:00
68.R8dx8f    02:26:00  02:17:00
69.P*8g      02:26:00  02:17:00
70.R8f-8d    02:26:00  02:17:00

Now it is clear to everybody that white is in trouble. There are no moves to improve
the position, so Habu just plays a useless exchange of rook pawns.

71.P3f-3e    02:42:00  02:17:00

Kimura is of course very happy with his position and starts the attack.

72.S4dx3e    02:42:00  02:44:00

An awkward position for the silver, but after 72.Px3e P5d Bx4f Px4f P*5e S6fx5e
Sx5e Sx5e and P*3c next is very strong so black is better here.

73.P*3c      02:50:00  02:44:00

Well timed pawn drop. After this black has both the option of taking the silver
on 3e or moving the bishop, depending on white's reply.

74.N2ax3c    02:50:00  02:45:00
75.N4ex3c+   02:50:00  02:45:00
76.S2bx3c    02:50:00  02:45:00

77.B4f-6h?!  02:50:00  02:45:00

This is the type of move that Kimura likes. Giving the opponent the right to move
in a position where a lot of his pieces are in an awkward position is a high class
technique that Kimura plays to perfection. However, in this position it is not the
best way to continue. As Fujii pointed out, when playing the Anaguma it is best to
keep attacking as strongly as possible. He suggested 77.Bx3e Px3e N5c+ and the
head of the knight is a gaping hole. If white tries to defend this with P7e then
S5d is good for black.

78.G3a-2b    02:50:00  02:55:00
79.S5f-4e?   02:52:00  02:55:00

This is the second time Kimura hands over the initiative, but now it is clearly a
mistake. Correct was 79.N*2e S3c-2d Nx1c+! Sx1c S4e which was still good for black.
After Sx3d next, the silver on 3e is hanging. 79.S4e is a powerless move and this
silver actually will be attacked by the defending silver later. It is hard to
criticize someone for playing the way he has been very successful with, but as
Fujii put it: "I would have liked to see Kimura play a little differently here
than he normally does."

80.P9d-9e    02:52:00  02:58:00

Habu starts the counter attack and even though the position is very close, it must
have been a great relief for him to play something positive instead of a waiting
game. On the other hand, as much as he likes to defend, it must have been hard for
Kimura to change his mindset from crushing his opponent to fighting to survive.

81.P9fx9e    02:57:00  02:58:00
82.P*9h      02:57:00  02:58:00
83.L9ix9h    02:58:00  02:58:00
84.P*9g      02:58:00  02:58:00
85.L9hx9g    02:59:00  02:58:00
86.R8d-8b!   02:59:00  02:58:00

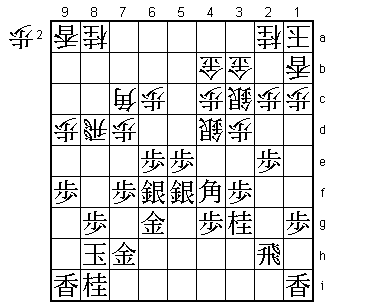
Doesn't look like much, but this rook is clearing the square 8d for a knight drop
and defends sideways at the same time.

87.P9e-9d    03:14:00  02:58:00

Kimura shows why he is considered the best defender in shogi nowadays. This move
creates space for the lance to escape. It is not easy to get to the black king...

88.P*9f      03:14:00  03:04:00
89.L9gx9f    03:14:00  03:04:00
90.N*8d      03:14:00  03:04:00
91.L9f-9e    03:16:00  03:04:00
92.N8d-9f    03:16:00  03:04:00
93.K8h-9g    03:27:00  03:04:00
94.P*8h      03:27:00  03:05:00
95.P9d-9c+   03:27:00  03:05:00
96.N8ax9c    03:27:00  03:11:00
97.P*9d      03:27:00  03:11:00
98.P8hx8i+   03:27:00  03:19:00
99.K9gx9f    03:27:00  03:19:00
100.S3e-4d   03:27:00  03:29:00
101.S4e-5f   03:31:00  03:29:00
102.S4dx5e!  03:31:00  03:43:00

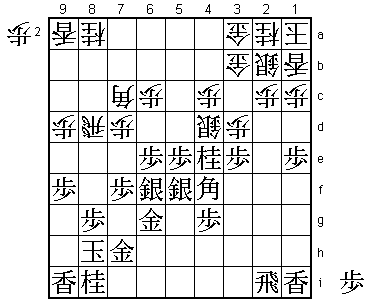
This aims at getting a silver in hand to drop on 8e.

103.P9dx9c+? 03:41:00  03:43:00

Atypical mistake in defense by Kimura. After 103.S5fx5e Bx5e P8f things would still
not have been easy. After 103.Px9c+ the black position is no longer defendable, even
though it still takes some time to catch the black king.

104.B7cx9e   03:41:00  03:50:00
105.B6hx9e   03:49:00  03:50:00
106.L9ax9c   03:49:00  03:50:00
107.B*7c     03:49:00  03:50:00
108.R8b-8c   03:49:00  03:51:00
109.N*8e     03:49:00  03:51:00
110.S5ex6f   03:49:00  03:51:00
111.G6gx6f   03:51:00  03:51:00
112.L*9b     03:51:00  03:52:00
113.N8ex9c+  03:56:00  03:52:00
114.S*8e     03:56:00  03:52:00
115.K9f-9g   03:56:00  03:52:00
116.L9bx9c   03:56:00  03:52:00
117.P*9f     03:57:00  03:52:00
118.R8cx7c   03:57:00  03:52:00
119.N*7g     03:57:00  03:52:00
120.L9cx9e   03:57:00  03:54:00
121.N7gx8e   03:57:00  03:54:00
122.R7c-8c   03:57:00  03:54:00
123.S*9d     03:57:00  03:54:00
124.R8c-8a   03:57:00  03:54:00
125.P9fx9e   03:58:00  03:54:00
126.B*4h     03:58:00  03:55:00
127.G6f-6g   03:58:00  03:55:00
128.P*9f     03:58:00  03:56:00
129.K9gx9f   03:58:00  03:56:00
130.N*8d     03:58:00  03:57:00
131.K9f-8f   03:58:00  03:57:00
132.N8dx7f   03:58:00  03:57:00
133.K8fx7f   03:58:00  03:57:00
134.P*5e     03:58:00  03:57:00
135.S5fx5e   03:58:00  03:57:00
136.B*9i     03:58:00  03:57:00
137.N*6f     03:58:00  03:57:00
138.S3c-4d   03:58:00  03:57:00
139.S5e-4f   03:58:00  03:57:00
140.N*8d     03:58:00  03:57:00
141.K7f-8f   03:58:00  03:57:00
142.B4hx6f+  03:58:00  03:57:00
Resigns      03:59:00  03:57:00

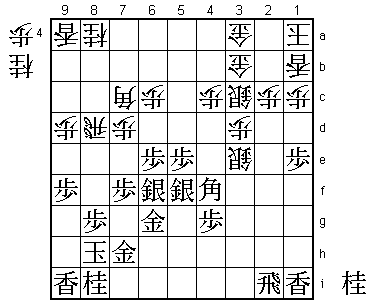
This threatens mate with +B7e but if black defends 7e then +Bx6g Gx6g G*9f is mate.
Of course 143.Gx6f Bx6f+ is hisshi. Since there is not even a check against the white
king, Kimura resigned here. Tough loss with the black pieces after the opening gave
him everything he could wish for. Kimura already desperately needs a win with the
white pieces in game two to stay in this match.
