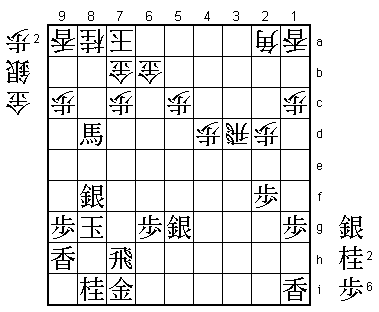
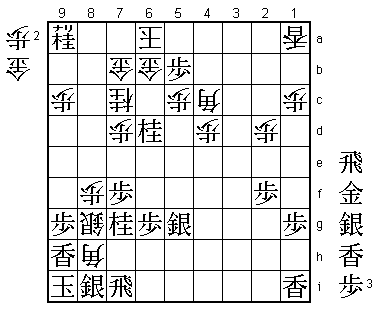
79th Kisei Match Game 5
[Black "Sato Yasumitsu, Kisei"]
[White "Habu Yoshiharu, Challenger"]
[Event "79th Kisei-sen, Game 5"]
[Date "July 18th 2008"]
1.P7g-7f     00:00:00  00:00:00

Both players pretended to have no interest for the pawn toss, but I am sure both
liked to have the black pieces in this decisive game. The result of the furigoma
was four pawns, so Kisei Sato started the game.

2.P3c-3d     00:00:00  00:01:00
3.P2g-2f     00:01:00  00:01:00
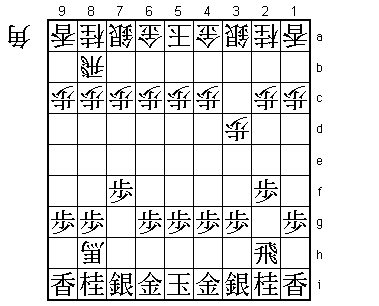
4.B2bx8h+!?  00:01:00  00:02:00

Already very positive play by Habu. The Kakugawari with tempo loss is of course
a very popular opening, but it is usually played after white forces the black
rook pawn to 2e (for an example we need to look no further than the fourth game
of this Kisei match where Habu played 4.P9d P2e Bx8h+). The point is then that
white hasn't moved the pawn in front of the rook yet, while black has committed
himself, which sometimes is compensation for losing a move through the bishop
exchange. Habu plays the bishop exchange immediately, thus forfeiting this attempt
at compensation, but he has another interesting idea.

5.S7ix8h     00:01:00  00:02:00
6.S3a-4b     00:01:00  00:02:00
7.S8h-7g     00:01:00  00:02:00
8.S4b-3c     00:01:00  00:02:00
9.S3i-3h     00:09:00  00:02:00
10.R8b-2b    00:09:00  00:06:00

Habu's idea is that this opposing rook strategy is better without 4.P9d P2e as we
will see next.

11.B*6e      00:21:00  00:06:00
12.B*7d      00:21:00  00:08:00

The point of Habu's idea is that if black plays 12.Bx4c+ white can play 13.G4a-5b
and after +Bx5b Rx5b, the gold is still on 6a, so it is easy for white to castle
there. If the pawn was on 2e instead of on 2f, white cannot answer Bx4c+ with G4a-5b
because of P2d Px2d P*2c Rx2c +B3b. Therefore, white has to play G6a-5b after Bx4c+,
which makes it much more difficult to find a safe spot for the king.

13.B6ex7d    00:21:00  00:08:00

Sato agrees with Habu and decides to settle for a slow game.

14.P7cx7d    00:21:00  00:08:00
15.P4g-4f    00:21:00  00:08:00
16.K5a-6b    00:21:00  00:11:00
17.S3h-4g    00:22:00  00:11:00
18.G4a-5b    00:22:00  00:13:00
19.K5i-6h    00:38:00  00:13:00
20.P2c-2d    00:38:00  00:18:00
21.K6h-7h    00:39:00  00:18:00
22.P6c-6d    00:39:00  00:18:00
23.K7h-8h    00:42:00  00:18:00
24.S7a-7b    00:42:00  00:19:00
25.L9i-9h    00:45:00  00:19:00
26.K6b-7a    00:45:00  00:19:00
27.G6i-7i    00:47:00  00:19:00
28.S3c-4d    00:47:00  00:28:00
29.K8h-9i    00:50:00  00:28:00
30.N2a-3c    00:50:00  00:38:00
31.S7g-8h    00:50:00  00:38:00
32.B*6e      00:50:00  00:44:00
33.S4g-5f    00:59:00  00:44:00
34.B6ex7f    00:59:00  00:46:00
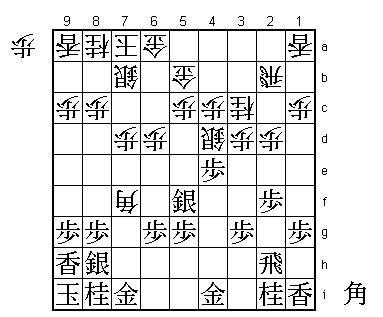
35.P4f-4e?   01:34:00  00:46:00

After the game Sato admitted that he was very unhappy about this move. He even said
it may have been the losing move. That seems an exaggeration considering what follows,
but it is clearly a mistake. Sato counted on 36.Sx4e after which 37.Sx4e Bx6g+ B*5f
+Bx4i Sx3d is good for black. Had Sato realized what was coming next, he would have
played 35.G5h and after 36.B5d P4e Nx4e S5e is good for black because after Sx5e he
can play B*3c R2a Bx5e+.

36.N3cx4e!   01:34:00  00:48:00

The point is that this knight supports an attack on the third file that Sato
underestimated.

37.G4i-5h    01:34:00  00:48:00
38.P3d-3e    01:34:00  01:06:00
39.G5h-6h    01:52:00  01:06:00
40.N4ex3g+   01:52:00  02:28:00
41.N2ix3g    01:54:00  02:28:00
42.P3e-3f    01:54:00  02:28:00
43.G6h-6i!   02:10:00  02:28:00

Sato fights back strongly. This gold makes room for a rook switch to 7h.

44.P3fx3g+   02:10:00  02:32:00
45.R2h-7h    02:10:00  02:32:00
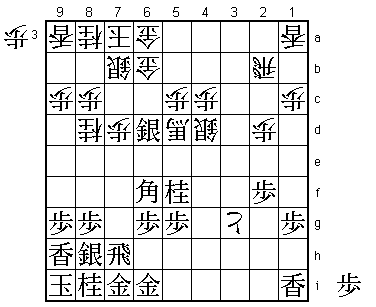
46.N*8d!     02:10:00  02:45:00

Habu realizes that the undefended pawns on 6d and 7d are an important weakness
and that after 46.B5d N*6f followed by Nx7d is a very strong attack. He therefore
decides to keep the bishop on 7f to block the rook.

47.B*6f      02:21:00  02:45:00
48.B7f-5d    02:21:00  02:53:00
49.S5f-5e    02:24:00  02:53:00
50.B5d-2g+   02:24:00  02:53:00
51.S5ex6d    02:29:00  02:53:00
52.+B2g-5d   02:29:00  02:56:00
53.N*5f      02:41:00  02:56:00
54.G5b-6b!   02:41:00  03:00:00

This is another great move by Habu that is not easy to find. It adds defence to
the vital point 7c, but just as important is that it moves the gold away from
being attack after Nx4d next. If black plays Nx4d now, white can just ignore it
and take the silver with +Bx6d.

55.P*3d!     03:05:00  03:00:00

Sato has a good counter. This forces the rook to 3b, where it will be attacked
after the knight takes on 4d. Still, the rook on 3b threatens to take the pawn
on 3d any time, so this adds urgency to the black attack.

56.R2b-3b    03:05:00  03:06:00
57.N5fx4d    03:05:00  03:06:00
58.P4cx4d    03:05:00  03:07:00
59.S6d-5e    03:06:00  03:07:00

Or 59.Rx7d +B6e S7e N*7f S7g Rx3d R6d +B3b and black cannot break through.

60.+B5d-6e   03:06:00  03:08:00
61.S*5f      03:08:00  03:08:00
62.+B6ex6f   03:08:00  03:13:00
63.S5ex6f    03:08:00  03:13:00
64.R3bx3d    03:08:00  03:15:00
65.S5f-6e    03:08:00  03:15:00
66.+P3g-4g   03:08:00  03:20:00
67.S6ex7d    03:13:00  03:20:00
68.P*7c      03:13:00  03:23:00
69.S7dx8c+   03:13:00  03:23:00
70.S7bx8c    03:13:00  03:23:00
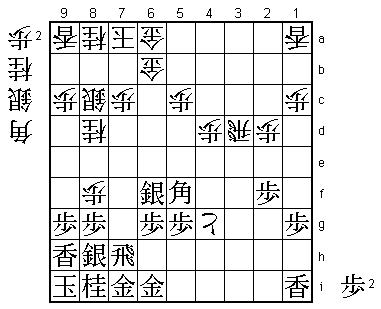
71.B*5f      03:13:00  03:23:00

Sato thought his position was better here. Black has exchanged the strong promoted
bishop and has managed to activate the silver to the point where it has opened up
the white castle on 8c. On top of that 71.B*5f is a fork where taking either the
silver on 8c or the rook on 3d is good for black. Sato must have been very surprised
by Habu's next move...

72.P*8f!!    03:13:00  03:23:00

The weak point of the Anaguma is point 8g, but to go for that while ignoring a fork
requires a lot of courage. Habu has seen (probably already a long time ago) that when
he opens up 8g, he can drag the bear out of its hole where it will be much easier to
attack.

73.B5fx8c+?  03:52:00  03:23:00

Sato was so impressed with 72.P*8f that he cannot think clearly anymore. Habu was far
from convinced that 72.P*8f would give him a clear advantage. Here he feared 73.S7e
B*4c Bx8c+ G6a-7b +Bx8d Px8g+ Sx8g P*8f S7ex8f! (not possible in the game) Bx8g+ P*8b
and both players seem to have a strong attack here. Also, 73.R7g B*4c Bx8c+ G6a-7b
+Bx8d Px8g+ Rx8g is not so clear.

74.G6a-7b    03:52:00  03:28:00
75.+B8cx8d   03:52:00  03:28:00
76.P8fx8g+   03:52:00  03:28:00
77.S8hx8g    03:52:00  03:28:00
78.P*8f      03:52:00  03:29:00
79.S8gx8f    03:52:00  03:29:00
80.N*8g      03:52:00  03:37:00
81.K9i-8h    03:52:00  03:37:00
82.N8gx7i+   03:52:00  03:37:00
83.G6ix7i    03:52:00  03:37:00
84.+P4gx5g   03:52:00  03:37:00
85.S6fx5g    03:59:00  03:37:00
86.P*8g      03:59:00  03:38:00
87.K8hx8g    03:59:00  03:38:00
88.B*2a!     03:59:00  03:38:00

Subtle play. Habu has a reason for not dropping this bishop closer to the king. Why
88.B*4c was bad will become clear later.

89.P*7f?     03:59:00  03:38:00

If Sato would have realized why it was important to get the white bishop on 4c
instead of 2a, he would have played 89.P*4c here. This forces 90.Bx4c which makes
a big difference later on.

90.G*7d      03:59:00  03:38:00
91.N*8c      03:59:00  03:38:00
92.K7a-6a    03:59:00  03:39:00
93.+B8dx7d   03:59:00  03:39:00
94.P7cx7d    03:59:00  03:39:00
95.N8cx9a+   03:59:00  03:39:00
96.P*8e      03:59:00  03:41:00
97.S8f-7g    03:59:00  03:41:00
98.N8a-7c    03:59:00  03:44:00
99.P*4c      03:59:00  03:44:00

Now Sato realizes how good it would have been to have the white bishop on 4c. If
so, black would have had some strong attacking options like N*5e or G*4b. Sato
tries to repair the damage, but it is too late.

100.S*8f!    03:59:00  03:50:00

Habu ignores the pawn on 4c until it can no longer be answered by N*5e. Black
doesn't get another chance to turn the tables.

101.K8g-8h   03:59:00  03:50:00
102.S8fx7g+  03:59:00  03:50:00
103.N8ix7g   03:59:00  03:50:00
104.P8e-8f   03:59:00  03:50:00
105.N*6d     03:59:00  03:50:00
106.B2ax4c   03:59:00  03:52:00
107.S*8i     03:59:00  03:52:00
108.R3d-3i+  03:59:00  03:52:00
109.P*5b     03:59:00  03:52:00
110.S*8g     03:59:00  03:52:00
111.K8h-9i   03:59:00  03:52:00
112.+R3ix7i  03:59:00  03:52:00
113.R7hx7i   03:59:00  03:52:00
114.B*8h     03:59:00  03:52:00
Resigns      03:59:00  03:52:00

A very straightforward mate after 115.Sx8h Sx8h+ Kx8h G*8g K8i S*8h. Sato started
this Kisei match in great form, winning the first two games, but Habu came storming
back to take the remaining three to take the Kisei title from Sato. A little bit
of revenge for the Kio match which also went the full five games, but in which
Sato won the decisive game. Habu wins his first Kisei title in eight years and
holds four major titles at the same time after almost two and a half years. With
the majority of titles in his possession and challenging for the Oi title against
Fukaura, there is a buzz starting about Habu making another run at holding all
seven crowns.
