79th Kisei Match Game 4
[Black "Sato Yasumitsu, Kisei"]
[White "Habu Yoshiharu, Challenger"]
[Event "79th Kisei-sen, Game 4"]
[Date "July 8th 2008"]
1.P7g-7f     00:00:00  00:00:00
2.P3c-3d     00:00:00  00:00:00
3.P2g-2f     00:00:00  00:00:00
4.P9c-9d     00:00:00  00:00:00
5.P2f-2e     00:02:00  00:00:00
6.B2bx8h+    00:02:00  00:00:00
7.S7ix8h     00:02:00  00:00:00
8.S3a-2b     00:02:00  00:00:00

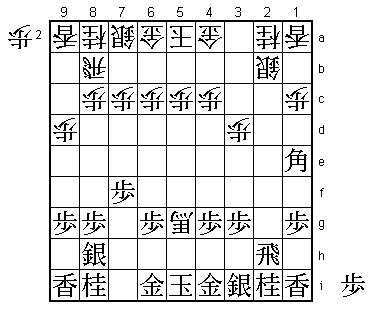
For Habu this is a very important game, as he must win with the white pieces to
force a deciding fifth game. His choice of opening should be no surprise. He has
played the position after 8.S2b seven times, winning three times with black and
four times with white. That is a pretty impressive record...

9.P2e-2d     00:05:00  00:00:00
10.P2cx2d    00:05:00  00:01:00
11.R2hx2d    00:05:00  00:01:00
12.B*3e      00:05:00  00:04:00
13.R2d-2h    00:05:00  00:04:00
14.B3ex5g+   00:05:00  00:04:00
15.B*1e      00:05:00  00:04:00

It looks like the position is already on fire, but there are actually two ways
of playing here for white. The quiet way of playing is 16.P*2d Bx2d +Bx2d Rx2d
B*5g R2h G3b which Habu played in June 2004 in the Oi challenger play-off against
Yamasaki. Habu won that game, but black gets two pawns for the white promotion
of the bishop, so the position is unclear.

16.N2a-3c    00:05:00  00:06:00

Habu doesn't hold back and plays the sharpest variation.

17.R2hx2b+   00:06:00  00:06:00
18.R8bx2b    00:06:00  00:06:00
19.B1ex3c+   00:06:00  00:06:00
20.R2b-4b    00:06:00  00:06:00
21.G6i-5h    00:07:00  00:06:00
22.+B5g-3e   00:07:00  00:06:00
23.+B3cx1a   00:07:00  00:06:00

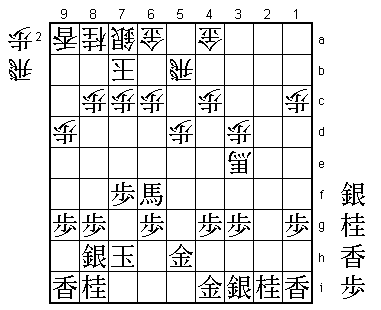
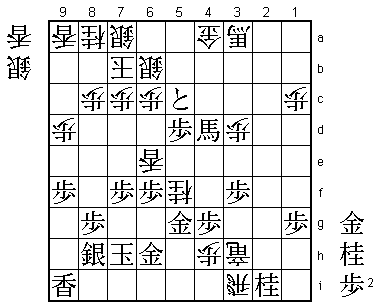
If we count the material here, white has no less than three pieces for the rook
(a silver, lance and knight). A famous shogi proverb says: "Always take two pieces
for a major piece, even if one of them is a pawn". So if two-for-one is an advantage,
a three-for-one exchange is definitely good. However, this is one of those exceptional
positions where things are not so easy. Why this is so will become clear a little later.

24.K5a-6b    00:07:00  00:06:00
25.K5i-6i    00:21:00  00:06:00
26.K6b-7b    00:21:00  00:12:00
27.K6i-7h    00:24:00  00:12:00
28.R4b-5b    00:24:00  00:18:00
29.+B1a-6f   00:37:00  00:18:00
30.P5c-5d    00:37:00  00:19:00

Now we can see a little better why the three-for-one exchange is not necessarily
good for black. The point of this position is that white has no inactive pieces,
while black has trouble activating the gold, silver, knight and lance on the right.
Sato was counting on the fact that with three pieces in hand there would surely be
some place to drop them, but this turns out not to be the case.

31.N8i-7g    00:56:00  00:19:00

Maybe Sato counted on being able to play 31.+B6e here. However, after the simple reply
32.G6b it is not so easy to find a good attacking plan. For example, 33.L*8f S8b
N*7e looks pretty threatening, but after Px7d +Bx7d G7c white can stop the black
attack.

32.G6a-6b    00:56:00  00:24:00
33.P9g-9f    01:09:00  00:24:00
34.P5d-5e    01:09:00  00:30:00
35.P3g-3f    01:13:00  00:30:00
36.+B3e-4d   01:13:00  00:50:00
37.G5h-6h    01:58:00  00:50:00
38.R5b-2b!   01:58:00  01:26:00

Sato didn't realize how strong this rook switch is until it is too late. Black cannot
prevent the promotion of this rook.

39.P*2h      01:58:00  01:26:00
40.P*2g      01:58:00  01:29:00
41.P2hx2g    01:59:00  01:29:00

The normal defence here would be 41.G3h, but after 42.Px2h+ Sx2h P5f! black is in
trouble. White threatens +Bx6f Px6f R*5i and after +Bx5f Rx2h+ Gx2h R*5i white is
threatening mate with S*8i and attacking the promoted bishop on 5f so white wins.

42.R2bx2g+   01:59:00  01:29:00
43.S3i-3h    01:59:00  01:29:00
44.+R2g-2h   01:59:00  02:08:00
45.+B6f-6e   02:29:00  02:08:00
46.+R2hx1i   02:29:00  02:13:00
47.L*4f      02:32:00  02:13:00
48.+B4d-2f   02:32:00  02:18:00
49.P*5d      02:34:00  02:18:00
50.L*6d      02:34:00  02:25:00
51.L4fx4c+   02:36:00  02:25:00
52.P*4h      02:36:00  02:32:00
53.G4i-5h    03:10:00  02:32:00
54.R*3i      03:10:00  02:49:00
55.P5d-5c+   03:14:00  02:49:00
56.G6bx5c    03:14:00  03:09:00
57.+B6ex5e   03:20:00  03:09:00
58.P*5g!     03:20:00  03:11:00

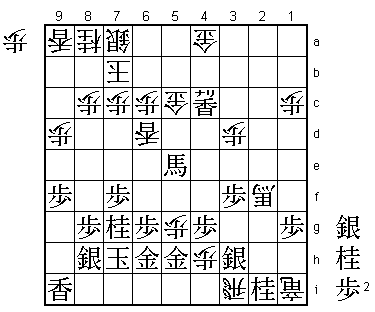
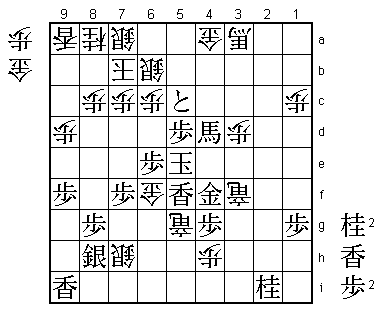
A strong pawn sacrifice to break the connection between the two defending golds.
Sato has worked hard to stay in the game, but admitted in the post-mortem analysis
that this was a very painful drop.

59.G5hx5g    03:20:00  03:11:00
60.+R1i-1h   03:20:00  03:11:00
61.+L4cx5c   03:20:00  03:11:00
62.+B2fx5c   03:20:00  03:11:00
63.P*5d      03:20:00  03:11:00

With the promoted bishop on the centre square 5e combined with the attacking base
on 5d, it seems that Sato has managed to make a fight of it.

64.+B5c-3a!  03:20:00  03:11:00

But this is a very strong move which is easy to overlook because it moves the
bishop away from the defence and the bishop also has less mobility here. Habu
realized that it is important to keep the bishop on this diagonal, so that after
moving the lance on 6d, it can help in attack because it covers squares 8f and 9g.
Furthermore, by moving the bishop all the way back to 3a it is no longer vulnerable
to being attacked by black. Sato admitted after the game that he had the feeling
that he had clawed his way back into the game, but that after +B3a he lost confidence
in his position again.

65.+B5e-4d   03:42:00  03:11:00
66.+R1hx3h   03:42:00  03:25:00
67.N7g-6e    03:43:00  03:25:00

Sato's last try.

68.P*5b!     03:43:00  03:29:00

Habu doesn't fall for it. It is very tempting to take the knight, because after
68.Lx6e, the promoted bishop on 3a is looking straight into the black king position
as intended. Furthermore, 68.Lx6e is actually a mating threat: S*8i K7g N*8e etc.
However, Habu saw that after 68.Lx6e black has the nasty 69.P5c+!, which defends
against the mating threat and after +Bx5c +Bx5c black has a mating threat with
N*6d Px6d S*6c against which there is no good defence, so black wins. The reason
why 68.P*5b is a perfect defence becomes clear after 69.P5c+ Px5c Nx5c+. This looks
very similar to the position before, but after +Bx5c +Bx5c +Rx2i black no longer
has a mating threat because the white lance is still on 6d, thereby preventing a
knight drop on 6d. Black now loses because +Rx2i is a mating threat (R8i+ K7g N*7g
etc.) against which there is no proper defence. It is interesting the lance on 6d,
which white wanted to move quite badly to activate the promoted bishop, needs to
stay put for this variation to work.

69.P6g-6f    03:55:00  03:29:00

Or 69.Nx7c+ Nx7c N*7d L*5c! and the white attack is unstoppable.

70.S*6b      03:55:00  03:30:00
71.S*5c      03:59:00  03:30:00
72.P5bx5c    03:59:00  03:37:00
73.P5dx5c+   03:59:00  03:37:00
74.L6dx6e    03:59:00  03:37:00
75.P*5d      03:59:00  03:37:00
76.N*5f!     03:59:00  03:42:00

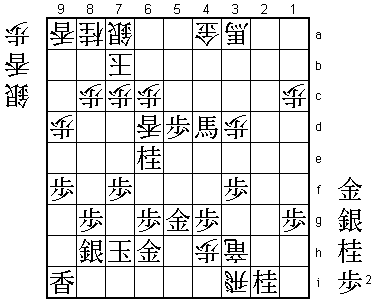
The decisive move. 76.Gx5f is answered by +Rx4g which is a mating threat while
threatening the promoted bishop on 4d at the same time. Therefore, black cannot
take this knight.

77.P6fx6e    03:59:00  03:42:00
78.N5fx6h+   03:59:00  03:49:00
79.K7hx6h    03:59:00  03:49:00
80.R3i-5i+   03:59:00  03:51:00

Again, black cannot take this rook because 80.Kx5i P4i+ leads to mate.

81.K6h-6g    03:59:00  03:51:00
82.+R3hx3f   03:59:00  03:51:00
83.G*4f      03:59:00  03:51:00
84.S*7h      03:59:00  03:52:00
85.K6g-6f    03:59:00  03:52:00
86.L*5e      03:59:00  03:52:00
87.K6fx5e    03:59:00  03:52:00
88.+R5ix5g   03:59:00  03:52:00
89.L*5f      03:59:00  03:52:00
90.G*6f      03:59:00  03:53:00
Resigns      03:59:00  03:53:00

A perfect hisshi. Black has the double mating threat +Rx5f Gx5f +Rx5f and Gx6e
Kx6e G*6d and the only defence against this double threat is 91.+B4e, but this
is mate after 92.+B2b. Sato therefore had nothing else but to resign here. Habu
wins the game with the white pieces and suddenly the Kisei match is level at 2-2
where Sato seemed to be cruising to a title defence after taking a 2-0 lead. The
all-deciding fifth game of the Kio match was won by Sato just a few months earlier.
Can he do it again in this Kisei title match?
