79th Kisei Match Game 3
[Black "Habu Yoshiharu, Challenger"]
[White "Sato Yasumitsu, Kisei"]
[Event "79th Kisei-sen, Game 3"]
[Date "July 2nd 2008"]
1.P7g-7f     00:00:00  00:00:00
2.P8c-8d     00:00:00  00:01:00
3.S7i-6h     00:01:00  00:01:00
4.P3c-3d     00:01:00  00:01:00
5.S6h-7g     00:01:00  00:01:00
6.S7a-6b     00:01:00  00:03:00
7.P5g-5f     00:01:00  00:03:00
8.S3a-4b     00:01:00  00:03:00
9.S3i-4h     00:01:00  00:03:00
10.P5c-5d    00:01:00  00:03:00
11.G6i-7h    00:03:00  00:03:00
12.G6a-5b    00:03:00  00:06:00
13.K5i-6i    00:05:00  00:06:00
14.P4c-4d    00:05:00  00:07:00
15.G4i-5h    00:07:00  00:07:00
16.G5b-4c    00:07:00  00:07:00
17.B8h-7i    00:09:00  00:07:00
18.S4b-3c    00:09:00  00:07:00
19.P3g-3f    00:15:00  00:07:00
20.B2b-3a    00:15:00  00:07:00
21.S4h-3g    00:15:00  00:07:00
22.B3a-6d    00:15:00  00:11:00
23.P6g-6f    00:17:00  00:11:00
24.P7c-7d    00:17:00  00:15:00
25.G5h-6g    00:22:00  00:15:00
26.G4a-3b    00:22:00  00:15:00
27.B7i-6h    00:23:00  00:15:00
28.P9c-9d    00:23:00  00:16:00
29.K6i-7i    00:25:00  00:16:00
30.P9d-9e    00:25:00  00:16:00
31.K7i-8h    00:28:00  00:16:00
32.N8a-7c    00:28:00  00:17:00
33.P2g-2f    00:38:00  00:17:00
34.R8b-8a    00:38:00  00:20:00
35.P2f-2e    00:42:00  00:20:00

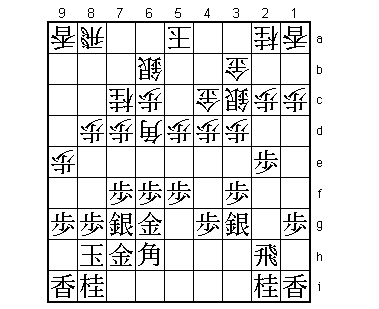
It was a little bit of a surprise to see Sato play the Yagura in this game. Of course,
he is one of the leading specialists in this opening, but the theory says that if the
Yagura is played with the white pieces, white has to put his king in a position that
is as safe as possible and wait for the black attack. The point of the game then
becomes if and how white handles the attack and can create counter chances. This
waiting game is not really Sato's style, so many wondered why he was playing passively
in this game. However, after seeing Sato's next move, this all changed...

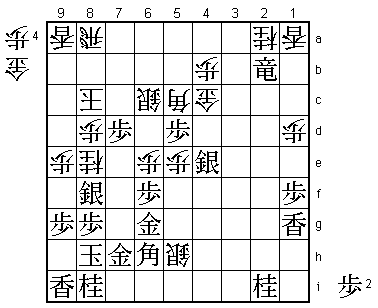
36.K5a-5b?!  00:42:00  00:29:00

This goes against all Yagura theory. Every beginner is taught that after preparing a
castle with S3c-G3b-G4c, it is vital to move the king into this castle. Here, Sato
defies this theory and dares Habu to attack his king in the centre. The idea of K5h
is not completely without precedent. Sometimes the king is moved to 5b when black is
threatening to play a bogin attack. The white king is first moved to 4a and as soon
as black is going for the bogin, the king moves away from the battle area with K4a-5b.
Sato actually has experience with this type of king manoeuvre, because he played it
in the first game of the 75th Kisei match against Moriuchi (a game Sato won). Compared
with this plan, white wins a move by playing K5b immediately instead of moving the king
first to 4a and then to 5b. Still, black has not committed to the bogin attack yet, so
this way of playing is very risky. In the press room there was admiration for Sato's
courage, but this game doesn't give any reason to rewrite the opening theory.

37.P1g-1f    00:46:00  00:29:00
38.P1c-1d    00:46:00  00:31:00
39.L1i-1g    00:53:00  00:31:00
40.B6d-5c    00:53:00  01:02:00
41.S3g-4f    01:37:00  01:02:00
42.P6c-6d    01:37:00  01:07:00
43.P3f-3e    01:45:00  01:07:00
44.S6b-6c    01:45:00  01:12:00
45.P3ex3d    02:02:00  01:12:00
46.S3cx3d    02:02:00  01:12:00
47.P*3e      02:09:00  01:12:00

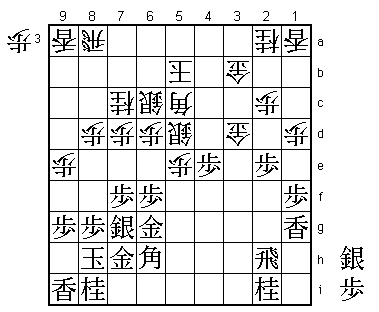
Habu plays a natural attack on the third file, which is very strong.

48.P4d-4e    02:09:00  01:21:00
49.P3ex3d    02:09:00  01:21:00
50.P4ex4f    02:09:00  01:21:00
51.P4gx4f    02:09:00  01:21:00
52.G4cx3d    02:09:00  01:30:00
53.P5f-5e    02:32:00  01:30:00
54.P5dx5e    02:32:00  01:32:00
55.P4f-4e    02:32:00  01:32:00
56.S*5d      02:32:00  02:19:00

White has no choice but to try and keep the position closed. The difference in king
position is too big for white to try his luck in a mutual attacking game.

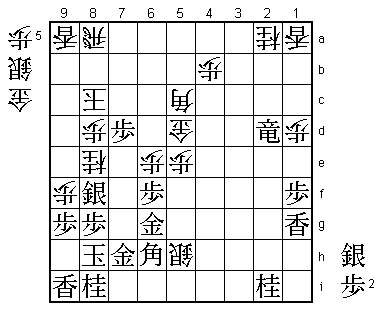
57.S*4d!     02:41:00  02:19:00

Sato probably underestimated this move. It looks a bit thick, but it works.

58.G3dx4d    02:41:00  03:08:00

The point of 57.S*4d is that white cannot play 58.B6b here. This is the natural
response, because white wants to keep the thick formation P4e-S4d on the board,
but it is answered by 59.P*5c K6a S3e and the black attack continues.

59.P4ex4d    02:41:00  03:08:00

This is now a big pawn near the white king. White cannot take this pawn because
after 60.Bx4d G*3d followed by P2d and black breaks through on the second file.

60.N7c-8e    02:41:00  03:08:00

Also bad is 60.S*3c P2d Px2d Bx2d.

61.S7g-8f    02:50:00  03:08:00
62.K5b-6b    02:50:00  03:09:00
63.P2e-2d    03:02:00  03:09:00
64.P2cx2d    03:02:00  03:09:00

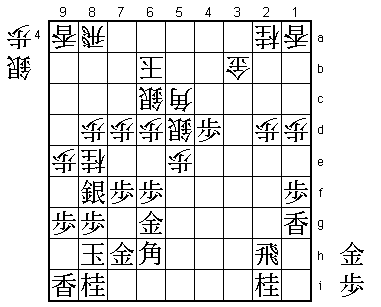
65.G*4c?     03:05:00  03:09:00

Uncharacteristically, Habu gets ahead of himself in the endgame. Correct was 65.B3e
and black gets an overwhelming position. From now on, black is unable to activate
the bishop on 6h, although it does indirectly play an important role later on in
the game.

66.S5dx4c    03:05:00  03:09:00
67.P4dx4c+   03:05:00  03:09:00
68.G3bx4c    03:05:00  03:09:00
69.R2hx2d    03:05:00  03:09:00

Black has broken through on the second file and because the promotion of the rook
is next it seems that black is winning. However, in doing so, white has been given
a number of pieces in hand to drop and this makes this actually a very close game.

70.S*5h!     03:05:00  03:19:00

This doesn't seem to be doing much, because taking the gold on 6g is not very
effective. White's real aim with this silver drop is to have this silver wait
here until white gets another silver in hand after which the classic double silver
attack against the Yagura with S*6i is very strong.

71.R2d-2b+   03:15:00  03:19:00
72.P*4b      03:15:00  03:19:00
73.S*4e      03:29:00  03:19:00

With this silver drop black aims at P*4d and/or P*5d. An attack that is very easy
to understand, but Sato shows that it is not so effective.

74.K6b-7c!   03:29:00  03:38:00

Sato actively uses his king like it is a handicap game. It will move to 8c next,
where it is reasonably safe despite not having any generals around.

75.P7f-7e    03:35:00  03:38:00
76.K7c-8c    03:35:00  03:42:00
77.P7ex7d    03:50:00  03:42:00
78.P6d-6e    03:50:00  03:44:00

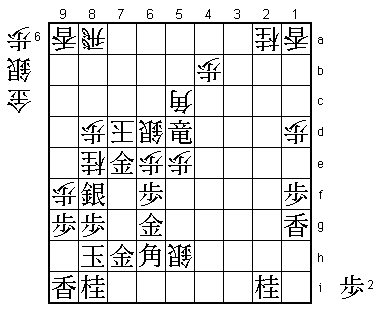
This opens the bishop diagonal and white now threatens a devastating edge attack
with P9f at any time. Sato may not have been happy with how his opening experiment
turned out, but he did feel that his position was getting better and better.

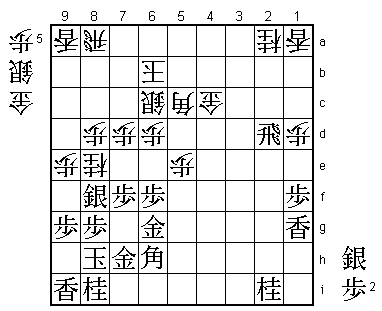
79.P*5d      03:51:00  03:44:00

80.S6cx5d?   03:51:00  03:57:00

Just when his chance seemed to come, Sato throws it away. White could have made it
very interesting by playing 80.Bx8f here. Sato didn't like this move because of
81.Bx8f and the sleeping bishop on 6h would join in the black attack. However,
in the post-mortem analysis the variations 80.P7c+ Kx7c Bx8f +R2h (or G6g-6h) were
analysed, but after P*7g the white attack is very strong. Deep analysis seemed to
indicate that +R2g instead of +R2h is still better for black, but there are some
very complicated variations and it is unclear if black could play it perfectly in
limited time. Sato should have definitely tried 80.Bx8f here.

81.S4ex5d    03:53:00  03:57:00
82.G4cx5d    03:53:00  03:57:00
83.+R2b-2d   03:53:00  03:57:00
84.P9e-9f    03:53:00  03:59:00

Sato has no choice but to try a final attack. If he plays 84.S*4d here white has
no attacking power left. Also, 84.P*3d Rx3d G4d fails to +Rx4d Bx4d Sx8e Px8e N*7e
K8d G7f and the white king is without defence. Note that 84.P9f is not just an
edge attack: it is a mating threat, so black cannot simply take the gold on 4d.

85.P7d-7c+!  03:55:00  03:59:00

The white mating threat has an important condition: white must be able to drop on
8e after exchanging all the pieces on 9g. Habu is now going to take away this condition.

86.K8cx7c    03:55:00  03:59:00
87.S*7d      03:55:00  03:59:00
88.K7cx7d    03:55:00  03:59:00

No choice. If the king moves to 8b, the white silver is defending 8e, so the mating
threat is no longer there. Black then wins by taking the gold on 5d.

89.+R2dx5d   03:55:00  03:59:00
90.S*6d      03:55:00  03:59:00

Because the bishop now no longer can participate in the edge attack, the white mating
threat is gone again.

91.G*7e      03:56:00  03:59:00
Resigns      03:56:00  03:59:00

Because white no longer has a mating threat, 92.K8c is simply answered by 93.Gx6d,
so Sato resigned here. Despite losing the game, Sato was in good spirits after the
game. Of course, losing with white after taking a 2-0 lead is not such a big problem,
but the main reason seemed that he had tried something nobody had ever tried before.
As a result, he had learned something about a part of general shogi theory that he
had some doubts about. Sato will now try to close out this match with the black
 pieces in game 4.
