79th Kisei Match Game 2
[Black "Sato Yasumitsu, Kisei"]
[White "Habu Yoshiharu, Challenger"]
[Event "79th Kisei-sen, Game 2"]
[Date "June 21st 2008"]
1.P7g-7f 00:00:00 00:00:00
2.P3c-3d 00:00:00 00:00:00
3.P2g-2f 00:00:00 00:00:00
4.B2b-3c 00:00:00 00:01:00
One of those early opening moves that was considered bad in the old days, but very
much playable now. After the exchange of the bishops, the head of the knight is
weak according to old school thought, but things are not so simple.
5.B8hx3c+ 00:04:00 00:01:00
6.N2ax3c 00:04:00 00:01:00
7.G6i-7h 00:04:00 00:01:00
This invites white to play Furibisha, because the gold on 7h usually is in a bad
spot in an Ibisha versus Furibisha opening.
8.R8b-4b 00:04:00 00:04:00
And Habu responds with Furibisha.
9.S3i-4h 00:04:00 00:04:00
10.K5a-6b 00:04:00 00:04:00
11.K5i-6h 00:16:00 00:04:00
12.K6b-7b 00:16:00 00:05:00
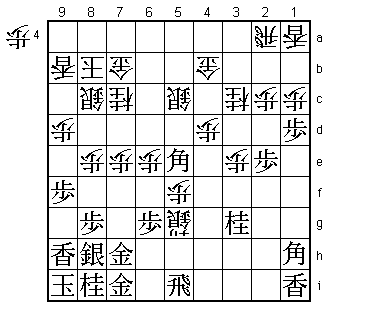
13.K6h-7g 00:17:00 00:05:00
This is not a new move, but the idea that follows it is Sato's new strategy. He aims
to move straight into the Anaguma castle before deciding how to play the position
on the right side of the board. Why this is a good idea will become clear later.

14.R4b-2b    00:17:00  00:10:00
15.P2f-2e    00:28:00  00:10:00
16.S3a-4b    00:28:00  00:13:00
17.K7g-8h    00:28:00  00:13:00
18.K7b-8b    00:28:00  00:14:00
19.L9i-9h    00:48:00  00:14:00
20.P9c-9d    00:48:00  00:17:00
21.K8h-9i    00:48:00  00:17:00
22.S7a-7b    00:48:00  00:30:00
23.S7i-8h    00:52:00  00:30:00
24.P5c-5d    00:52:00  00:49:00
25.G4i-5h    01:00:00  00:49:00
26.S4b-5c    01:00:00  00:49:00
27.G5h-6h    01:07:00  00:49:00
28.R2b-2a    01:07:00  00:52:00
29.P3g-3f    01:13:00  00:52:00
30.G4a-4b    01:13:00  00:59:00
31.P9g-9f    01:25:00  00:59:00
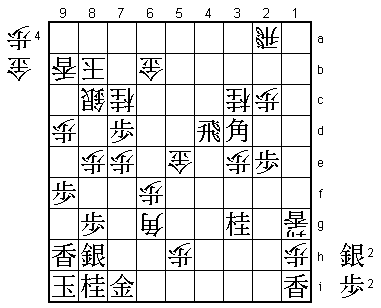
32.S5c-4d    01:25:00  01:24:00

The point of Sato's opening strategy becomes clear now. White wants to play the
Ginkanmuri formation with P8d followed by S8c and G7b, but if white plays 32.P8d
here, black can respond with 33.S3g S8c S4f, attacking the head of the knight (the
weakness in the 4.B3c opening). Normally this attack is not possible, because black
plays P4f followed by S4g or P5f before settling for a castle formation. By moving
straight into the Anaguma, Sato has kept the option of the climbing silver attack
open and Habu is now stuck for moves. After 25 minutes of thought he decides to
play 32.S4d, which according to Fujii (9-dan) is admitting failure. White wants
to use this silver in attack and move it to 6d instead of 4d. Of course, on 4d
it defends the head of the knight and makes it difficult for black to attack, but
it also gives up all hope of an attack. From now on, white can only wait for the
black attack and this is not a good strategy against the Anaguma, because a counter
attack will be much harder against such a strong castle.

33.P4g-4f    01:34:00  01:24:00
34.P8c-8d    01:34:00  01:26:00
35.P5g-5f    01:48:00  01:26:00
36.S7b-8c    01:48:00  01:29:00
37.P1g-1f    01:49:00  01:29:00
38.G6a-7b    01:49:00  01:32:00
39.P1f-1e    01:49:00  01:32:00
40.P7c-7d    01:49:00  01:32:00
41.N2i-3g    01:50:00  01:32:00
42.N8a-7c    01:50:00  01:34:00
43.G7h-7i    01:51:00  01:34:00
44.P8d-8e    01:51:00  01:39:00
45.G6h-7h    02:01:00  01:39:00
46.L9a-9b    02:01:00  01:49:00
47.S4h-5g    02:10:00  01:49:00

This move was met with surprise in the press room. After all, 48.B*4g next looks
very inviting...

48.B*4g      02:10:00  02:11:00

After some 20 minutes of thought, Habu decides to go for it.

49.B*1h      03:29:00  02:11:00
Interestingly, Sato took one hour and 19 minutes out of the allotted time of 4
hours to play 49.B*1h. Some in the press room even started to suspect that he
had completely overlooked 48.B*4g or that he found a serious hole in his calculations
and that B*4g was much stronger than he expected. There was even fear that if that
was the case, the black position would suddenly crumble. The truth was much simpler.
After the game, Sato explained that he didn't spend so much time on 48.B*4g before
it was played. He didn't expect Habu to play this bishop drop anyway and even if
he did, he thought that there would be some counter to it anyway. This explanation
made Fujii cringe, because he is a strong believer that professional play is based
on calculation, not intuition. Calculation versus intuition, but Sato has won many
more titles than Fujii... When Habu did actually play 49.B*4g, Sato started his
famously deep calculations. It is unlikely that this time was spent on selecting
49.B*1h, because it is the only move that defends against the bishop promotion.

50.P5d-5e    03:29:00  03:04:00

Habu takes almost an hour for his reply, almost closing the time gap. Sato was
worried about 50.N6e here, but after 51.G7h-6h Nx5g+ Gx5g S*1g black has R7h and
the attack on this file is very strong. Actually, the reason Habu didn't play
50.N6e was because he didn't like 51.S6f Bx5f+ B2i +Bx4f S6e (threatening Sx7d),
but after +Bx3g R1h S8d (difficult move to find) white is better.

51.P4f-4e    03:37:00  03:04:00
52.S4d-5c?   03:37:00  03:08:00

This is an important mistake that basically decides the game. The only way to play
for white here was 52.Px5f. Then after 53.S4f S5c or 53.S4h Nx4e! Nx4e B5h+ followed
by either Sx4e or P5g+, white seems to have the better position.

53.R2h-4h    03:37:00  03:08:00

Now white loses the bishop he dropped in the black camp. Against the Anaguma this
loss of material is very big.

54.B4gx5f+   03:37:00  03:08:00
55.S5gx5f    03:37:00  03:08:00
56.P5ex5f    03:37:00  03:08:00
57.R4h-5h    03:37:00  03:08:00
58.S*5g      03:37:00  03:09:00
59.R5h-5i    03:40:00  03:09:00
60.S5g-4f+   03:40:00  03:09:00
61.P3f-3e    03:42:00  03:09:00
62.P3dx3e    03:42:00  03:09:00

White now has to be very careful not to give black a pawn, because a pawn drop on
3d will be very painful.

63.B*5e!     03:44:00  03:09:00

Strong move that forces the promoted silver in front of the pawn. The threat of
promoting on 5g was the only asset white got for the material loss, so losing
this threat is an important concession.

64.+S4f-5g   03:44:00  03:11:00
65.B5e-6f    03:48:00  03:11:00
66.P6c-6d    03:48:00  03:31:00
67.P4e-4d    03:50:00  03:31:00
68.P4cx4d    03:50:00  03:31:00
69.P7f-7e    03:50:00  03:31:00
70.P6d-6e    03:50:00  03:32:00
71.B6f-5e    03:56:00  03:32:00
72.P7dx7e    03:56:00  03:32:00
73.P1e-1d?   03:56:00  03:32:00
A mistake. The best move here was 73.N7g. Then after 74.N4e Nx4e Px4e Nx6e S5d
B6d Sx6e Bx4b+ black wins.

74.G7b-6b!   03:56:00  03:41:00

A little Habu magic. Simple 74.Px1d fails to 75.Bx7b+ Kx7b Lx1d Lx1d P*7d Sx7d
G*8d and the white position collapses. To see a chance in a move like 73.P1d, when
most players would automatically take this pawn, shows again that Habu is a different
class. He immediately saw that if he lets black take the pawn on 1c, that he can
counter attack on the first file of the bishop is still on 1h. The only problem is
that black can take the gold on 7b at any moment. The remedy: move this gold out of
the bishop line, even if it leaves the gold undefended. Habu's flexible mind at work,
but unfortunately for him the difference is already too big to turn the tables with
a single move.

75.P1dx1c+   03:56:00  03:41:00
76.L1ax1c    03:56:00  03:41:00
77.B1h-2g    03:56:00  03:41:00
78.P*1h      03:56:00  03:41:00
79.P*5d      03:56:00  03:41:00
80.L1c-1g+   03:56:00  03:41:00
81.P5dx5c+   03:56:00  03:41:00
82.G4bx5c    03:56:00  03:41:00
83.B2g-3h    03:59:00  03:41:00
84.G5c-5d    03:59:00  03:45:00
85.B3hx5f    03:59:00  03:45:00
86.P*5h      03:59:00  03:45:00

A very unusual position where three major pieces are attacked by three different
minor pieces at the same time. Again, this doesn't help Habu.

87.R5i-4i    03:59:00  03:45:00
88.G5dx5e    03:59:00  03:47:00
89.B5f-3d    03:59:00  03:47:00
90.P6e-6f    03:59:00  03:47:00
91.R4ix4d    03:59:00  03:47:00
92.P6fx6g+   03:59:00  03:47:00
93.G7hx6g    03:59:00  03:47:00
94.+S5gx6g   03:59:00  03:47:00
95.B3dx6g    03:59:00  03:47:00
96.P*6f      03:59:00  03:47:00
97.B6g-3d    03:59:00  03:47:00
98.B*6g      03:59:00  03:47:00
99.P*7d      03:59:00  03:47:00
Resigns      03:59:00  03:51:00
And after 100.N6e, 101.S*7c is winning. White can still try a desperate defensive
stand here, but there is no attack against the black king and the white king will
fall anyway, so Habu resigned here. A perfect start for Sato in this Kisei match.
He now needs only one more win to get his 7th straight Kisei title, which would
tie the record for consecutive Kisei titles held by the great Oyama.