79th Kisei Match Game 1
[Black "Habu Yoshiharu, Challenger"]
[White "Sato Yasumitsu, Kisei"]
[Event "79th Kisei-sen, Game 1"]
[Date "June 11th 2008"]
1.P7g-7f     00:00:00  00:00:00
2.P8c-8d     00:00:00  00:00:00
3.P2g-2f     00:01:00  00:00:00
4.G4a-3b     00:01:00  00:02:00
5.G6i-7h     00:01:00  00:02:00
6.P3c-3d     00:01:00  00:02:00
7.P2f-2e     00:02:00  00:02:00
8.B2bx8h+    00:02:00  00:02:00

In games between Sato and Habu it is very hard to predict the opening, especially
when Sato has the white pieces. Sato doesn't shy away from sometimes outrageous
opening experiments, but in this game he stays close to well-known opening theory
with the Kakukawari with tempo loss. Still, professionals in the press room like
Kitahama expected a Gokigen Nakabisha opening here, so there still was an element
of surprise to this choice.

9.S7ix8h     00:02:00  00:02:00
10.S3a-2b    00:02:00  00:02:00
11.S3i-3h    00:03:00  00:02:00
12.S2b-3c    00:03:00  00:02:00
13.K5i-6h    00:03:00  00:02:00
14.S7a-7b    00:03:00  00:04:00
15.P3g-3f    00:04:00  00:04:00
16.P6c-6d    00:04:00  00:04:00
17.S3h-3g    00:06:00  00:04:00
18.S7b-6c    00:06:00  00:08:00
19.S3g-4f    00:09:00  00:08:00
20.S6c-5d    00:09:00  00:08:00
21.P3f-3e    00:10:00  00:08:00
22.P3dx3e    00:10:00  00:12:00
23.S4fx3e    00:10:00  00:12:00

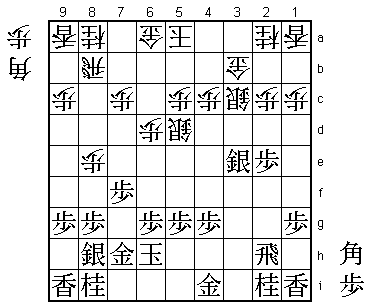
In the normal Kakugawari this quick attack has a bad reputation because the silver
on 5d is a good antidote, but in the Kakugawari with tempo loss black has an extra
move and this is an important difference. Therefore, this quick attack has made a
revival lately.

24.P8d-8e    00:10:00  00:13:00

Pushing the rook pawn up is a move that white wants to avoid in the Kakugawari with
tempo loss, but here it is an important move. If black plays 25.S7g to avoid the pawn
exchange in front of the rook (and to get rid of the wall silver on 8h at the same time),
white can play 26.P8f Px8f P*8e and black cannot take this pawn because after Px8e Rx8e
the rook forks the knight on 8i and the silver on 3e. Therefore, the fight now
concentrates on the right side of the board.

25.P2e-2d    00:20:00  00:13:00
26.P2cx2d    00:20:00  00:14:00
27.P*3d      00:33:00  00:14:00
28.S3c-2b    00:33:00  00:23:00
29.R2hx2d    00:50:00  00:23:00

Looks risky because of what is coming next, but after 29.Sx2d white can play 30.B*5e
and B*4f Bx4f Px4f P*2c S3e B*4g will give white a strong promoted bishop next.

30.P*2e      00:50:00  00:44:00

After 30.P*2c R2f black's opening strategy is a complete success. The rook is very
strong and the pawn on 3d is also a strong attacking base while the white silver on
2b will be a wall silver for a long time. Therefore 30.P*2e is the right way to
play here. This threatens to kill the rook with B*1d next, so black has no choice
but to take this pawn.

31.R2dx2e    00:58:00  00:44:00
32.B*3f      00:58:00  00:44:00
33.R2e-2f    00:58:00  00:44:00
34.B3fx4g+   00:58:00  00:44:00

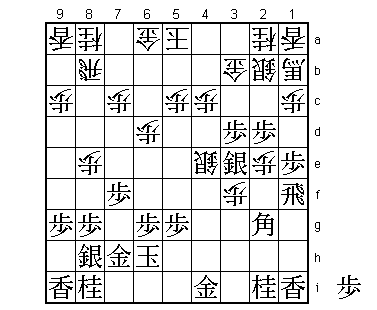
White has again created a promoted bishop, but black can chase this bishop back
into its own position to importantly reduce its effectiveness.

35.B*3h      00:58:00  00:44:00
36.+B4g-1d   00:58:00  00:47:00
37.P1g-1f    00:59:00  00:47:00
38.S5d-4e    00:59:00  01:22:00
39.B3h-2g    01:14:00  01:22:00

Up until this point, the game followed an earlier game played in May 2005 by Sato
(with white) against Yamasaki in the Oi league. There Yamasaki played 39.P1e.

40.P*3f      01:14:00  01:38:00

During the game against Yamasaki, Sato thought that 40.P*3f would be alright against
39.B2g, but when he was actually faced with this move here, he was not so sure anymore
and feared that the pawn on 3f would become a liability. From this game it is hard
to draw any conclusions.

41.P1f-1e    01:16:00  01:38:00
42.P*2e      01:16:00  01:47:00
43.R2f-1f    01:17:00  01:47:00
44.+B1d-2c   01:17:00  01:47:00
45.P*2d      01:21:00  01:47:00
46.+B2c-1b   01:21:00  01:47:00

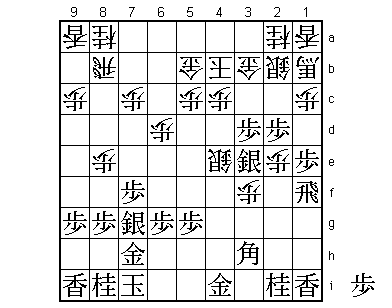
Black has chased the white promoted bishop back to 1b and the theme of the game now
becomes whether or not white can activate this promoted bishop. On 1b it doesn't seem
to be worth more than the unpromoted bishop on 2g, so Habu felt that the this position
was playable for black.

47.S8h-7g    01:22:00  01:47:00

Black would be very happy with this position if 47.N3g would work, but this fails to
48.Sx3d (Px3g+ is of course bad because of Bx4e) Rx3f S3c and black cannot break through
or avoid that the promoted bishop gets active again. Instead, Habu decides to strengthen
his position by getting rid of the wall silver on 8h and moving the king towards the
castle with K7i.

48.K5a-4b    01:22:00  02:29:00
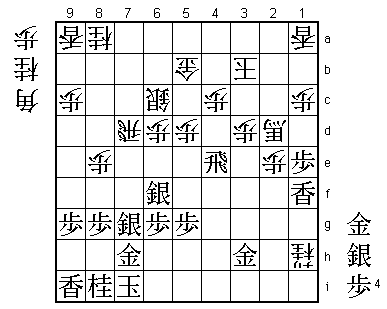
49.K6h-7i    01:29:00  02:29:00
50.G6a-5b    01:29:00  02:33:00
51.B2g-3h!   02:19:00  02:33:00

It is hard to overlook this move (even for professional players) because it seems that
the only way to make this bishop work is to play N3g at some point. Kitahama was
particularly impressed with 51.B3h, because he saw no way for black to continue in
this position. Habu comes up with a very original strategic plan which involves
redirecting the silver on 3e to 6f. However, Sato doesn't budge and a very complicated
middle game battle starts where it is unclear who is better.

52.S4ex3d    02:19:00  03:01:00
53.R1fx3f    02:19:00  03:01:00
54.S3d-4e    02:19:00  03:01:00
55.R3f-6f    02:40:00  03:01:00
56.S4e-5d    02:40:00  03:09:00
57.N2i-3g    02:42:00  03:09:00
58.P*3d      02:42:00  03:10:00
59.S3e-4f    02:45:00  03:10:00
60.S2b-3c    02:45:00  03:17:00
61.R6fx6d    02:51:00  03:17:00
62.S5d-6c    02:51:00  03:23:00
63.R6d-6e    02:55:00  03:23:00
64.S3cx2d    02:55:00  03:23:00
65.S4f-5e    02:55:00  03:23:00
66.R8b-8d    02:55:00  03:33:00
67.S5e-6f    03:23:00  03:33:00
68.P7c-7d    03:23:00  03:36:00
69.P7f-7e    03:24:00  03:36:00
70.P*6d      03:24:00  03:38:00
71.R6e-4e    03:24:00  03:38:00
72.N2a-3c    03:24:00  03:44:00
73.R4e-4h    03:32:00  03:44:00
74.S2d-3e    03:32:00  03:45:00
75.N3g-4e    03:33:00  03:45:00
76.N3cx4e    03:33:00  03:54:00
77.R4hx4e    03:33:00  03:54:00
78.S3e-3f    03:33:00  03:54:00
79.R4e-5e    03:35:00  03:54:00
80.P5c-5d    03:35:00  03:56:00
81.R5e-5f    03:37:00  03:56:00
82.S3f-3g+   03:37:00  03:56:00
83.N*2d      03:38:00  03:56:00
84.+B1b-2c   03:38:00  03:57:00
85.N2dx3b+   03:38:00  03:57:00
86.K4bx3b    03:38:00  03:57:00
87.B3h-2i    03:41:00  03:57:00
88.N*2g      03:41:00  03:58:00
89.L1i-1f    03:52:00  03:58:00
90.N2g-1i+   03:52:00  03:58:00
91.B2i-3h    03:52:00  03:58:00
92.+N1i-1h   03:52:00  03:58:00

93.P7ex7d?   03:52:00  03:58:00

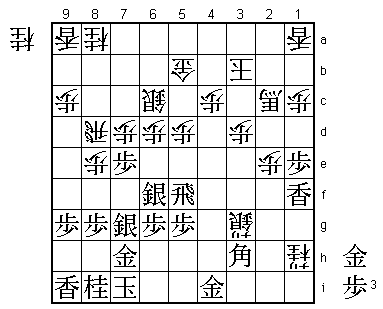
Habu makes the first real mistake and unfortunately for him it is already a decisive
one. Black was under quite some pressure here, because if white is allowed to play
+N2h next, he is clearly better. However, 93.Px7d solves nothing because black still
loses the bishop and the promoted bishop on 1b comes into play, deciding the game.
The only move here was 93.G*4e. This seems a little to simplistic and putting the
gold in the bishop line, but after 94.+N2h Gx5d Sx5d Rx5d G*5c Bx7d Rx7d Rx5c+ Gx5c
Px7d Sato admitted that he didn't believe white could win this position. Therefore,
it seems that white has to defend the pawn on 5d with 94.N*4b, but then 95.R4f gives
the black bishop a clear path and this is not what white wants. In the post-mortem
analysis Habu admitted that even though the gold drop doesn't look particularly
appealing, it was the only move to play.

94.R8dx7d    03:52:00  03:58:00
95.R5f-4f    03:53:00  03:58:00
96.+S3gx3h   03:53:00  03:58:00
97.G4ix3h    03:53:00  03:58:00
98.+B2c-2d   03:53:00  03:58:00
99.R4f-4e    03:53:00  03:58:00

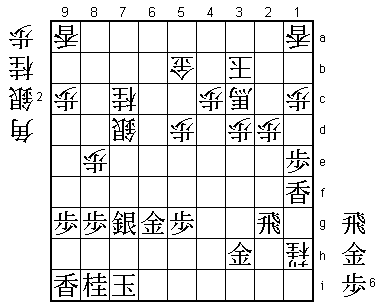
100.P6d-6e!  03:53:00  03:58:00

The decisive move. Black cannot avoid losing the silver on 6f and the collapse of
its position.

101.P*3c     03:55:00  03:58:00

Goes for the desperate attack, but after 101.Sx6e white just coolly pulls back the
rook with 102.R7a and the threat N*5c next is too much.

102.+B2dx3c  03:55:00  03:58:00
103.R4ex6e   03:56:00  03:58:00
104.N8a-7c   03:56:00  03:58:00
105.R6ex2e   03:56:00  03:58:00
106.P*2d     03:56:00  03:58:00
107.R2e-2g   03:57:00  03:58:00
108.P*6e     03:57:00  03:58:00

This pawn kills the silver on 6f. The game is over.

109.S*8c     03:57:00  03:58:00
110.P6ex6f   03:57:00  03:58:00
111.S8cx7d=  03:57:00  03:58:00
112.P6fx6g+  03:57:00  03:58:00
113.G7hx6g   03:57:00  03:58:00
114.S6cx7d   03:57:00  03:59:00
Resigns      03:59:00  03:59:00

It seems a bit early to resign without any mating threats, but black has no good
attack. For example, 114.R*7b S*6b is powerless. On the other hand, white has the
threat N*7e and if black defends against this with 115.P*7f, then 116.B*4i is easily
winning for white. Habu decided to resign here and save his energy for the next
game. A very strong start for Sato, winning the first game with the white pieces.
If he can keep his service game with black in the second game, he is already well
positioned to take his seventh consecutive Kisei title.
