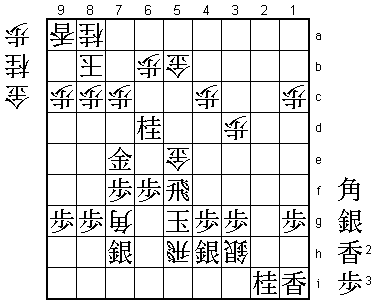
78th Kisei Match Game 4
[Black "Watanabe Akira, Challenger"]
[White "Sato Yasumitsu, Kisei"]
[Event "78th Kisei-sen, Game 4"]
[Date "July 6th 2007"]
1.P7g-7f     00:00:00  00:00:00
2.P3c-3d     00:00:00  00:01:00
3.P2g-2f     00:00:00  00:01:00
4.P5c-5d     00:00:00  00:01:00
5.P2f-2e     00:07:00  00:01:00
6.R8b-5b     00:07:00  00:01:00

Sato often plays the Gokigen Nakabisha with the white pieces, so it was
no surprise that he started the game with this opening. He actually plays
one of the wildest variations, so everybody was looking forward to what
he had prepared at home.

7.G4i-5h     00:14:00  00:01:00
8.P5d-5e     00:14:00  00:04:00
9.P2e-2d     00:14:00  00:04:00
10.P2cx2d    00:14:00  00:04:00
11.R2hx2d    00:14:00  00:04:00
12.P5e-5f    00:14:00  00:04:00
13.P5gx5f    00:14:00  00:04:00
14.B2bx8h+   00:14:00  00:04:00
15.S7ix8h    00:14:00  00:04:00
16.B*3c      00:14:00  00:04:00
17.R2dx2a+   00:14:00  00:04:00
18.B3cx8h+   00:14:00  00:04:00
19.N*5e      00:14:00  00:04:00
20.K5a-6b    00:14:00  00:04:00
21.+R2ax1a   00:24:00  00:04:00
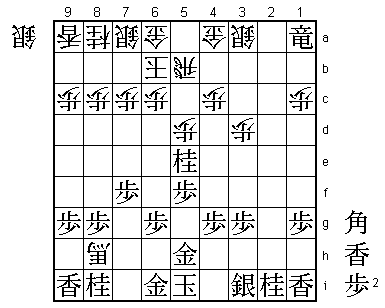
22.P*5d!?    00:24:00  00:57:00

From a professional point of view, an almost unthinkable move. It took
Watanabe and all the professionals in the press room by complete surprise.
At first glance it is a terrible move, as it blocks the rook and takes away
the option of dropping the pawn on 5g. There is another reason why this move
is bad, which becomes clear after the move Watanabe played. Despite all these
reasons for P*5d being a bad move, Sato insisted that it was a move he "wanted
to try", which is an euphemism for saying that he had deeply studied it at home.
Indeed, things are not so clear as they seem.

23.N5ex6c+   00:41:00  00:57:00
24.K6bx6c    00:41:00  00:57:00
25.L*6f      00:41:00  00:57:00

This is the other problem on 22.P*5d: white has no pawns to drop here.

26.K6c-7b    00:41:00  00:57:00
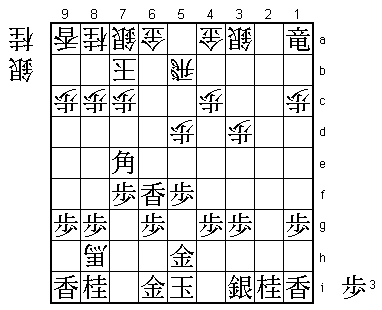
27.B*7e!     01:08:00  00:57:00

Now it is Sato's turn to be surprised. This is a good place to drop the bishop,
controlling a number of vital squares and attacking the silver on 3a.

28.R5b-5a!   01:08:00  01:44:00

Sato finds the right reply. Having all the pieces on the back rank looks bad
for white, but the position somehow is strong enough. For example, 29.Lx6a+ Rxa6a
is not very effective, making the bishop drop on 7e more or less useless.

29.P*2c?     01:17:00  01:44:00

A mistake. Watanabe should have played 29.+R1b here. The best way to defend
against this check is with 30.R5b, which leads to an unclear position. Watanabe
even considered 29.P*2c to be the losing move.

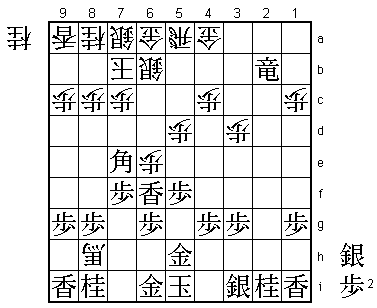
30.S*6b!     01:17:00  01:48:00

Watanabe had overlooked this defense. The white position suddenly is much more
compact and +R1b is no longer a check.

31.P2c-2b+   02:25:00  01:48:00

Played after 68 minutes, which were probably mostly spent in agony of not being
able to find a way to break through.

32.S3ax2b    02:25:00  01:50:00
33.+R1ax2b   02:25:00  01:50:00
34.P*6e      02:25:00  01:50:00

Now white has a clear advantage. The lance cannot move because this will lose
the rook on 2b.

35.S*7g      02:45:00  01:50:00
36.+B8hx8i   02:45:00  01:51:00
37.L6fx6e    02:45:00  01:51:00
38.+B8ix9i   02:45:00  01:51:00
39.G6i-7h    02:52:00  01:51:00
40.P5d-5e    02:52:00  02:21:00

Here Sato felt that his attack in the center might be strong enough. On the other
hand, Watanabe felt he was losing the game here.

41.S7g-8h    03:10:00  02:21:00
42.+B9i-9h   03:10:00  02:22:00
43.L6ex6b+   03:10:00  02:22:00
44.S7ax6b    03:10:00  02:23:00
45.S*5c      03:10:00  02:23:00
46.P5ex5f    03:10:00  02:29:00
47.P*5d      03:13:00  02:29:00
48.L*5b      03:13:00  02:30:00
49.S5cx6b+   03:14:00  02:30:00
50.G6ax6b    03:14:00  02:30:00
51.S*5c      03:14:00  02:30:00
52.P*6a      03:14:00  02:31:00
53.S3i-4h    03:14:00  02:31:00
54.N*6e      03:14:00  02:40:00
55.S5cx6b+   03:14:00  02:40:00
56.P6ax6b    03:14:00  02:41:00
57.G*5e      03:17:00  02:41:00
58.L*5g      03:17:00  03:23:00
59.G5ex6e    03:20:00  03:23:00
60.+B9h-8i   03:20:00  03:23:00
61.S8h-7i    03:21:00  03:23:00
62.L5gx5h+   03:21:00  03:23:00
63.K5ix5h    03:21:00  03:23:00
64.S*3h      03:21:00  03:28:00
65.K5h-6h    03:32:00  03:28:00
66.S*7d      03:32:00  03:43:00
67.P5d-5c+   03:40:00  03:43:00
68.S7dx7e    03:40:00  03:43:00
69.+P5cx5b   03:43:00  03:43:00
70.R5ax5b    03:43:00  03:47:00
71.+R2bx5b   03:43:00  03:47:00
72.G4ax5b    03:43:00  03:47:00
73.G6ex7e    03:43:00  03:47:00

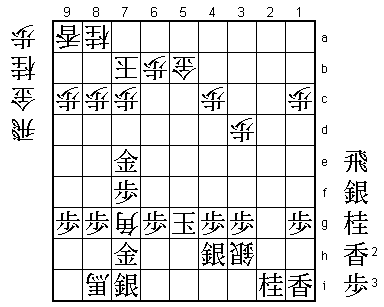
74.P5f-5g+?  03:43:00  03:51:00

Here Sato misses a mate: 74.R*5h Kx5h N*6f and now Px6f B*4i or K6h Nx7h+ both
lead to mate. Actually, both players had missed this mate. For Watanabe, who
felt he was losing anyway, being mated would not have been a big shock. However,
Sato might have deeply regretted missing this if he had lost this game. Actually,
Sato said after the game that he never even considered that there could be a
mate in this position. The white king is still safe, so instead of finding a
mate, he tried to find a winning sequence here.

75.K6hx5g    03:44:00  03:51:00
76.B*7g      03:44:00  03:52:00

This looks like the win Sato was aiming for. White is threatening mate with
N*4e next, and if 77.Gx7g then +B7i also leads to mate.

77.P6g-6f?   03:55:00  03:52:00

Watanabe had been thinking about 77.N*6d, but after 78.K6c S*7b K5d G*6e Kx6e
L*6f K5d P*5e Kx5e R*5f K4d is defending against the white mating threat.
When shown this variation after the game, Sato became a little pale. Watanabe
didn't play this variation because there is no mate against the white king and
he felt that the black king still would be mated. An important error of judgment
as there is no mate after K3c Rx5b+. The best white can play then is G*4b which
still seems to be winning, but is much better than what happened in the game.
Furthermore, Sato said that he was so convinced that he was winning after
76.B*7g that the shock of having his mate threat erased might be too much
to make a cool judgment about defending with G*4b. Watanabe admitted that
he should have played this way even if he was worried about being mated.

78.G*5e      03:55:00  03:55:00

This leaves black without defense.

79.R*5f      03:59:00  03:55:00
80.+B8ix7h   03:59:00  03:56:00
81.N*6d      03:59:00  03:56:00
82.K7b-8b    03:59:00  03:56:00
83.S7ix7h    03:59:00  03:56:00
84.R*5h      03:59:00  03:56:00
Resigns      03:59:00  03:56:00

Mate after 85.Kx5h G*6h K5g N*4e or 85.K6g R6h+. With this win, Sato gets his sixth
consecutive Kisei title and takes revenge for losing the Ryu-O match against Watanabe
last year. With bad losses in the first and second game, Watanabe could only admit
that he was beaten by a better man this time. Still, Watanabe could have made it
very difficult for Sato in this 4th game, so he may have been closer to winning
this match than the score line indicates.
