78th Kisei Match Game 2
[Black "Watanabe Akira, Ryu-O"]
[White "Sato Yasumitsu, Challenger"]
[Event "78th Kisei-sen, Game 2"]
[Date "June 23rd 2007"]
1.P7g-7f     00:00:00  00:00:00
2.P3c-3d     00:00:00  00:01:00
3.P2g-2f     00:00:00  00:01:00
4.G4a-3b     00:00:00  00:01:00
5.G6i-7h     00:01:00  00:01:00
6.P8c-8d     00:01:00  00:01:00
7.P2f-2e     00:01:00  00:01:00
8.B2bx8h+    00:01:00  00:01:00
9.S7ix8h     00:01:00  00:01:00
10.S3a-2b    00:01:00  00:01:00
11.K5i-6h    00:21:00  00:01:00
12.S2b-3c    00:21:00  00:01:00
13.S3i-3h    00:21:00  00:01:00
14.S7a-7b    00:21:00  00:01:00
15.P3g-3f    00:21:00  00:01:00
16.P6c-6d    00:21:00  00:01:00
17.S3h-3g    00:21:00  00:01:00
18.P8d-8e    00:21:00  00:03:00
19.S8h-7g    00:24:00  00:03:00
20.S7b-6c    00:24:00  00:03:00
21.S3g-4f    00:25:00  00:03:00
22.S6c-5d    00:25:00  00:03:00
23.K6h-7i    00:25:00  00:03:00
24.P4c-4d    00:25:00  00:05:00
25.P3f-3e    00:25:00  00:05:00
26.S5d-4c    00:25:00  00:09:00
27.P3ex3d    00:27:00  00:09:00
28.S4cx3d    00:27:00  00:09:00
29.P*3e      00:27:00  00:09:00
30.S3d-4c    00:27:00  00:09:00
31.S4f-3g    00:28:00  00:09:00
32.G6a-5b    00:28:00  00:18:00
33.S3g-3f    00:28:00  00:18:00

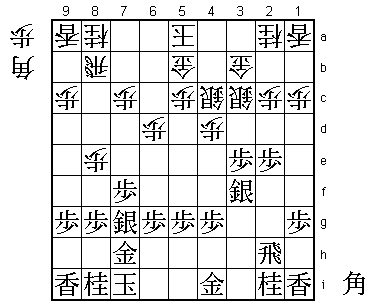
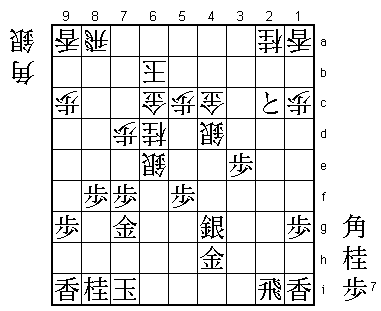
For this second game, Sato selected the Kakugawari opening with tempo loss.
In reply, Watanabe chose to take a vanguard pawn position on 3e, combined
with a complicated silver maneuver to get the silver to 3f. Actually, this
is the same position as Watanabe played two days earlier in the B1 Junisen
game against Inoue (and lost). Inoue moved the king towards the vanguard pawn,
but Sato has something better in mind...

34.P7c-7d    00:28:00  00:28:00
35.G4i-5h    00:31:00  00:28:00
36.N8a-7c    00:31:00  00:39:00
37.P4g-4f    00:52:00  00:39:00
38.K5a-6b!   00:52:00  00:50:00

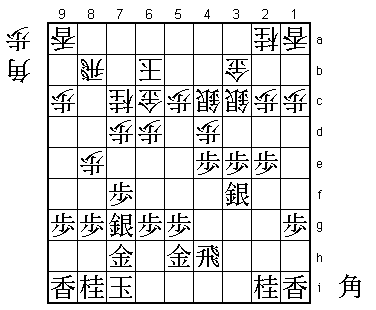
The Right Side King is much better for white than what Inoue played. Black has
taken a lot of moves to create a stronghold on 3e, but with the white king
on the other side of the board this is meaningless. Watanabe: "After K6b the
game is over". That may be a little strong, but it is clear that white has
managed a strategic victory.

39.P4f-4e    01:13:00  00:50:00
40.G5b-6c    01:13:00  01:09:00
41.R2h-4h    01:20:00  01:09:00

42.R8b-8a!   01:20:00  01:10:00

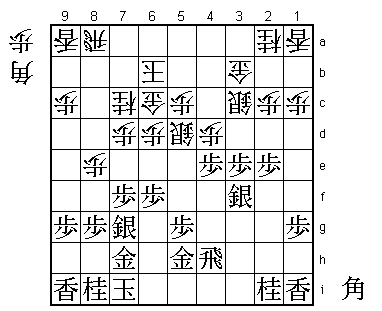
Watanabe had hoped that 41.R4h would put enough pressure on 4d to force white
into 42.Px4e Sx4e P*4d S5f, which would put the black silver on 3f in a much
better position on 5f, but Sato is having nothing of it. He just allows black
to take the pawn on 4d.

43.P6g-6f    01:22:00  01:10:00
44.S4c-5d!   01:22:00  01:16:00

Another good move by Sato. This sacrifices the pawn on 4d, but only temporarily.

45.P4ex4d    01:39:00  01:16:00
46.P*4f!     01:39:00  01:16:00
47.R4h-2h?   01:49:00  01:16:00

This seems like a good move because 47.Rx4f is answered by B*5e and 47.R2h
seems to defend against Sx4d because black can break through on the second file.
However, better was 47.N3g. Watanabe didn't like this move because of Sx4d Rx4f B*2h,
but Sato was far from confident in his position here, so Watanabe probably should
have tried this.

48.S3cx4d!   01:49:00  01:21:00

Sato plays it anyway!

49.N2i-3g    02:05:00  01:21:00

Here Watanabe realized that after 49.P2d Px2d Rx2d white has B*1e! and the silver
on 3f is very difficult to defend. For example, P*2e is answered by S3c winning the
rook and R2f Sx3e Sx3e Bx5h+ is also bad for black. 49.N3g is a painful change of plan.

50.P6d-6e    02:05:00  01:47:00
51.P5g-5f    02:29:00  01:47:00
52.P8e-8f    02:29:00  02:07:00
53.P8gx8f    02:42:00  02:07:00
54.P6ex6f    02:42:00  02:35:00
55.B*5g      02:44:00  02:35:00
56.P6f-6g+   02:44:00  02:44:00
57.G7hx6g    02:49:00  02:44:00
58.B*6d      02:49:00  02:53:00
59.P2e-2d    02:58:00  02:53:00

60.N7c-6e!   02:58:00  03:20:00

Sato doesn't let up. 60.Px2d is also good for white, but he has something better in mind.

61.B5g-6f    02:59:00  03:20:00
62.G3b-4c!   02:59:00  03:20:00

This activates the gold and also takes all the punch out of the pawn promotion on 2c.

63.P2dx2c+   03:02:00  03:20:00
64.P*2g      03:02:00  03:22:00
65.R2hx2g    03:15:00  03:22:00
66.P4f-4g+   03:15:00  03:22:00
67.S3fx4g    03:15:00  03:22:00

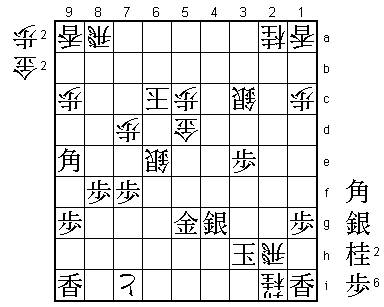
Even worse is 67.Gx4g Nx7g+ Bx7g S*3h and after the rook moves Sx4g+ Sx4g Bx3g+.

68.P*2f      03:15:00  03:22:00
69.R2gx2f    03:15:00  03:22:00
70.B6dx3g+   03:15:00  03:22:00

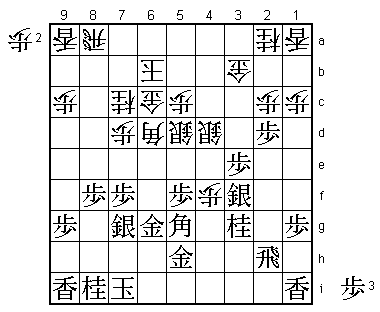
This bishop promotion was all made possible by ignoring the pawn push 59.P2d. Sato is
playing great shogi in this game, but because of his weak king position, things are
still not easy here.

71.R2f-2i    03:15:00  03:22:00
72.N6ex7g+   03:15:00  03:29:00
73.G6gx7g    03:18:00  03:29:00
74.S5d-6e    03:18:00  03:34:00
75.B6f-4h    03:27:00  03:34:00
76.+B3gx4h   03:27:00  03:40:00
77.G5hx4h    03:27:00  03:40:00
78.N*6d      03:27:00  03:45:00

79.+P2c-3c?  03:57:00  03:45:00

Watanabe uses 30 minutes of the 33 minutes he still had to decide that his best chance
is in the semeai. This is the wrong decision. Sato feared 79.N*6h here. For example,
80.B*6f (Sato: "I would never play this in a real game") B*5g Bx7g+ Nx7g G*8g looks
pretty strong, but after K6i Gx7g K5i it is not so easy. It would be great if the rook
on 8a could join by taking the pawn on 8f, but this is not possible because of the
bishop fork B*9e. 79.+P3c is bad because it gives white the pawn he needs to give
his attack deciding strength.

80.S4dx3c    03:57:00  03:46:00
81.N*5e      03:57:00  03:46:00
82.G4c-5d    03:57:00  03:46:00

This gold now strengthens the 6th file and there is no way for black to get to the
white king in time.

83.N5ex6c+   03:59:00  03:46:00
84.K6bx6c    03:59:00  03:46:00
85.G4h-5h    03:59:00  03:46:00
86.P*8h      03:59:00  03:48:00
87.K7i-6h    03:59:00  03:48:00
88.P8hx8i+   03:59:00  03:48:00
89.B*9e      03:59:00  03:48:00
90.+P8i-7i   03:59:00  03:55:00
91.K6h-5i    03:59:00  03:55:00
92.N6dx5f    03:59:00  03:55:00
93.G7g-6g    03:59:00  03:55:00
94.B*3g      03:59:00  03:57:00
95.P*4h      03:59:00  03:57:00
96.N*5g      03:59:00  03:57:00
97.G6gx5g    03:59:00  03:57:00
98.S*6h      03:59:00  03:57:00
99.K5i-4i    03:59:00  03:57:00
100.N5fx4h+  03:59:00  03:57:00
101.G5hx4h   03:59:00  03:57:00
102.S6hx5g+  03:59:00  03:57:00
103.G*3h     03:59:00  03:57:00
104.B3gx4h+  03:59:00  03:57:00
105.G3hx4h   03:59:00  03:57:00
106.N*3g     03:59:00  03:57:00
107.K4i-3h   03:59:00  03:57:00
108.N3gx2i+  03:59:00  03:57:00
109.G4hx5g   03:59:00  03:57:00
110.R*2h     03:59:00  03:57:00
Resigns      03:59:00  03:57:00

Mate after 111.K4i G*4h or 111.K3g G*2f K4f G*4e. A very good game by Sato, showing
all kinds of important tactics with a non-conventional king position. Already a 2-0
lead and he needs only one more win to revenge the loss in the Ryu-O title match
against Watanabe and win his 6th consecutive Kisei title.
