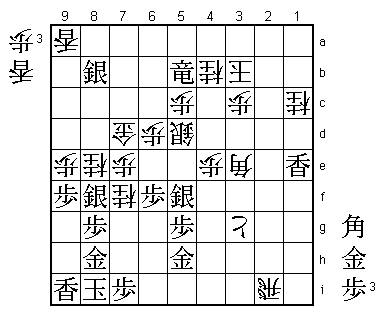
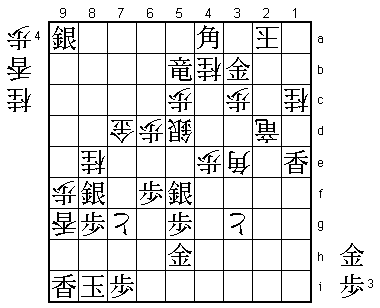
78th Kisei Match Game 1
[Black "Sato Yasumitsu, Kisei"]
[White "Watanabe Akira, Challenger"]
[Event "78th Kisei-sen, Game 1"]
[Date "June 9th 2007"]
1.P7g-7f     00:00:00  00:00:00

In a short match, the furigoma before the first game can be very important,
because at this level the black player is considered to have a small but
significant advantage and winning the first game often means dictating the
pace of the match. The furigoma before this game was special, because two of
the five pawns ended up on their side and there were only two pawns and one
tokin. Because the rule is that the majority decides, there was no need to redo
the pawn toss and Sato was black in the first game.

2.P8c-8d     00:00:00  00:02:00
3.P2g-2f     00:01:00  00:02:00
4.G4a-3b     00:01:00  00:03:00
5.G6i-7h     00:01:00  00:03:00
6.P8d-8e     00:01:00  00:04:00
7.B8h-7g     00:01:00  00:04:00
8.P3c-3d     00:01:00  00:04:00
9.S7i-8h     00:01:00  00:04:00
10.B2bx7g+   00:01:00  00:04:00
11.S8hx7g    00:01:00  00:04:00
12.S3a-4b    00:01:00  00:04:00
13.S3i-3h    00:01:00  00:04:00
14.S7a-7b    00:01:00  00:05:00
15.P9g-9f    00:01:00  00:05:00
16.P9c-9d    00:01:00  00:05:00
17.P1g-1f    00:01:00  00:05:00
18.P1c-1d    00:01:00  00:05:00
19.P4g-4f    00:01:00  00:05:00
20.P6c-6d    00:01:00  00:06:00
21.S3h-4g    00:01:00  00:06:00
22.S7b-6c    00:01:00  00:07:00
23.K5i-6h    00:01:00  00:07:00
24.S6c-5d    00:01:00  00:08:00
25.K6h-7i    00:02:00  00:08:00
26.G6a-5b    00:02:00  00:09:00
27.P3g-3f    00:03:00  00:09:00
28.K5a-4a    00:03:00  00:09:00
29.G4i-5h    00:04:00  00:09:00
30.K4a-3a    00:04:00  00:10:00
31.S4g-5f    00:04:00  00:10:00
32.P4c-4d    00:04:00  00:10:00
33.P6g-6f    00:06:00  00:10:00
34.P7c-7d    00:06:00  00:12:00
35.N2i-3g    00:06:00  00:12:00
36.N8a-7c    00:06:00  00:13:00
37.P2f-2e    00:16:00  00:13:00
38.S4b-3c    00:16:00  00:13:00

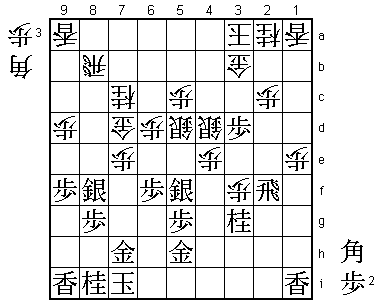
This is one of the most often played middle game positions in shogi: the Reclining
Silver variation of the Kakugawari. It has been studied very thoroughly, but this
game shows that there is still a lot of room for new ideas. It is not a big
surprise that this opening appears in this match. Sato and Watanabe also played
it in the first and the fifth game of last year's Ryu-O match, which is still a
very recent memory because of the heroic fight that went to seven games before
Watanabe successfully defended his title.

39.P4f-4e    00:17:00  00:13:00
40.P4dx4e    00:17:00  00:13:00
41.P2e-2d    00:18:00  00:13:00

Recently, immediately 41.P3e is played more often.

42.P2cx2d    00:18:00  00:15:00
43.P1f-1e    00:18:00  00:15:00
44.P1dx1e    00:18:00  00:16:00
45.P7f-7e    00:18:00  00:16:00
46.P7dx7e    00:18:00  00:16:00
47.P3f-3e    00:18:00  00:16:00
48.S3c-4d    00:18:00  00:27:00
49.R2hx2d    00:21:00  00:27:00
50.P*2c      00:21:00  00:27:00
51.R2d-2f    00:21:00  00:27:00
52.G5b-6c    00:21:00  00:27:00
53.P*7d      00:23:00  00:27:00
54.G6cx7d    00:23:00  00:27:00
55.P3ex3d    00:23:00  00:27:00
56.P8e-8f    00:23:00  00:31:00
57.S7gx8f    00:24:00  00:31:00
58.P*3f      00:24:00  00:31:00

The game has developed at a blistering pace, not giving any indication that this
is a title match game. Sato has only used 24 minutes here and Watanabe only 32
minutes, even though we are already close to 60 moves.

59.P*1b      00:48:00  00:31:00
60.L1ax1b    00:48:00  00:33:00
61.P*1c      00:48:00  00:33:00
62.L1bx1c    00:48:00  01:08:00

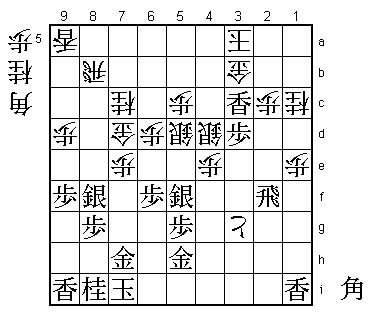
A new move. It looks like the natural response, but in the only other game with
this position, the A-Junisen game between Maruyama and Goda in March, Goda played
62.Px3g+, but after Px1b+, Maruyama won the game relatively easily.

63.N3g-2e    00:51:00  01:08:00

Goda probably rejected 62.Lx1c because of this move, but Watanabe has studied
this position a little deeper at home and has found a new and interesting idea.

64.P3f-3g+   00:51:00  01:44:00

This was generally considered too risky for white, so in the press room 64.L1d
was expected. Then 65.Px3c+ Nx3c N1c+ and white can try either B*3e or P3g+.
After the game, Watanabe said he didn't like 64.L1d because of 65.Rx3f.

65.N2ex1c=   01:31:00  01:44:00
66.N2ax1c    01:31:00  01:44:00
67.L*3c      01:31:00  01:44:00

And because of moves like Rx2c+ next, it seems like the white position collapses...

68.B*3e!?    01:31:00  01:53:00

Sato admitted after the game that this move completely surprised him. Even more
than this, it spooked him a little. 69.Rx2c+ seems to give black an overwhelming
attack, but if Watanabe had actually studied this at home and found a way to keep
his position together, Sato would walk straight into this preparation.

69.R2fx2c+   02:51:00  01:53:00

After 80 minutes of thought, Sato decides that he has no choice but to go in and
let Watanabe show him his homework.

70.S4dx3c    02:51:00  01:53:00
71.+R2cx3c   02:51:00  01:53:00
72.G3bx3c    02:51:00  01:53:00
73.P3dx3c+   02:51:00  01:53:00
74.R*2i      02:51:00  01:57:00

This is the point of Watanabe's preparation. He thinks that he can hold the white
position with the power of the two rooks on 8b and 2i. An interesting idea, although
it seems a little optimistic.

75.K7i-8h    02:51:00  01:57:00
76.N*7f      02:51:00  02:31:00
77.K8h-9h    02:51:00  02:31:00
78.P*8h      02:51:00  02:33:00
79.P*7i      02:56:00  02:33:00

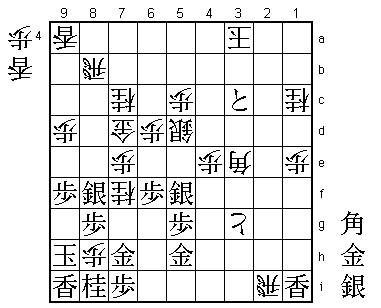
This defends against the white mating threat of Rx8i+ and now white cannot make new
mating threats anymore. Watanabe realized here that he had been too optimistic about
the position of his king. For example, 80.Px8i+ fails to 81.B*5a which threatens mate
with S*3b Rx3b G*4b etc. Watanabe therefore changes his tactic and tries to make it
difficult for Sato, hoping for a mistake to turn the tables.

80.P*3b      02:56:00  02:43:00
81.S*8c      03:11:00  02:43:00
82.P3bx3c    03:11:00  02:46:00
83.S8cx8b=   03:11:00  02:46:00
84.P8hx8i+   03:11:00  02:46:00
85.K9hx8i    03:14:00  02:46:00
86.K3a-3b!   03:14:00  02:51:00

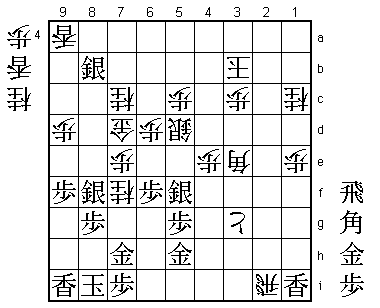
This doesn't look like a spectacular move, but it shows how strong Watanabe is. In the
pressroom, this move was discarded because it seems bad after 86.R*7b K2c B*4a K3d
Bx7d+ and black has won a gold and threatens Sx4e next. However, after Rx1i+, the
position is not so simple, even though black has seven generals. What makes 86.K3b
such a great move is that Watanabe understood that this was a good fighting chance
well in advance.

87.L1ix1e!   03:43:00  02:51:00

The right reply. After this, white is not able to get out of trouble.

88.P9d-9e    03:43:00  03:26:00
89.R*6b?!    03:46:00  03:26:00

Still winning, but better was 89.R*5a (a mating threat) K2c R2a+ P*2b B*1b K2d G*1f
and white seems to have no defense. After 89.R*6b, Watanabe gets a chance to lay one
final trap. Actually, Watanabe had laid a little trap in this position as well. He was
hoping for 89.R*5b, after which 90.K4c B*6a is a mating threat that seems to be winning,
but after B*2d things are not so easy.

90.N*4b      03:46:00  03:29:00
91.R6b-5b+   03:51:00  03:29:00
92.P*8h      03:51:00  03:36:00
93.G7hx8h    03:52:00  03:36:00
94.N7c-8e    03:52:00  03:40:00

This move puts a lot of pressure on the black position. Sato admitted after the
post-mortem analysis was over that he felt here that this was getting a little too
close for comfort and that he needed to be very careful.

95.B*4a!     03:53:00  03:40:00

Sato doesn't fall into Watanabe's trap. If he had played 95.Sx9a= here, Watanabe
had prepared 96.N8h+ Kx8h G*7g Sx7g Nx7g+ K9h R2a+! which is a mating threat defending
against a mating threat and suddenly the tables are turned.

96.K3b-2a    03:53:00  03:40:00

The point. White can no longer promote the rook on 2a now. The game is over.

97.S8bx9a=   03:54:00  03:40:00
98.N7fx8h+   03:54:00  03:51:00
99.K8ix8h    03:54:00  03:51:00
100.P7e-7f   03:54:00  03:51:00
101.N*8i     03:58:00  03:51:00
102.G*7g     03:58:00  03:59:00
103.K8h-9h   03:58:00  03:59:00
104.P9ex9f   03:58:00  03:59:00
105.L*2d     03:58:00  03:59:00
106.R2ix2d+  03:58:00  03:59:00
107.N8ix7g   03:58:00  03:59:00
108.L*9g     03:58:00  03:59:00
109.K9h-8i   03:58:00  03:59:00
110.P7fx7g+  03:58:00  03:59:00
111.G*3b     03:58:00  03:59:00
Resigns      03:58:00  03:59:00

Simple mate after 112.K1b G*2b +Rx2b Gx2b Kx2b +Rx4b K1a R*1b K2a +R2b. A good start
for Sato in his quest for a sixth consecutive Kisei title, but Watanabe has the black
pieces in the second game to try and strike back.
