77th Kisei Match Game 3
[Black "Suzuki Daisuke, Challenger"]
[White "Sato Yasumitsu, Kisei"]
[Event "77th Kisei-sen, Game 3"]
[Date "July 5th 2006"]
1.P7g-7f     00:00:00  00:00:00
2.P3c-3d     00:00:00  00:00:00
3.P7f-7e     00:00:00  00:00:00
4.P8c-8d     00:00:00  00:01:00
5.R2h-7h     00:00:00  00:01:00
6.P8d-8e     00:00:00  00:01:00
7.P7e-7d     00:02:00  00:01:00
8.P7cx7d     00:02:00  00:01:00
9.R7hx7d     00:02:00  00:01:00
10.B2bx8h+   00:02:00  00:01:00
11.S7ix8h    00:02:00  00:01:00
12.B*6e      00:02:00  00:01:00
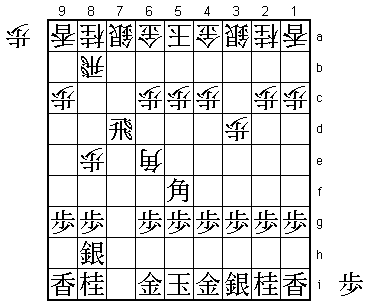
13.B*5f      00:02:00  00:01:00

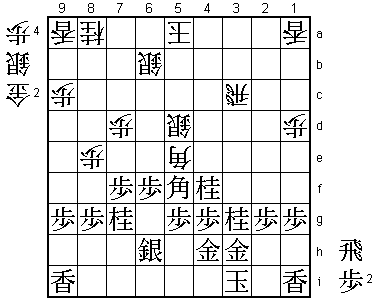
The same position as in the first game. There it followed 14.B5d (new move
by Sato) S3h G3b K4h S6b K3i and both sides castled quietly.

14.B6ex7d    00:02:00  00:10:00

This time Sato takes a more aggressive approach.

15.B5fx7d    00:02:00  00:10:00
16.G6a-7b    00:02:00  00:15:00

This is a new move in professional games. However, it was also played
in the final of this year's Amateur Ryu-O tournament between Imaizumi
and Kato. This game had been published in Shukan Shogi and both players
were aware of this. Suzuki even openly admitted that he had studied this
game between top amateurs very carefully, adding that he had never studied
so hard in his professional life than before and during this match.
He didn't want to be defeated in the study room against Sato who is
renowned for his thorough opening preparation.

17.B*5e      00:03:00  00:15:00
18.P*7c      00:03:00  00:17:00
19.B7d-5f    00:22:00  00:17:00
20.R*1b      00:22:00  00:18:00

Dropping the rook here can't be helped, but is also the point of 16.G7b.
If the gold would have been on 6b instead, black can play 21.Bx1a+ Rx1b
L*8c here. This is not necessarily bad for white, but in the game variation
there is no immediate attack, so the game will quiet down and white can hope
to put his rook on 1b into play later on. In this game, Sato will have to
wait a long time for an opportunity to do this.

21.B5fx3d    00:22:00  00:18:00
22.G4a-3b    00:22:00  00:18:00
23.B5e-7g    00:24:00  00:18:00
24.S7a-6b    00:24:00  00:23:00
25.S3i-4h!   00:27:00  00:23:00

Good play by Suzuki. The natural instincts of a Furibisha player cry out
for putting the king safe by moving it into a mino castle as quickly as
possible, but Suzuki resists this temptation and decides to use the right
silver to fight for the center.

26.S3a-4b    00:27:00  00:29:00
27.B3d-5f    00:37:00  00:29:00
28.P5c-5d    00:37:00  00:42:00
29.P3g-3f    00:37:00  00:42:00
30.S6b-5c    00:37:00  00:51:00
31.S4h-3g    00:38:00  00:51:00
32.S5c-6d    00:38:00  00:55:00
33.P6g-6f!   00:43:00  00:55:00

Another good move by Suzuki. If black plays 33.S4f too fast, then he will
be in trouble after 34.S4b-5c N3g S4d and the bishops will become a target
for the white silvers. 33.P6f is blocking the bishop diagonal and therefore
not looking very good, but a very important move in preparation for the
next bishop maneuver.

34.S4b-5c    00:43:00  01:02:00
35.K5i-4h    00:44:00  01:02:00
36.P5d-5e    00:44:00  01:15:00
37.B5f-6g    00:44:00  01:15:00
38.S5c-5d    00:44:00  01:16:00
39.G4i-3h    00:47:00  01:16:00
40.G7b-6b    00:47:00  01:21:00
41.B7g-6h    00:51:00  01:21:00
42.P7c-7d    00:51:00  01:28:00
43.S8h-7g    00:54:00  01:28:00
44.P4c-4d    00:54:00  01:30:00
45.P4g-4f    00:54:00  01:30:00
46.S6d-7e    00:54:00  01:42:00
47.G6i-5h    01:20:00  01:42:00
48.G6b-5c    01:20:00  01:43:00
49.S3g-2f    01:20:00  01:43:00
50.P6c-6d    01:20:00  01:49:00
51.P*7f      01:20:00  01:49:00
52.S7e-8d    01:20:00  01:49:00
53.S2f-3e    01:20:00  01:49:00
54.S8d-7c    01:20:00  02:01:00
55.K4h-3i    01:21:00  02:01:00
56.P6d-6e    01:21:00  02:07:00
57.P6fx6e    01:22:00  02:07:00
58.S5dx6e    01:22:00  02:07:00
59.P*6f      01:22:00  02:07:00
60.S6e-5d    01:22:00  02:07:00

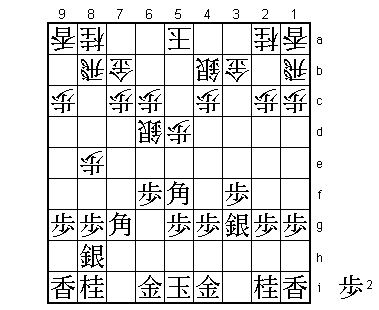
61.B6h-5i!   01:22:00  02:07:00

There are not many players who can claim that they outplayed Sato
strategically, but Suzuki has managed to do just that. This bishop
switches to the other side of the board to 2f, putting a lot of
pressure on the white position. Sato completely overlooked this
possibility and only realized it here, when it is already too late.
Like in the second game, Suzuki gets an overwhelming position.

62.R1b-2b    01:22:00  02:35:00
63.B5i-2f    01:25:00  02:35:00
64.R8b-4b    01:25:00  02:36:00

The only move to keep the white position together, but the white
rook and king are very badly placed.

65.S7g-6h    01:31:00  02:36:00
66.S7c-6b    01:31:00  02:47:00
67.N8i-7g    01:32:00  02:47:00
68.G3b-3c    01:32:00  03:24:00
69.N2i-3g    01:46:00  03:24:00
70.P2c-2d    01:46:00  03:25:00
71.P4f-4e    02:00:00  03:25:00
72.P2d-2e    02:00:00  03:29:00
73.B2f-1e    02:00:00  03:29:00
74.P1c-1d    02:00:00  03:29:00
75.B1ex3c+   02:00:00  03:29:00
76.N2ax3c    02:00:00  03:29:00
77.P4ex4d    02:02:00  03:29:00
78.P2e-2f    02:02:00  03:32:00
79.P2gx2f    02:02:00  03:32:00
80.P5e-5f    02:02:00  03:45:00
81.B6gx5f    02:04:00  03:45:00
82.B*5e      02:04:00  03:46:00
83.G5h-4h    02:09:00  03:46:00
84.G5cx4d    02:09:00  03:46:00
85.S3ex4d    02:09:00  03:46:00
86.R4bx4d    02:09:00  03:46:00
87.G*3d      02:09:00  03:46:00
88.R4d-4f    02:09:00  03:47:00
89.P*4g      02:16:00  03:47:00
90.R4fx3f    02:16:00  03:48:00
91.G*2g      02:16:00  03:48:00
92.R2bx2f    02:16:00  03:50:00
93.G2gx2f    02:20:00  03:50:00
94.R3fx2f    02:20:00  03:50:00

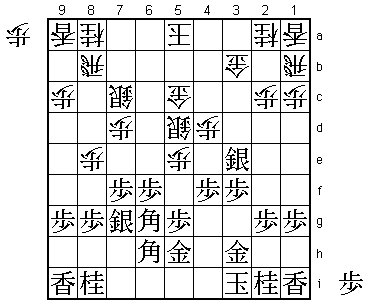
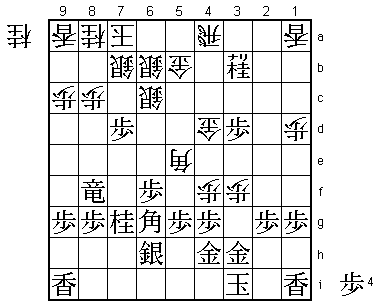
95.P*2g?     02:20:00  03:50:00

Like in the second game, Suzuki has trouble with handling a winning
position. This time it is not carelessness, but being overcautious that
is costing him. Here 95.Gx3c would have made things easy. After 96.G*2i
K4i Bx3c R*3a K4b Rx8a+ the black king can't be attacked while the white
king is very difficult to defend.

96.R2f-3f    02:20:00  03:50:00
97.G3dx3c    02:21:00  03:50:00
98.R3fx3c    02:21:00  03:50:00
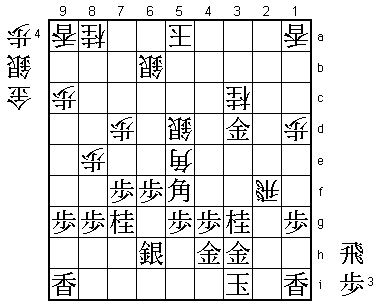
99.N*4f?     02:21:00  03:50:00

Looks like a good move, because it closes the bishop diagonal and attacks
the white silver at the same time. Suzuki had counted on 100.S5d-6c R*2a
P*3a and thought that attacking was easy with the two knights and bishop
on 5f. However, this is based on a serious oversight...

100.S5d-6c   02:21:00  03:50:00
101.P*3d     02:32:00  03:50:00

A change of plan because here Suzuki realized that 101.R*2a fails to
G*3a! R2e+ G*3e and black loses the rook after which R*6i next is very
dangerous for black. Unfortunately, 101.P*3d is not much better.

102.R3c-3a   02:32:00  03:50:00
103.B5f-4e   02:32:00  03:50:00
104.G*5b     02:32:00  03:53:00
105.R*8c     02:47:00  03:53:00
106.S*7b     02:47:00  03:54:00
107.R8cx8e+  02:47:00  03:54:00
108.G*4d     02:47:00  03:54:00
109.B4e-6g   02:51:00  03:54:00
110.P*8d     02:51:00  03:56:00
111.+R8ex8d  02:56:00  03:56:00
112.K5a-6a   02:56:00  03:56:00
113.P7f-7e   02:57:00  03:56:00
114.P*8c     02:57:00  03:56:00
115.+R8d-8f  02:58:00  03:56:00
116.K6a-7a   02:58:00  03:57:00

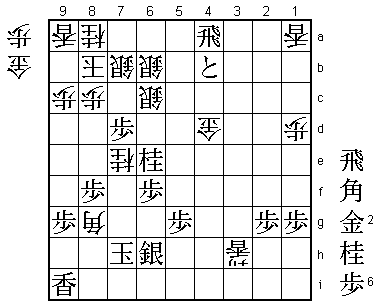
The exposed white king is suddenly in a strong four-general castle.

117.P7ex7d   02:58:00  03:57:00
118.P*3f     02:58:00  03:57:00
119.N3g-4e   03:00:00  03:57:00
120.R3a-4a   03:00:00  03:57:00
121.N4e-3c+  03:03:00  03:57:00
122.P*4e     03:03:00  03:57:00
123.+N3c-3b  03:03:00  03:57:00
124.P4ex4f!  03:03:00  03:58:00

With the strong castle, white can even afford to give up a rook without
worrying about being immediately mated. Suzuki still tries to fight, but
the tables have been completely reversed. Sato shows how to win a won
position, even when byoyomi.

125.P4gx4f   03:03:00  03:58:00
126.B5ex4f   03:03:00  03:58:00
127.+N3bx4a  03:03:00  03:58:00
128.B4fx1i+  03:03:00  03:58:00
129.K3i-4i   03:03:00  03:58:00
130.L*3e     03:03:00  03:58:00
131.+N4a-4b  03:07:00  03:58:00
132.G5bx4b   03:07:00  03:58:00
133.P3d-3c+  03:07:00  03:58:00
134.P3f-3g+  03:07:00  03:58:00
135.+P3cx4b  03:07:00  03:58:00
136.+P3gx3h  03:07:00  03:58:00
137.G4hx3h   03:07:00  03:58:00
138.L3ex3h+  03:07:00  03:58:00
139.K4i-5h   03:07:00  03:58:00
140.+B1i-6d  03:07:00  03:59:00
141.R*4a     03:07:00  03:59:00
142.K7a-8b   03:07:00  03:59:00
143.N7g-6e   03:08:00  03:59:00
144.N*5e     03:08:00  03:59:00
145.B6g-5f   03:08:00  03:59:00
146.+B6dx8f  03:08:00  03:59:00
147.P8gx8f   03:08:00  03:59:00
148.G*6g     03:08:00  03:59:00
149.B5fx6g   03:08:00  03:59:00
150.N5ex6g+  03:08:00  03:59:00
151.K5hx6g   03:08:00  03:59:00
152.N*7e     03:08:00  03:59:00
153.K6g-7g   03:08:00  03:59:00
154.R*7h     03:08:00  03:59:00
155.K7gx7h   03:08:00  03:59:00
156.B*8g     03:08:00  03:59:00
Resigns      03:08:00  03:59:00

Suzuki plays on until the mate is very simple, showing his regrets
about what could have been in the second and third game. An early end
to Kisei match, giving Sato its fifth consecutive Kisei title. This
means he also has earned the title Lifetime Kisei . There are only four
other Lifetime Kisei: Oyama, Nakahara, Yonenaga and Habu. Very good
company indeed and Sato was obviously very pleased with this achievement,
pledging not to embarrass the name of Lifetime Kisei in the rest of his
career. He will get a first chance to show what a Lifetime Kisei can do
in the upcoming Oi and Oza matches against Habu.
