77th Kisei Match Game 2
[Black "Sato Yasumitsu, Kisei"]
[White "Suzuki Daisuke, Challenger"]
[Event "77th Kisei-sen, Game 2"]
[Date "June 20th 2006"]
1.P7g-7f     00:00:00  00:00:00
2.P3c-3d     00:00:00  00:00:00
3.P2g-2f     00:00:00  00:00:00
4.P5c-5d     00:00:00  00:00:00
5.P2f-2e     00:00:00  00:00:00
6.R8b-5b     00:00:00  00:00:00
7.B8hx2b+    00:00:00  00:00:00
8.S3ax2b     00:00:00  00:00:00
9.P9g-9f     00:00:00  00:00:00
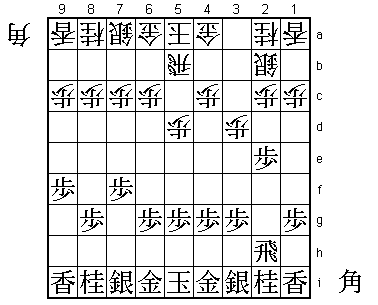
This is currently considered the best way to handle the Gokigen Nakabasha.
It is a move that Sato introduced himself in the first game of last year's
Oi title match against Habu. Until then 9.S7h was the main line, but after
10.P5e B*6e G3b Bx8c+ B*8h black is in trouble. If black opts to strengthen
his position instead of dropping the bishop after 10.P5e, white can just
exchange the pawns on the 5th file and black has not enough compensation for
that. The point of 9.P9f is that in the line above, the black lance can escape
to 9g after B*8h. The push of the edge pawn may not look like much, it is very
significant.
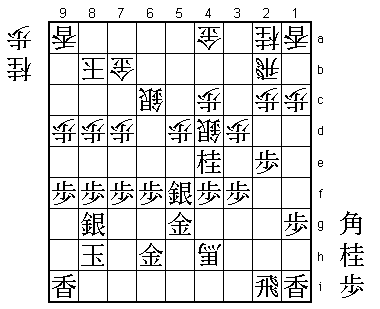
10.P9c-9d 00:00:00 00:00:00
11.S7i-7h 00:01:00 00:00:00
12.K5a-6b 00:01:00 00:00:00
13.S3i-4h 00:01:00 00:00:00
14.K6b-7b 00:01:00 00:00:00
15.P4g-4f 00:01:00 00:00:00
16.S2b-3c 00:01:00 00:00:00
17.K5i-6h 00:01:00 00:00:00
18.K7b-8b 00:01:00 00:06:00
19.S4h-4g 00:01:00 00:06:00
20.S7a-7b 00:01:00 00:06:00
21.K6h-7i 00:06:00 00:06:00
22.R5b-2b 00:06:00 00:07:00
23.N8i-7g 00:35:00 00:07:00
24.P6c-6d 00:35:00 00:07:00
25.P3g-3f 00:40:00 00:07:00
26.S7b-6c 00:40:00 00:13:00
27.P8g-8f 00:40:00 00:13:00
28.G6a-7b 00:40:00 00:16:00
29.K7i-8h 00:40:00 00:16:00
30.P7c-7d 00:40:00 00:17:00
31.S7h-8g 00:40:00 00:17:00
32.S3c-4d 00:40:00 00:24:00
33.G6i-7h 00:40:00 00:24:00
34.N8a-7c 00:40:00 00:24:00
35.N2i-3g 00:54:00 00:24:00
36.P6d-6e 00:54:00 00:29:00
37.G4i-5h 01:04:00 00:29:00
38.S4d-5e 01:04:00 00:32:00
39.G5h-6h 01:48:00 00:32:00
40.P8c-8d 01:48:00 00:38:00
41.S4g-5f 01:49:00 00:38:00
42.B*5i 01:49:00 00:59:00
43.N3g-4e 01:51:00 00:59:00
44.S5e-4d 01:51:00 01:11:00
45.N7gx6e 01:53:00 01:11:00
46.N7cx6e 01:53:00 01:12:00
47.P6g-6f 01:53:00 01:12:00
48.B5i-3g+ 01:53:00 01:13:00
49.R2h-2i 01:53:00 01:13:00
50.N6ex5g+ 01:53:00 01:23:00
51.G6hx5g 01:53:00 01:23:00
52.+B3g-4h 01:53:00 01:23:00
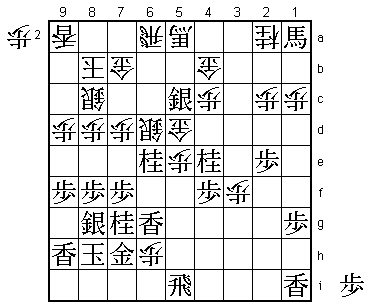
53.G7h-6h! 02:04:00 01:23:00
53.G7h-6g is better shape, but then 54.P5e S6e P*6d P*5d N*6a is good for
white. Moving the gold away from the king looks bad, and it seems that
white is clearly better here.
54.P*6d 02:04:00 01:29:00
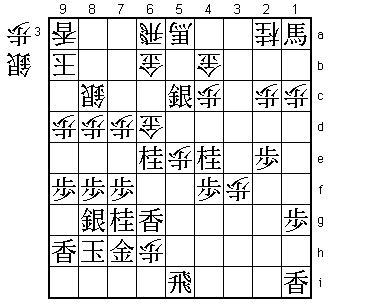
55.G6h-5h!? 02:06:00 01:29:00
Moving even further away from the king!
56.+B4h-1e 02:06:00 01:31:00
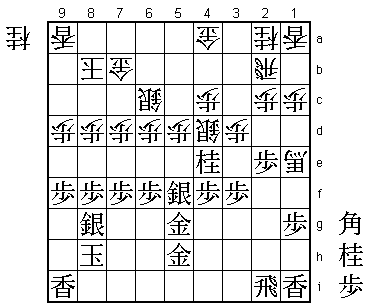
Suzuki felt that he was winning here. Pulling back the promoted bishop
into the own camp is very good. Black's position is in disarray, while
the white position is very well-balanced. The commentators in the press
room agreed with Suzuki. However, as the say: "a won game is like a devil".
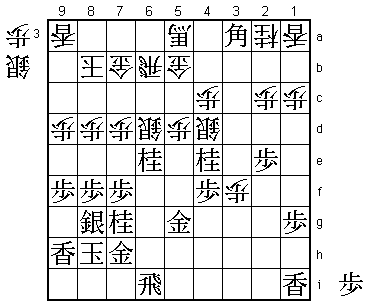
57.L9i-9h 02:58:00 01:31:00
58.+B1e-5a 02:58:00 01:35:00
59.G5h-6h 02:59:00 01:35:00
60.P3d-3e?! 02:59:00 01:44:00
Suzuki is getting careless. He thought that black has to take this pawn.
61.G6h-7h! 03:00:00 01:44:00
Instead, Sato sacrifices a pawn to rearrange his pieces, setting up a
sudden, but very strong attack.
62.P3ex3f 03:00:00 01:45:00
63.P6f-6e 03:02:00 01:45:00
There it is. Combined with the rook switch to the 6th file, white
suddenly has to be very careful...
64.P6dx6e 03:02:00 01:46:00
65.R2i-6i 03:04:00 01:46:00
66.N*7c 03:04:00 01:52:00
67.N*7g 03:05:00 01:52:00
68.R2b-5b 03:05:00 01:56:00
69.P*6d 03:13:00 01:56:00
70.S6cx6d 03:13:00 01:56:00
71.S5fx6e 03:13:00 01:56:00
72.N7cx6e 03:13:00 02:09:00
73.N7gx6e 03:13:00 02:09:00
74.R5b-6b 03:13:00 02:09:00
75.N*7g 03:22:00 02:09:00
76.G4a-5b 03:22:00 02:15:00
77.B*3a! 03:31:00 02:15:00
Easy to overlook and that is exactly what Suzuki did. The obvious move
is 77.B*2b to pick up some material. 77.B*3a is just aiming at 6d, but
there a two more complex threats here. If white doesn't do anything,
black can play P*5c G5b-6c P5b+ +Bx5b Bx6d+ Gx6d S*5c and the white
position collapses. The second threat is P7e Sx7e Bx7e+ Px7e P*7d and
even though this attack looks simple, there is no good way to defend
against it. Tough psychological situation for Suzuki. He was convinced
he was winning and suddenly all moves he is looking at seem to be losing.

78.S*8c?     03:31:00  02:44:00

Panicking a little and as a result, Suzuki plays the decisive mistake.
This defends the 7th file, but only temporarily as the next move shows.

79.G5g-6f!   03:32:00  02:44:00

Bringing in this hanging piece into the attack, Sato felt that there
was no stopping his attack. Because Suzuki had dropped the silver on
8c, white can no longer counter G6f with P*6h Rx6h S*5g. White's best
option was 79.S4d-5e and after 80.P7e Px7e P*7d G5b-6c N4e-5g+ Gx7d it
seems black is a little bit better, but there is still a lot of fight
left in the white position.

80.G5b-4b    03:32:00  03:11:00
81.B3a-2b+   03:34:00  03:11:00
82.P*6h      03:34:00  03:12:00
83.R6i-5i    03:40:00  03:12:00
84.S4d-5e    03:40:00  03:16:00
85.G6fx5e    03:41:00  03:16:00
86.P5dx5e    03:41:00  03:16:00
87.+B2bx1a   03:41:00  03:16:00
88.G*5d      03:41:00  03:22:00
89.L*6g      03:44:00  03:22:00
90.R6b-6a    03:44:00  03:22:00
91.S*5c!     03:47:00  03:22:00
Right at the focal point to finish this game. Taking this silver would
bring the lance on 6g in play. It must have bee painful for Suzuki to
see the transformation of Sato's position from all-over-the-place to
compact, while his own position went exactly the opposite way.

92.K8b-9b    03:47:00  03:24:00
93.P*6b      03:48:00  03:24:00
94.G7bx6b    03:48:00  03:25:00
95.S5cx6d+   03:49:00  03:25:00
96.G5dx6d    03:49:00  03:25:00
97.S*5c      03:54:00  03:25:00
Resigns      03:54:00  03:35:00
Now the lance on 6g comes into play, as well as the promoted bishop on
1a that will go to 5e. Suzuki thought for 10 minutes, but decided that
he had enough. The first game a blowout, the second game a display of
differences in strategic skills. There seems to be a reason why Suzuki
is 1-8 in games against Sato. He seems to be out of his depth in this
match. Can he find a way to win the next game?