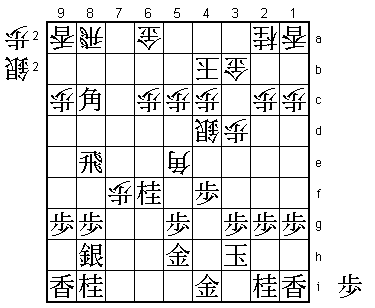
77th Kisei Match Game 1
[Black "Suzuki Daisuke, Challenger"]
[White "Sato Yasumitsu, Kisei"]
[Event "77th Kisei-sen, Game 1"]
[Date "June 5th 2006"]
1.P7g-7f     00:00:00  00:00:00
2.P3c-3d     00:00:00  00:01:00
3.P7f-7e     00:01:00  00:01:00
4.P8c-8d     00:01:00  00:03:00
5.R2h-7h     00:03:00  00:03:00

It is very rare for a player to say before the match what opening
strategy he would play, but Suzuki had boldly announced that he
would play the Ishida with black and the Gokigen Nakabisha with
white. True to his word, this game is an Isihida-style Sankenbisha.

6.P8d-8e     00:03:00  00:04:00
7.P7e-7d     00:10:00  00:04:00
8.P7cx7d     00:10:00  00:06:00
9.R7hx7d     00:10:00  00:06:00
10.B2bx8h+   00:10:00  00:07:00
11.S7ix8h    00:10:00  00:07:00
12.B*6e      00:10:00  00:07:00
13.B*5f      00:10:00  00:07:00
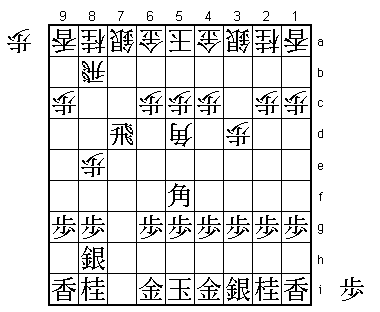
14.B6e-5d!?  00:10:00  00:14:00

In this position it was thought that white had the choice between
14.Bx7d and 14.Bx5f, but Sato plays a third option. The idea is that
the bishop on 5d is attacking 8g, so the white silver on 8h cannot
move. Therefore, the bishop on 5d is better than the bishop on 5f.

15.S3i-3h    01:10:00  00:14:00

Suzuki thought for an hour about this move and with reason. The
proverb says: "In the opening, a bishop is worth more than a rook",
so the obvious move here is 15.Rx5d, making a promoted bishop after
16.Px5d 17.B*5c. However, there is a problem here after 18.S3b B7e+
R*2e +B6f P5e B7d G6b! and after S3h G7c B6e G6d B7f P*7e the black
bishop has no place to go. It is clear that Sato's 14.B5d was based
on the move G6b. Black cannot exchange the rook for the bishop, but
Suzuki and the professionals in the press room still thought that
black was better because of the ability to make a strong mino castle.

16.G4a-3b    01:10:00  00:22:00
17.K5i-4h    01:19:00  00:22:00
18.S7a-6b    01:19:00  00:27:00
19.P6g-6f    01:26:00  00:27:00
20.S3a-4b    01:26:00  00:45:00
21.K4h-3i    01:28:00  00:45:00
22.P6c-6d    01:28:00  00:56:00
23.K3i-2h    01:29:00  00:56:00
24.S6b-6c    01:29:00  00:59:00
25.R7d-7h    01:31:00  00:59:00
26.S4b-3c    01:31:00  01:08:00
27.G6i-5h    01:40:00  01:08:00
28.S3c-4d    01:40:00  01:44:00
29.P4g-4f    01:43:00  01:44:00
30.P8e-8f    01:43:00  02:01:00
31.P8gx8f    01:50:00  02:01:00
32.R8bx8f    01:50:00  02:01:00

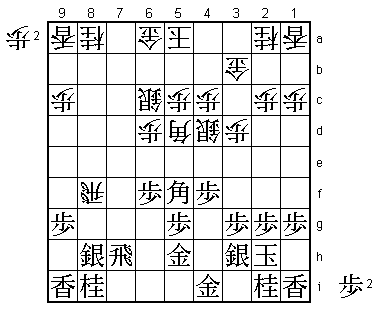
33.R7h-6h?   02:10:00  02:01:00

A change of plan. Suzuki originally intended 33.G*6g, but here he
suddenly started fearing 34.B8g+ and after 35.Sx8g Rx8g+ G6h +Rx8i
R7a+ Gx7a Bx8i R*8h B5f the position is unclear (Rx6h+ fails to
B*9e). Suzuki thought that he had the better position, so he didn't
want to give up his advantage by allowing Sato to make a fight of it.
However, the truth is that the position is about even as it is. Sato
said after the game that he probably wouldn't have played B8g+.

34.P*7f      02:10:00  02:39:00
35.P*8g      02:14:00  02:39:00
36.R8f-8d    02:14:00  02:39:00
37.P6f-6e    02:16:00  02:39:00
38.K5a-4b    02:16:00  02:43:00

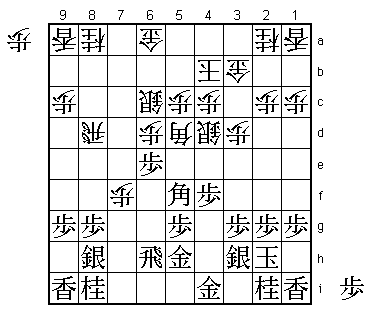
39.P6ex6d?   02:42:00  02:43:00

Suzuki thinks he has seen something that will press his advantage home,
but both his positional judgment and tactical judgment is lacking here.
He originally intended 39.G6g here, but didn't like 40.N7c. However,
Sato also didn't like 40.N7c after 41.Px6d Sx6d P*7d N6e P*6f P7g+ Nx7g
Nx7g+ Gx7g. The last move of this variation seems to put the gold in
an awkward position, but actually the position is far from clear here.
If Suzuki would have correctly judged the position as even, he might
thought about this variation a little bit longer.

40.S6cx6d    02:42:00  02:43:00
41.B5f-8c+?? 02:42:00  02:43:00

It is very rare in a title match game that a move like this is being
played. Both players see these kind of moves a long time coming and
either know that it is no problem or make sure it cannot be played.
Sato has seen it and judged it no problem. Suzuki thought it was good
enough to give him a big advantage. It turns out that Sato was right.

42.R8dx8c    02:42:00  02:47:00
43.R6hx6d    02:42:00  02:47:00
44.P*6c      02:42:00  02:53:00
45.R6d-7d    02:42:00  02:53:00

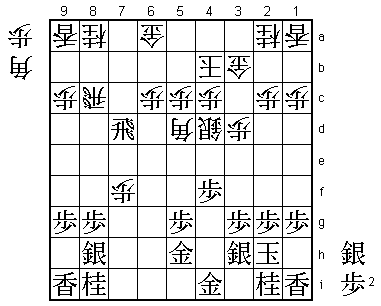
Black now threatens both S*7b and P*6b and Suzuki thought that there
was no defense. If Suzuki would have seen the following move, he would
have played 45.R6h here and there would still be some fight in the
black position.

46.R8c-8b!   02:42:00  02:54:00

Very simple move but completely overlooked by Suzuki. Black has no way
to continue.

47.P*6d      03:10:00  02:54:00
48.B*5e      03:10:00  03:00:00
49.S*7c      03:22:00  03:00:00
50.N8ax7c    03:22:00  03:01:00
51.R7dx7c+   03:22:00  03:01:00
52.B5ex6d    03:22:00  03:01:00
53.+R7cx8b   03:22:00  03:01:00
54.B6dx8b    03:22:00  03:01:00
55.N*6f      03:22:00  03:01:00
56.B5d-6e    03:22:00  03:03:00
57.R*8e      03:22:00  03:03:00
58.B6ex3h+   03:22:00  03:04:00
59.K2hx3h    03:22:00  03:04:00
60.B8b-5e    03:22:00  03:24:00
61.B*8c      03:25:00  03:24:00
62.R*8a!     03:25:00  03:29:00
Resigns      03:36:00  03:29:00

A nice drop of the rook in the white camp to end this game. The simple
threat is Rx8c Rx8c+ B*6e but there is no good defense against it.
Black loses more material and after 11 minutes Suzuki resigned. Not a
good start for Suzuki, who seemed outplayed strategically, tactically
and was put off balance by Sato's opening preparation. He will now
need a win with white to get back his confidence.
