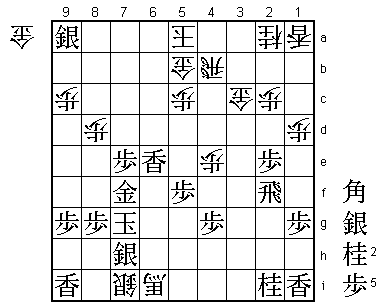
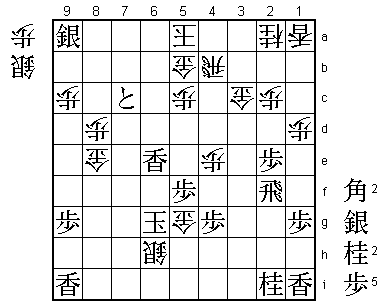
76th Kisei Match Game 5
[Black "Habu Yoshiharu, Challenger"]
[White "Sato Yasumitsu, Kisei"]
[Event "76th Kisei-sen, Game 5"]
[Date "July 26th 2005"]
1.P7g-7f     00:00:00  00:00:00

The furigoma in this final game gives Habu the black pieces.
In general this is considered an advantage, but in this match
the player with the black pieces and the player with the white
pieces have each won twice. Interesting detail: neither player
seemed particularly interested in the pawn toss. Both players
were in deep concentration and didn't look up when the pawns
were thrown.

2.P3c-3d     00:00:00  00:00:00
3.P2g-2f     00:01:00  00:00:00
4.G4a-3b     00:01:00  00:00:00
5.G6i-7h     00:02:00  00:00:00
6.P8c-8d     00:02:00  00:00:00
7.P2f-2e     00:02:00  00:00:00
8.B2bx8h+    00:02:00  00:00:00

After game 1 and 2, the third time the Kakugawari with tempo
loss is being played. Black won both of these games.

9.S7ix8h     00:02:00  00:00:00
10.S3a-2b    00:02:00  00:00:00
11.S3i-3h    00:04:00  00:00:00
12.S2b-3c    00:04:00  00:00:00
13.K5i-6h    00:05:00  00:00:00
14.S7a-6b    00:05:00  00:01:00
15.S8h-7g    00:05:00  00:01:00
16.P6c-6d    00:05:00  00:01:00
17.S3h-2g    00:05:00  00:01:00
18.S6b-6c    00:05:00  00:05:00
19.S2g-2f    00:05:00  00:05:00
20.P1c-1d    00:05:00  00:12:00
21.P3g-3f    00:05:00  00:12:00
22.P4c-4d    00:05:00  00:18:00
23.P3f-3e    00:06:00  00:18:00
24.P7c-7d    00:06:00  00:20:00
25.K6h-7i    00:11:00  00:20:00
26.R8b-4b    00:11:00  00:24:00
27.P3ex3d    00:21:00  00:24:00
28.S3cx3d    00:21:00  00:24:00
29.S2f-3g    00:21:00  00:24:00
30.G3b-3c    00:21:00  00:25:00
31.G4i-5h    00:26:00  00:25:00
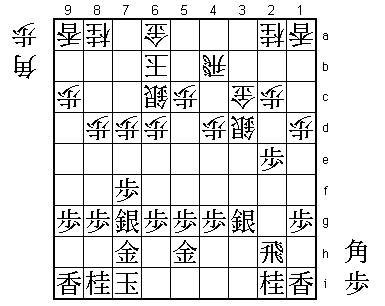
32.K5a-6b?!  00:26:00  00:25:00

The right side king is a powerful answer to a climbing silver
attack, but this gives Habu a chance.

33.P6g-6f?   00:28:00  00:25:00

Uncharacteristic. Habu misses the chance to get a small but important
advantage after 33.B*8b B*7c Bx7c+ Kx7c. The king should be on 6b
in this opening, in which case the general on 5b and 6c have good
balance. Not so with the king on 7c, so white will have to move it
back (losing two moves) or play with a liability.

34.G6a-5b    00:28:00  00:33:00
35.K7i-8h    00:40:00  00:33:00
36.N8a-7c    00:40:00  00:40:00
37.G5h-6g    01:02:00  00:40:00
38.P4d-4e    01:02:00  00:44:00
39.P5g-5f    01:22:00  00:44:00
40.S3d-3e    01:22:00  01:17:00

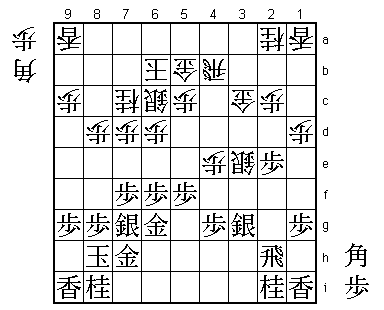
Like in most games they recently played, Sato starts the fighting.
It seems like he has committed himself to attacking early as a new
way to unsettle Habu, because Sato has been doing this with both the
black and the white pieces. Changing tactics is not a bad idea, since
Habu has won 10 of the 12 title matches they played. Also, it seems
to be paying off.

41.S3g-2f?   01:38:00  01:17:00

Another slip by Habu. Better was 41.B*6h. For example, 42.P4f Sx4f
S3f P2d Px2d S3e leads to a difficult position, but gives black much
more attacking options than in the game.

42.S3ex2f    01:38:00  01:20:00
43.R2hx2f    01:38:00  01:20:00
44.B*5h      01:38:00  01:20:00

This forces black into action.

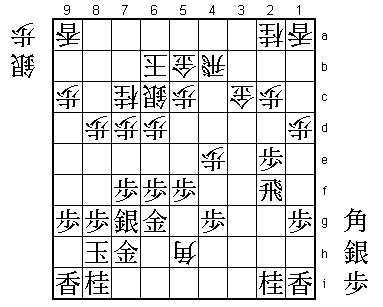
45.P6f-6e?   02:31:00  01:20:00

A third mistake and this time with serious consequences. The first
move Habu looked at was 45.S*3e and that was much better. It gives
black the options of both P2d and P*3d and Sato had a hard time to
come up with a decent reply in the post-mortem analysis. For example,
both 46.Bx4g+ or 46.R4a are answered by P2d. The best option seems
46.P4f Px4f P*3d P2d S*2e R2h B3f+ N3g with is unclear. Neither player
had much confidence in his own position here. Actually, black can also
try 45.P5e followed by P5d or 45.G5g followed by R3f. Both seem better
than 45.P6e.

46.P6dx6e    02:31:00  01:25:00
47.S*8b      02:33:00  01:25:00
48.S6c-6d!   02:33:00  01:59:00

It is unclear if Habu underestimated this move. He replied to it
instantly, which seems to indicate that he saw it coming, but white
now gets an overwhelming attack. He may have seen 48.S6d too late,
because it is not an easy move to play, weakening the king. 48.S*6d
seems to be the natural move, but then 49.P6f gives black a strong
attack. Even 49.Sx9a= is good, because white has dropped the silver
and therefore has no powerful attack.

49.S8bx9a=   02:33:00  01:59:00

An important point of 48.S6d is that black can no longer attack with
49.P6f because after 50.Px6f Sx6f P*6e S5e Sx5e Px5e S*6i the white
counter attack is too strong with the extra silver.

50.P7d-7e    02:33:00  01:59:00
51.P7fx7e    02:46:00  01:59:00
52.N7c-8e    02:46:00  02:01:00

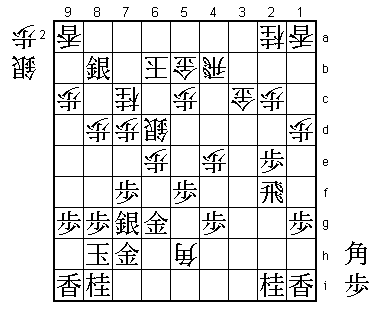
This attack is very strong. The white silver on 9a and the rook on 2f
are completely out of play and will be on these squares in the final
position.

53.S7g-7f    02:46:00  02:01:00
54.S*6f      02:46:00  02:07:00
55.L*6h      02:51:00  02:07:00
56.S6dx7e    02:51:00  02:16:00
57.S7fx7e    02:51:00  02:16:00
58.S6fx7e    02:51:00  02:18:00
59.P*7f      02:52:00  02:18:00

Habu wants so desperately to get the rook in position that in the
post-mortem analysis he suggested 59.R2h here. But then 60.P*7g Rx5h
Px7h+ Kx7h P*7g is still bad for black.

60.P*7g      02:52:00  02:38:00
61.N8ix7g    02:52:00  02:38:00
62.N8ex7g+   02:52:00  02:38:00
63.G7hx7g    02:53:00  02:38:00
64.N*8e      02:53:00  02:42:00
65.P7fx7e    02:54:00  02:42:00
66.B5h-6i+   02:54:00  02:43:00
67.S*7i      03:06:00  02:43:00
68.N8ex7g+   03:06:00  02:44:00
69.G6gx7g    03:06:00  02:44:00
70.P*7f      03:06:00  02:44:00
71.G7gx7f    03:06:00  02:44:00
72.P*7h      03:06:00  02:46:00
73.L6hx6e    03:10:00  02:46:00

With a little bit of Habu magic, he has managed to use a deeply buried
lance on 6h in attack, but it is too little, too late.

74.K6b-5a    03:10:00  02:46:00
75.S7ix7h    03:11:00  02:46:00
76.S*7i      03:11:00  02:50:00
77.K8h-7g    03:11:00  02:50:00

78.S7i-6h=   03:11:00  03:04:00

With the defensive of his Kisei title within reach, Sato suddenly
started thinking about strange things like winning the useless rook
on 2f. Fortunately for him, he realized that 78.+B5i P*6h Sx6h= K8f
+Bx2f the black king is suddenly much harder to catch.

79.K7g-6f    03:18:00  03:04:00
80.+B6ix7h   03:18:00  03:04:00
81.P7e-7d    03:18:00  03:04:00
82.+B7hx8g   03:18:00  03:16:00
83.P7d-7c+   03:23:00  03:16:00

It looks like white has some problems after 83.S*9f, but Sato has seen
that 84.S5g= K7e S*6f Gx7f +Bx9f is winning (Px9f G*8e K6d G6c Kx6c
S*7b and mate).

84.+B8gx7f   03:23:00  03:19:00
85.K6fx7f    03:23:00  03:19:00
86.G*8e      03:23:00  03:19:00
87.K7f-6g    03:23:00  03:19:00
88.G*5g      03:23:00  03:19:00
Resigns      03:23:00  03:19:00

Mate after 89.K6f S*7e K5e G*4d or no defense after 89.K7h G7f. A fine
performance by Sato in this decisive game gives him his fourth consecutive
Kisei title. A surprisingly flat performance by Habu, who fails to win a
title as challenger for the second time in a row, which is a first for him.
